Configuring consumer authentication in Zoom Contact Center and Virtual Agent
This feature allows you to securely identify an authenticated consumer and receive consumer information so our Zoom Virtual Agent bot and/or Zoom Contact Center agent can take appropriate steps to help resolve their issues. Consumer information of authenticated consumers are set by the Zoom Contact Center/Zoom Virtual Agent Web SDK to Zoom Contact Center / Zoom Virtual Agent Global variables so that they can be used in the flows or visible to agents in the Zoom Contact Center desktop client.
Requirements for configuring consumer authentication in Zoom Contact Center and Virtual Agent
- Pro, Business, or Education account
- Account owner or admin privileges; or relevant role/privilege
- Zoom Contact Center license
How to build a Consumer Authentication endpoint on your web site
- Follow the guidance shared on this page, create an authentication endpoint which uses cookies to authenticate the consumer. Consult with your web development team for the appropriate way to implement this on our website.
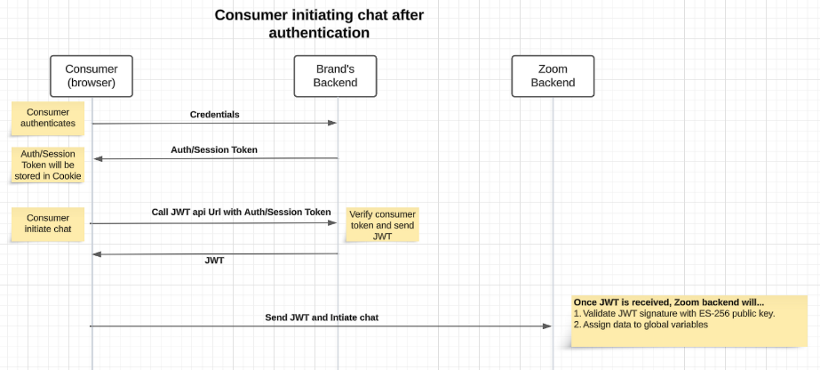
When a consumer begins a chat engagement on your website, the Zoom Contact Center/Zoom Virtual Agent Web SDK will place a GET request to your authentication endpoint. - Verify if the consumer is a valid, authenticated user. If the consumer is valid, your authentication endpoint should respond with consumer information in a signed JWT response in the following format:
{"loginUserIdJwt": "<JWT"}
The JWT should have three parts: Header, Payload, and Signature. The Header should contain information about the signing algorithm used, which should be ES-256 or RSA-256.
How to configure consumer authentication on Zoom Contact Center
- Sign in to the Zoom web portal as an admin or another role with the privilege to edit account settings.
- In the navigation menu, click Contact Center Management then Preferences.
- In the General Settings tab, scroll down to the Consumer Authentication section.
- Click the Consumer Authentication toggle and configure the two settings below:
- Authentication Endpoint: The Zoom Contact Center / Zoom Virtual Agent Web SDK will perform a GET API request when the consumer begins the engagement and when the page is reloaded. This endpoint should return a signed JWT containing information about the consumer.
- Encryption Type: Select between ES-256 and RSA-256.
- JWT Public Key: This is ES256 or RSA256 public key that Zoom will use to verify the JWT signature. See details below
How to configure consumer authentication on Zoom Virtual Agent
- Sign in to the Zoom web portal as an admin or another role with the privilege to edit account settings.
- In the navigation menu, click AI Management then Virtual Agent.
- In the Preferences tab, scroll down to the Consumer Authentication section.
- Click the Consumer Authentication toggle and configure the two settings below:
- Authentication Endpoint: The Zoom Contact Center / Zoom Virtual Agent Web SDK will perform a GET API request when the consumer begins the engagement and when the page is reloaded. This endpoint should return a signed JWT containing information about the consumer.
- Encryption Type: Select between ES-256 and RSA-256.
- JWT Public Key: This is ES256 or RSA256 public key that Zoom will use to verify the JWT signature. See details below
Example of JWT header
{
"cty": "text/plain",
"alg": "ES256"
}
The end consumer information should be part of payload. The payload should also include a field “exp” of epoch format, which indicates JWT expiration time. This will be used while verifying the JWT in the Zoom backend.
Example of JWT Payload
Shown below is an example of the JWT payload. This is just an example, you can decide what data is returned by your Consumer Authentication endpoint and the mapping of that data into Zoom Contact Center / Virtual Agent Global Variables.
{
"exp": <epoch_expiration_time,
"account": {
"number": "5975936",
"status": "active",
"company_name": "Example Corp."
},
"name": {
"first": "Janet",
"last": "Smith"
},
"email": "janet.smith@example.com"
}
Both Header and Payload data are in the JSON format but encoded. Finally, the signature is calculated by encoding the header and payload and signing it with your private Key.
As mentioned, the JWT needs to be signed so that Zoom can validate the authenticity of the authentication endpoint response. To do this, create a private key/public Key pair. Use your private key to sign the signature of the JWT. This ES256 or RSA256 public key should be added to the Zoom Contact Center/Zoom Virtual Agent Admin page. This public key will be used on Zoom’s backend to verify the JWT signature. You can refer this to create Key pairs:
Private key/public key pair
Generate ES256 key pair
Below is an example on how you can create ES256 private key/public key pair.
You can use this to create ES256 private Key public Key pairs. Create a private key using this:
openssl ecparam -name prime256v1 -genkey -noout -out es256-private-key.pem
Create the corresponding public key using this:
openssl ec -in es256-private-key.pem -pubout -out es256-public-key.pem
Private Key will be in es256-private-key.pem and public key in es256-public-key.pem
Generate RSA256 key pair
Below is an example on how you can create RSA private key/public key pair.
You can use this to create RSA private Key public Key pairs. Create a private key using this:
openssl genpkey -algorithm RSA -out rsa_private_key.pem -pkeyopt rsa_keygen_bits:2048
Create the corresponding public key using this:
openssl rsa -in rsa_private_key.pem -outform PEM -pubout -out rsa_public_key.pem
Private Key will be in rsa_private_key.pem and public key in rsa_public_key.pem
Get public key from RSA digital certification
If you already have a RSA self-signed digital certification, you can convert certification to public key with this:
openssl x509 -in server.crt -pubkey -noout > rsa_public_key.pem
How to map Zoom Contact Center global variables to Consumer Authentication JWT Fields
The purpose of the Consumer Authentication feature is that you can access data about the consumer within your Zoom Contact Center. The data that you include in the JWT payload can be mapped to Zoom Contact Center global variables.
- Sign in to the Zoom web portal as an admin or another role with the privilege to edit account settings.
- In the navigation menu, click Contact Center Management then Preferences.
- Click on the Variables tab. You can create custom variables or map data to system variables.
- Select a variable group.
- To the right of the variable name, click the ellipsis icon and select Edit.
- Scroll down to the Value section and click From consumer authentication.
- In the Consumer Data field, enter the JSON field name. Nested objects using JSON dot-notation are supported; however arrays are not supported. Using the above Example of JWT Payload code example, you could map the Account Number value of 5975936 into a variable by configuring the Consumer Data field with the value account.number.
Note: Mapping Consumer Authentication JWT fields is not supported for all Global System variables, as some variables are generated by the system such as EngagementId, etc.
How to map Zoom Virtual Agent global variables to Consumer Authentication JWT Fields
The purpose of the Consumer Authentication feature is that you can access data about the consumer within your Zoom Virtual Agent flow. The data that you include in the JWT payload can be mapped to Zoom Virtual Agent global variables.
If you are using both Zoom Contact Center and Zoom Virtual Agent together, you only need to complete the configuration as described above in the Mapping Zoom Contact Center global variables to Consumer Authentication JWT Fields, as the configuration you complete for Zoom Contact Center will by synchronized to Zoom Virtual Agent.
If you are using Zoom Virtual Agent without Zoom Contact Center, complete the steps below.
- Sign in to the Zoom web portal as an admin or another role with the privilege to edit account settings.
- In the navigation menu, click AI Management then Virtual Agent.
- Click on the Preferences tab and then click on Variables.
- Select a variable group.
- To the right of the variable name, click the ellipsis icon and select Edit.
- Scroll down to the Value section and click From consumer authentication.
- In the Consumer Data field, enter the JSON field name. Nested objects using JSON dot-notation are supported; however arrays are not supported. Using the above Example of JWT Payload code example, you could map the Account Number value of 5975936 into a variable by configuring the Consumer Data field with the value account.number.
Note: Mapping Consumer Authentication JWT fields is not supported for all Global System variables, as some variables are generated by the system such as EngagementId, etc.
How to use global variables in a flow
Now that you have completed the Consumer Authentication and variable mapping feature, you can begin to program your Flow using the variables that will be mapped by Consumer Authentication.
In addition to variables that you mapped in the two sections above, there is also the global system variable named authenticationStatus (global_system.Engagement.authenticationStatus), which is a boolean variable that is set to True if the consumer is authenticated. In your Zoom Contact Center / Zoom Virtual Agent flow, you should check the value of this variable.
- If it is true, then you can trust that the above mapped fields/variables are set using the Consumer Authentication process by validating the signed JWT with your public key.
- If the authenticationStatus variable is false, the consumer is not authenticated and you should not check the value of the mapped variables as they will not be initialized by the Consumer Authentication feature.