Best practices for Intelligent Director
If you have decided to optimize your meetings with Intelligent Director, there are several best practices and setup options to consider when you are getting started.
Best practice checklist
Camera setup
- Zoom recommends using a camera capable of 4k capture for the best experience.
- For the best camera performance, be sure to achieve good controlled lighting conditions in the room (avoid backlight).
- Plug all cameras directly into your computer using vendor-provided USB cables. The use of hubs or extenders may result in lowered USB bus speed or USB bus contention that can negatively affect performance.
- Disable any special camera features like automatic speaker tracking, presenter tracking, or auto-framing, etc. as it can interfere with Intelligent Director
- Cameras must be installed on the same wall.
- Pick cameras with the optimal field of view for your deployment. Establish some overlap on both sides of the center camera with the left- and right-cameras.
- Installed height of all cameras should generally be as close to the top or bottom edges of the display(s) as possible; installing cameras significantly higher or lower than the display(s) may result in loss of virtual eye contact.
- The installed width of the left and right cameras should generally be as close to the edges of the display(s) as possible. Placing the cameras at a wide position will help separate the faces of people seated in the far rows, but significantly wider positioning may result in the loss of virtual eye contact when the left and right cameras are used to frame individual participants facing the displays. Placing the cameras more closely to the center camera position can improve virtual eye contact, but may cluster the faces of distant in-room participant's too closely, leading to poor participant framing.
- Zoom-in as tightly as possible to the area the camera is assigned to capture.
- Pan, tilt, and zoom the center camera to make sure it captures the whole table and everyone sitting in the first row of seats. It is not necessary to capture empty space to the left and right of the table and first row of seats.
- Pan, tilt, and zoom the side cameras to capture the participant seating area across the table towards the opposite side of the room.
- The maximum number of individual participants that the cameras can pick up is 16. These 16 will be distributed across 3-6 video streams. Beyond 16, additional participants will not be distributed across video streams.
- Although Zoom recommends using the same make and model for all cameras to achieve the best color, contrast and exposure level uniformity, mixing camera models in your setup can help you capture the desired field of view for each camera in your room.
Optical PTZ Cameras (e.g. Aver CAM520 Pro 3, Yealink UVC86)
Note: Please review the camera setup best practices before this section.
Additional recommendations for these camera types:
- Intelligent Director only utilizes the main PTZ lens of the camera. Additional camera lenses such as the auxiliary lenses on select Aver or Yealink models are not used by Intelligent Director.
- Zoom out the center camera to ensure that the entire first row of participants are visible when setting the PTZ position preset.
- If at the widest zoom setting you are still unable to see the first row participants, you may either need to pull the table further back or use a different camera with a wider field of view.
Digital PTZ Cameras (e.g. Poly E70)
Note: Please review the camera setup best practices before this section.
Additional recommendations for these camera types:
- Zoom-in the center camera just enough to ensure that the entire first row of participants are visible when setting the PTZ position preset.
- When mounting the Poly E70 as a left and/or right side camera, physically position and install the camera so that its lens is directly pointed towards the participant seating area across the table towards the opposite side of the room.
- Use a Zoom Rooms Controller to zoom-in the camera and capture the participant seating area across the table towards the opposite side of the room.
- If your table seats more than five persons, consider temporarily covering the wide-angle lens of the Poly E70 during installation, and zoom-in until the narrow-angle lens is in use, then set the final PTZ position before saving the camera preset.
General room design
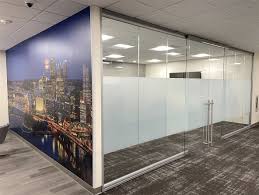
- Adding frost film to glass walls that border areas where additional faces may be seen is recommended.
- Removing any photos or art on the wall with people’s faces in the viewing angle of the camera is recommended.
- For the purposes of adding Intelligent Director, there is no need to consider adjusting the acoustics or audio system.
Example Three Camera Room Layouts
Notes:
- These layout designs can be downloaded from the attachments section at the bottom of the page.
- The examples below are guidelines and don't need to be followed precisely for every setup. It may be necessary to configure the camera positions and angles to fit your specific needs.
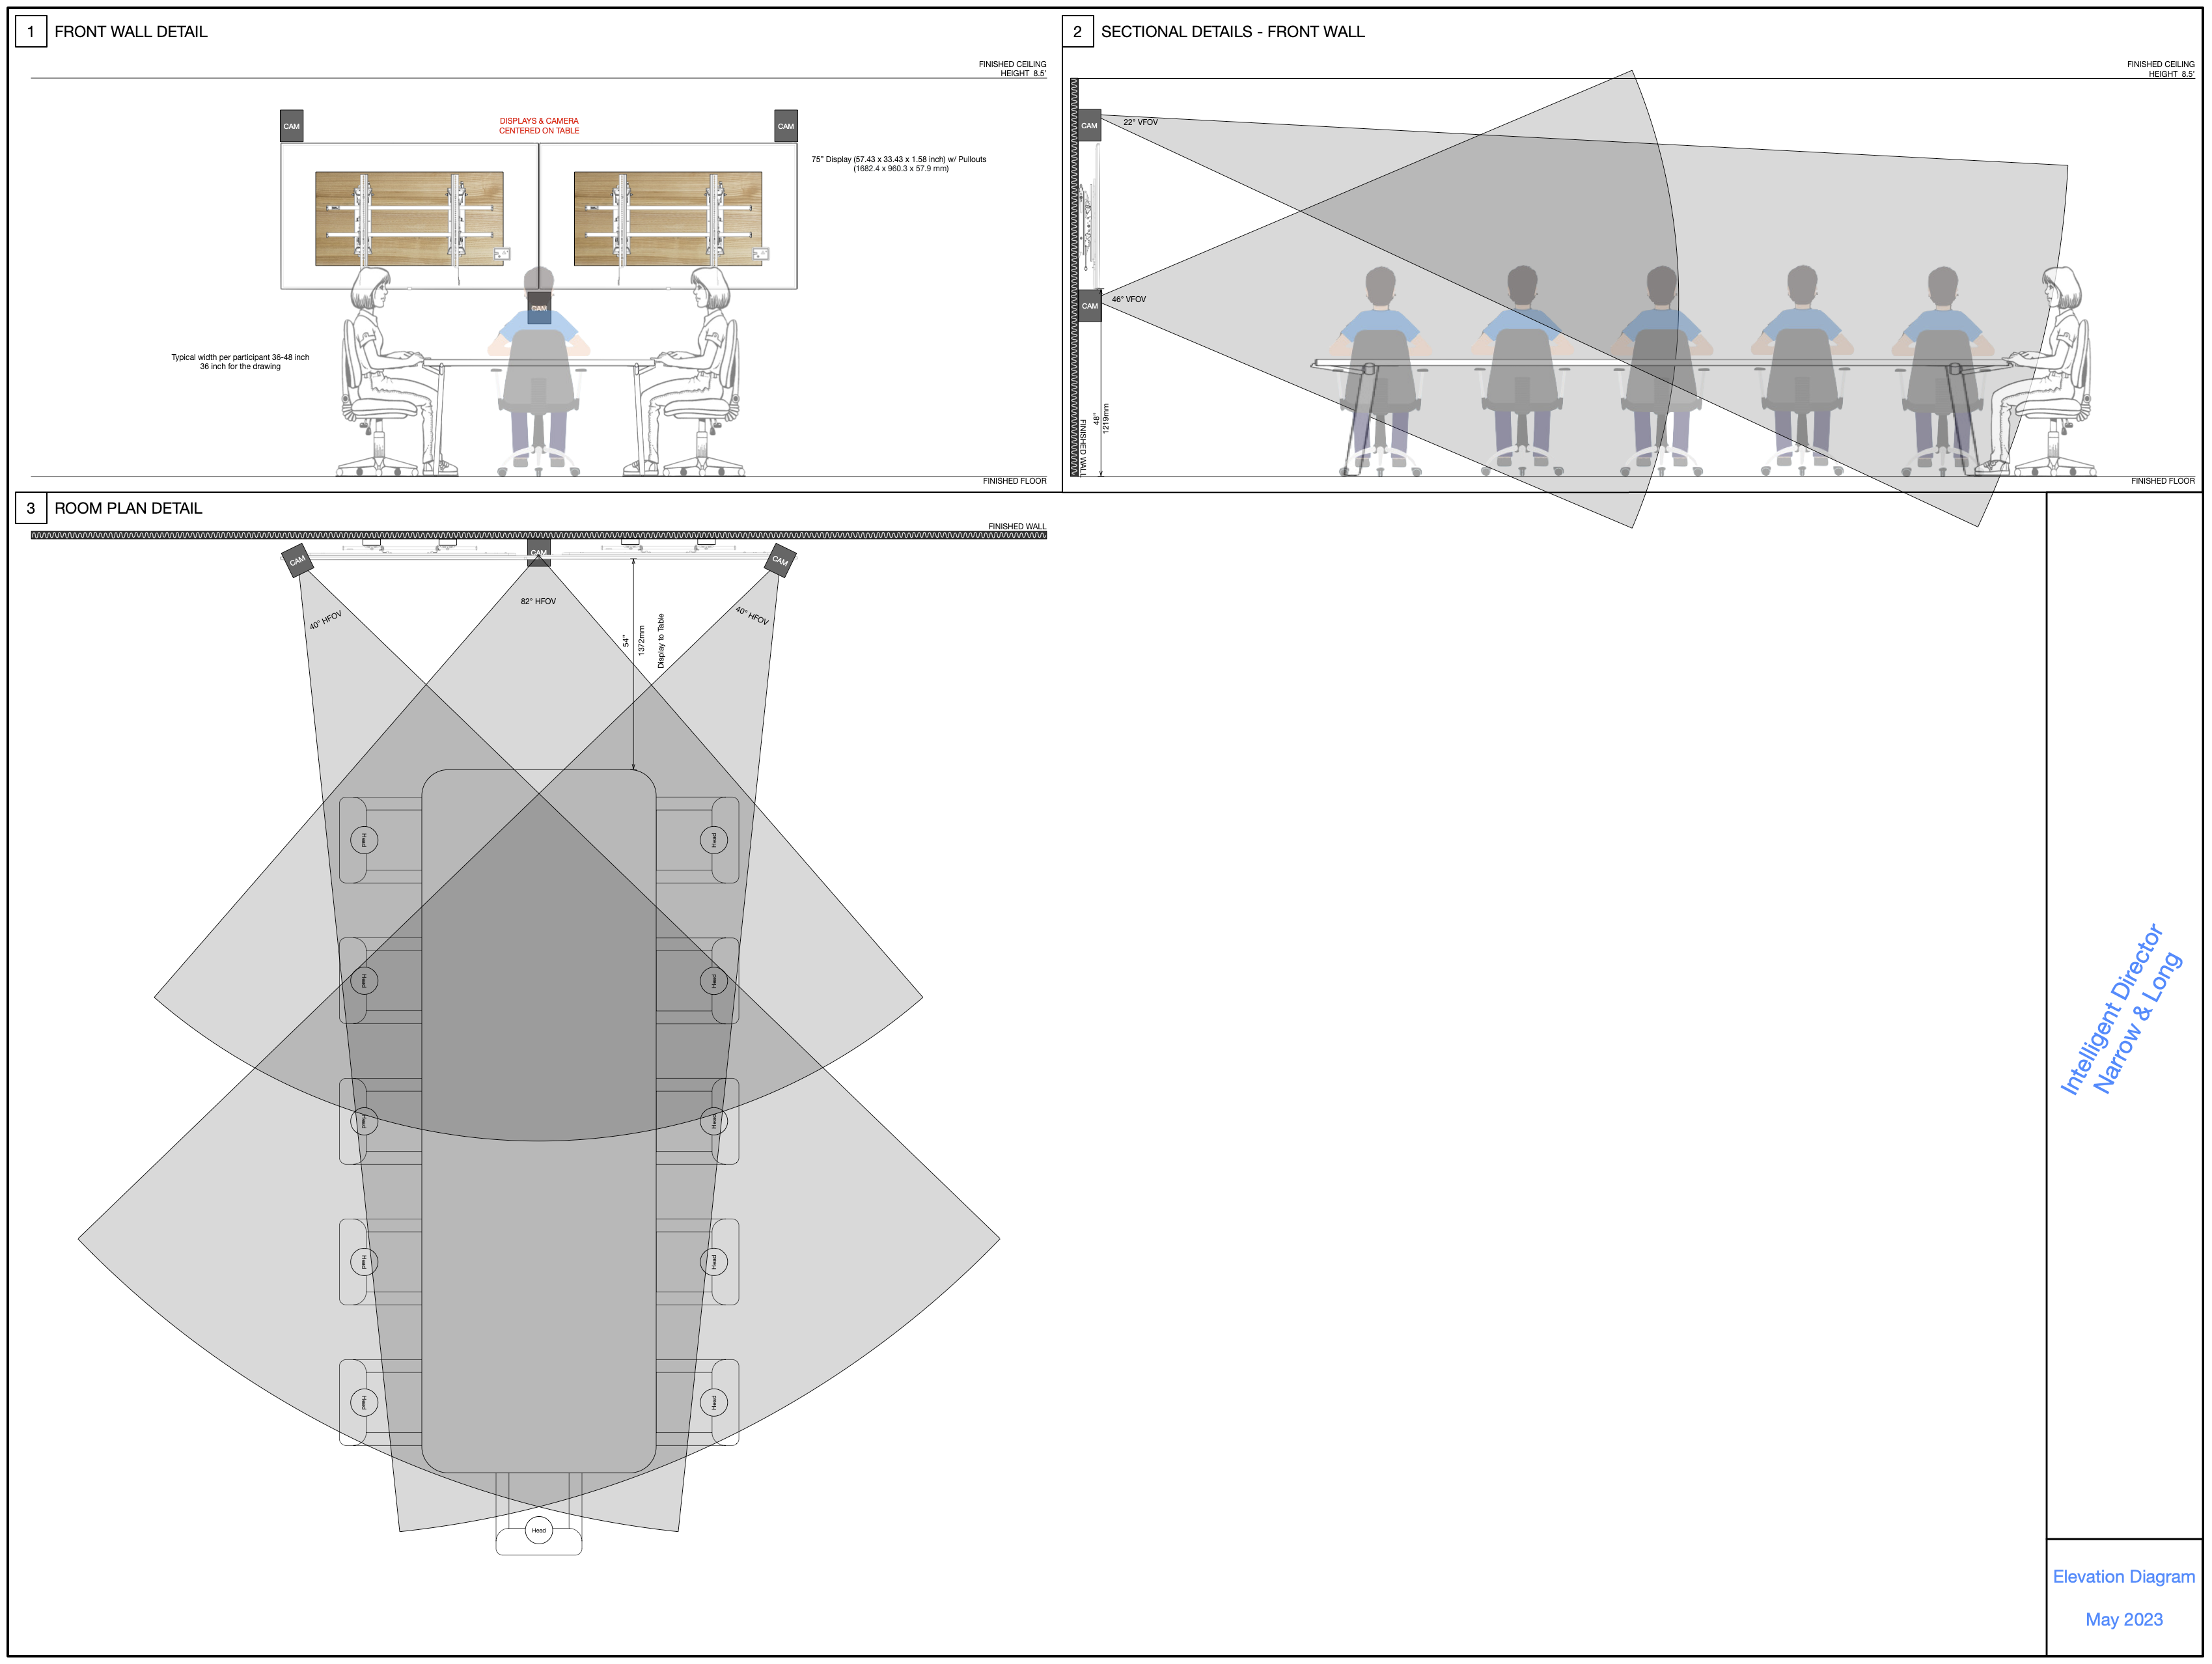
Furniture Layout A: Traditional Conference Spaces (Narrow and Long Table)
- This is a layout that is very common for many conference spaces.
- The center camera will be placed under the display to capture the first three rows of participants. It is essential to pick a supported camera that will zoom out wide enough to capture the first row of chairs. The camera’s horizontal field of view (FOV) will be the important specification to look out for.
- The side cameras will be placed on top of the displays close to each corner of the displays. Cameras on each side will capture the second half of the table panned to capture the opposite side of the table as shown in the diagram below.
- Both cameras should be zoomed out to a point where any person standing around the table would be captured in the view of the camera.
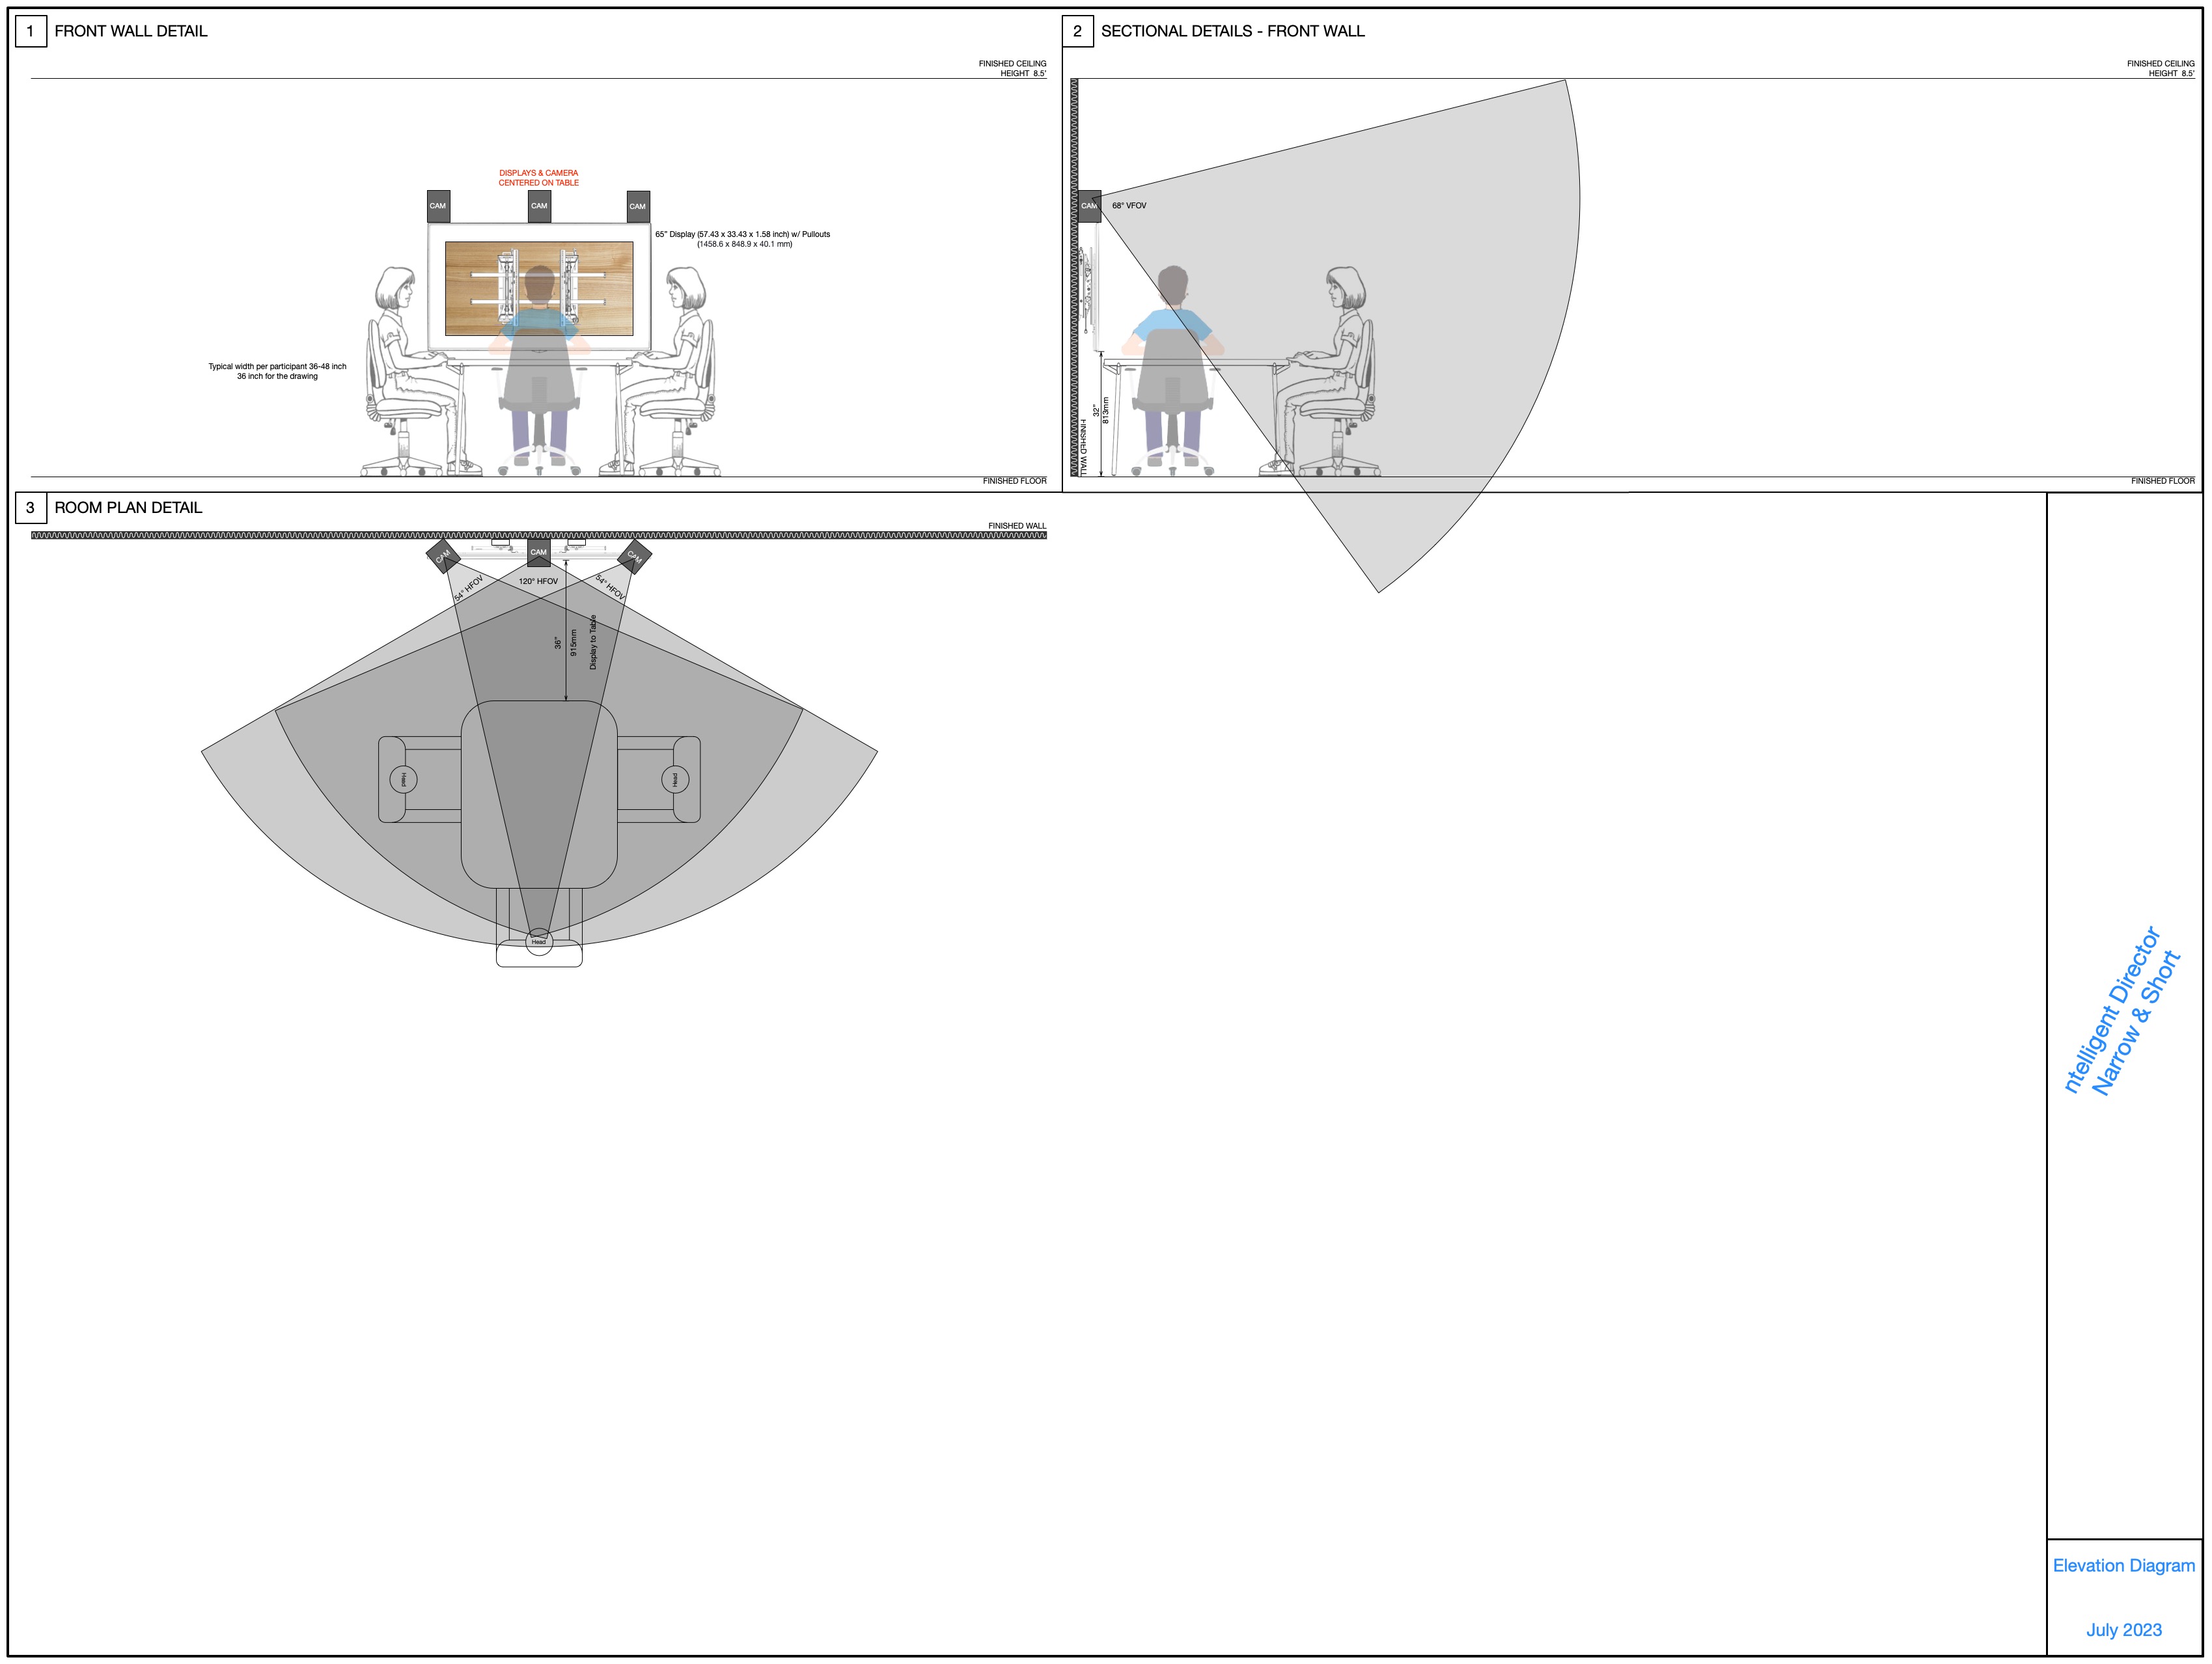
Furniture Layout B: Huddle Spaces (Narrow and Short Table)
- This is a layout that is common for a lot of Huddle Spaces. In rooms where table is butted against the wall, single camera may not have enough horizontal field of view (FOV) to cover the entire table
- All cameras are placed on top of the display to make sure we aren’t capturing too much of the table as well as the table not being in the way to be able to capture participants standing in the room.
- Center camera should be aimed straight forward, making sure it is able to capture users standing in this frame.
- Side cameras should be angled to be able to capture each side of the table.
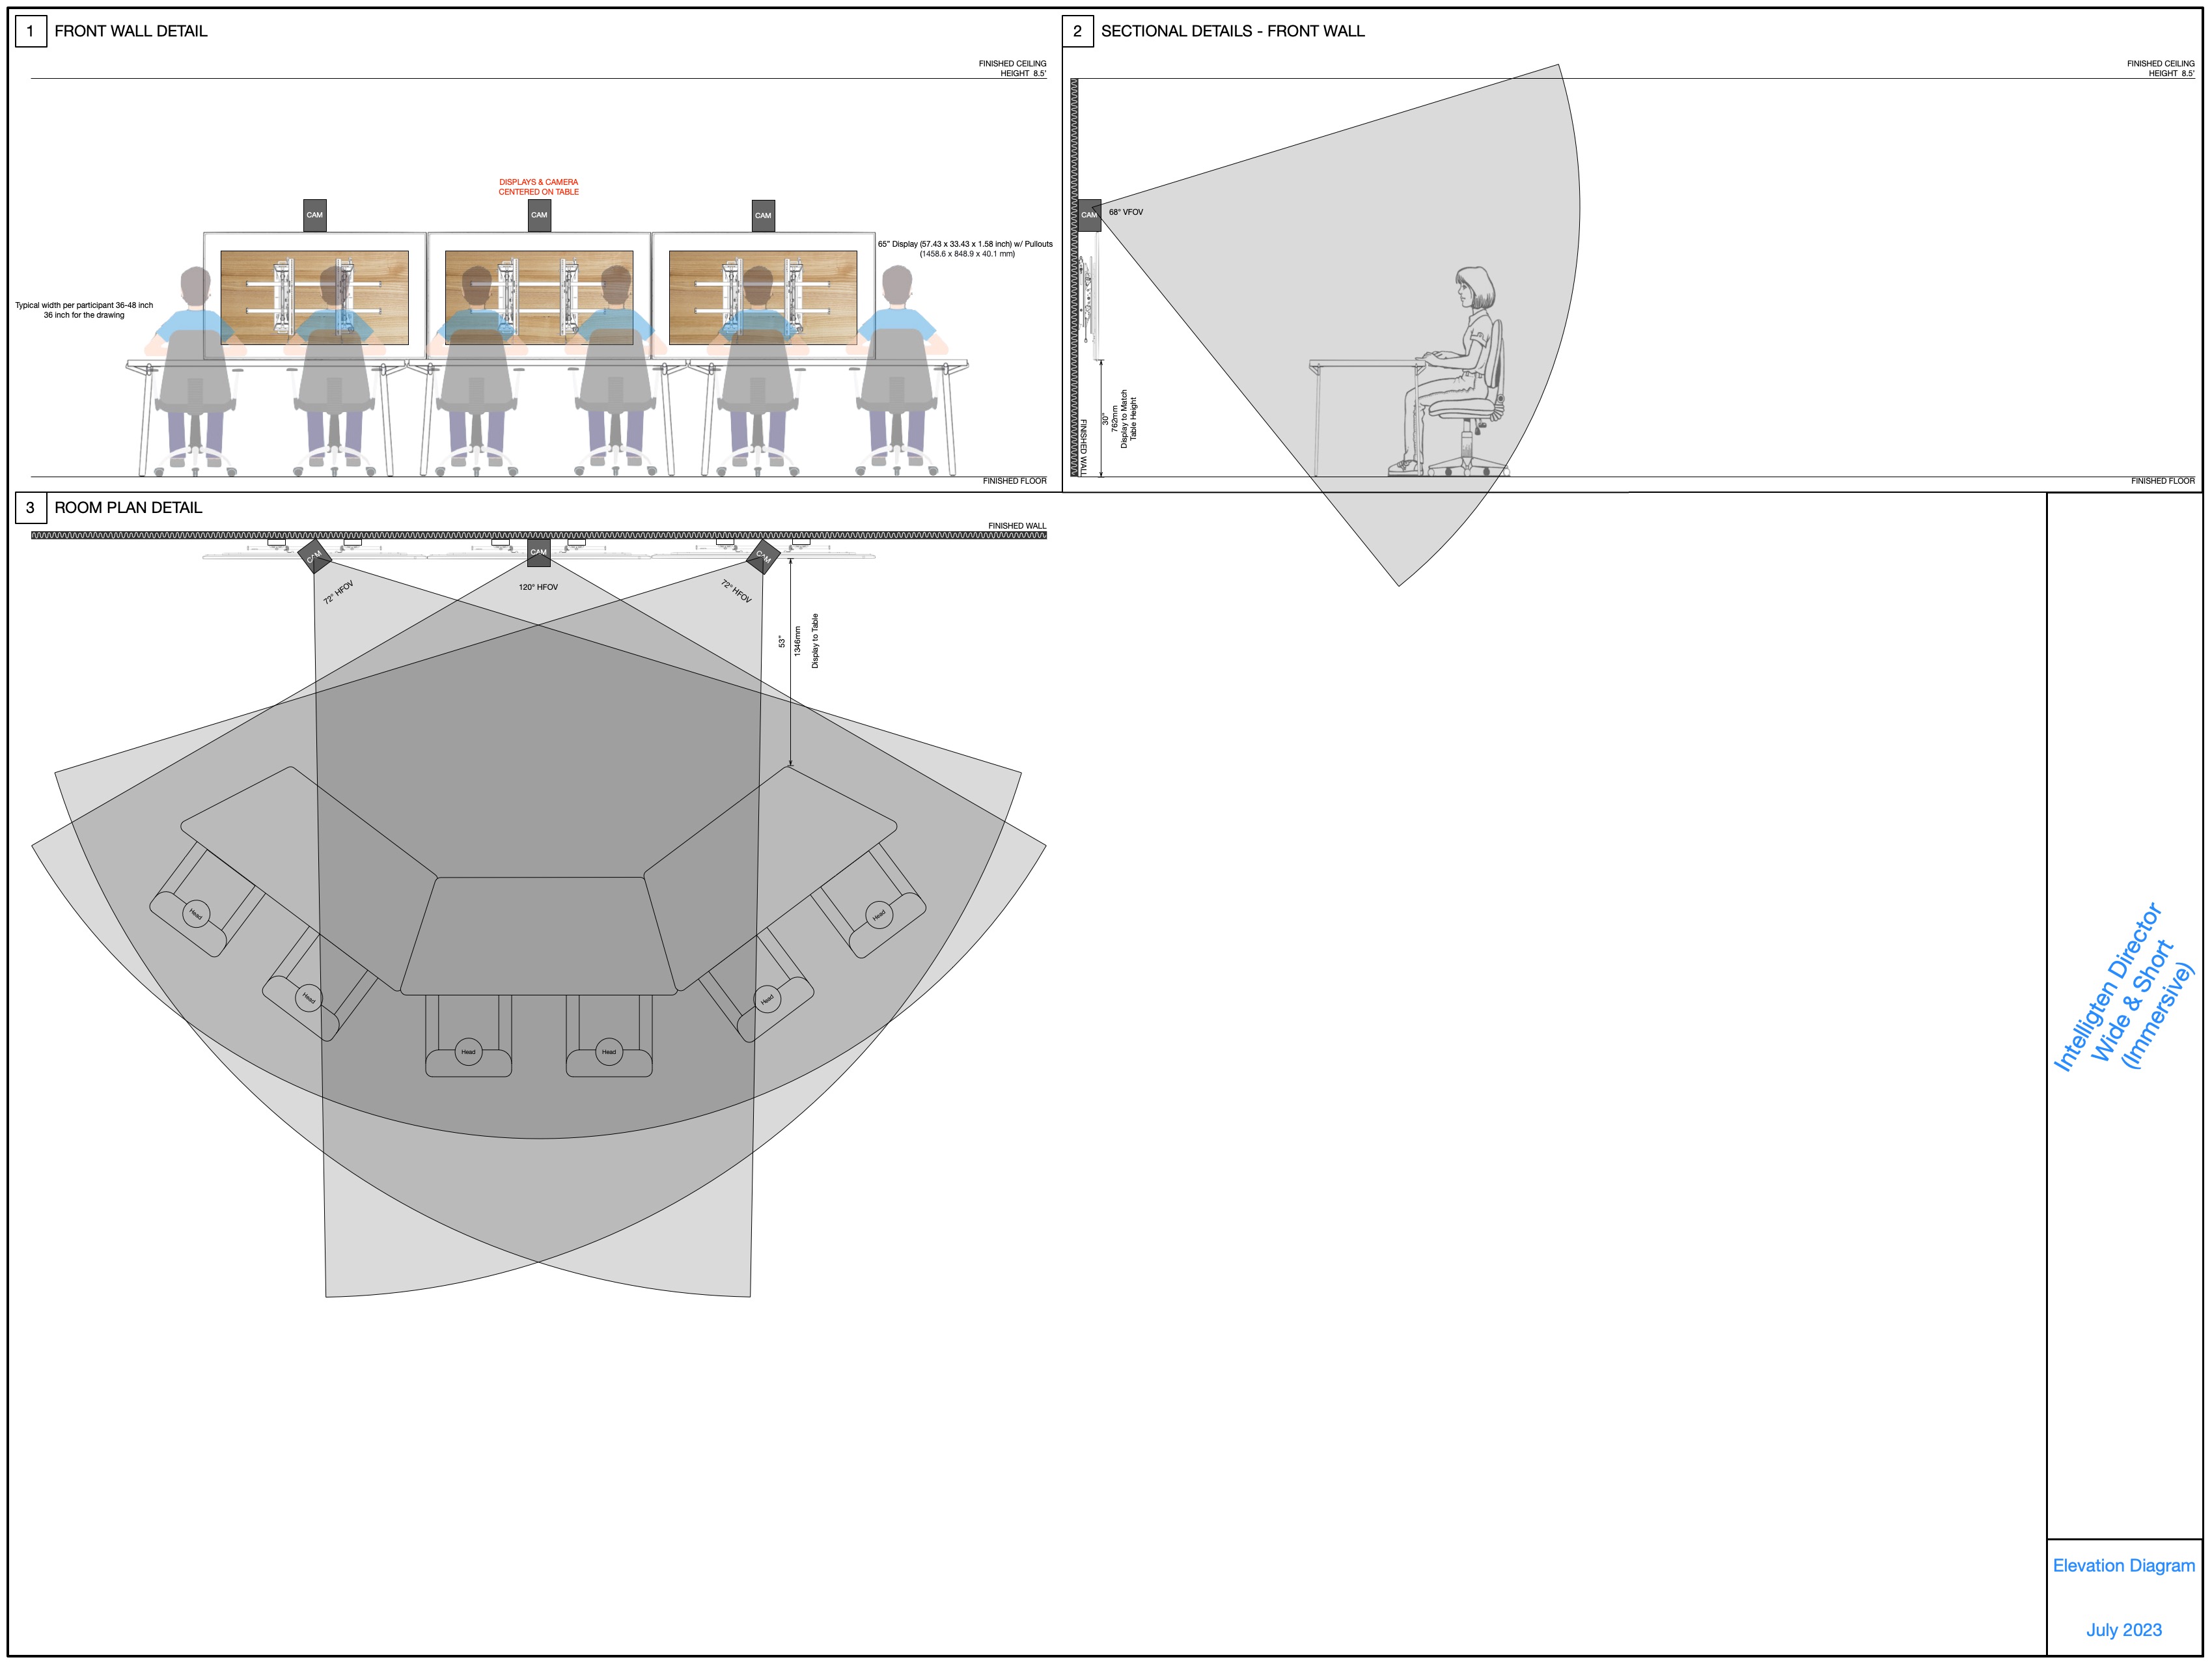
Furniture Layout C: Immersive Collaboration Spaces (Wide and Short Table)
- This is a layout that is common for Immersive Collaboration Spaces. In rooms where multiple displays are along the wide part of the room to create an immersive view, a single camera may not have enough horizontal field of view (FOV) to cover the entire table.
- All cameras are placed on top of the display to make sure we aren’t capturing too much of the table as well as the table not being in the way to be able to capture participants standing in the room.
- Center camera should be aimed straight forward, making sure it is able to capture users standing in this frame.
- Side cameras should be angled to be able to capture each side of the table.
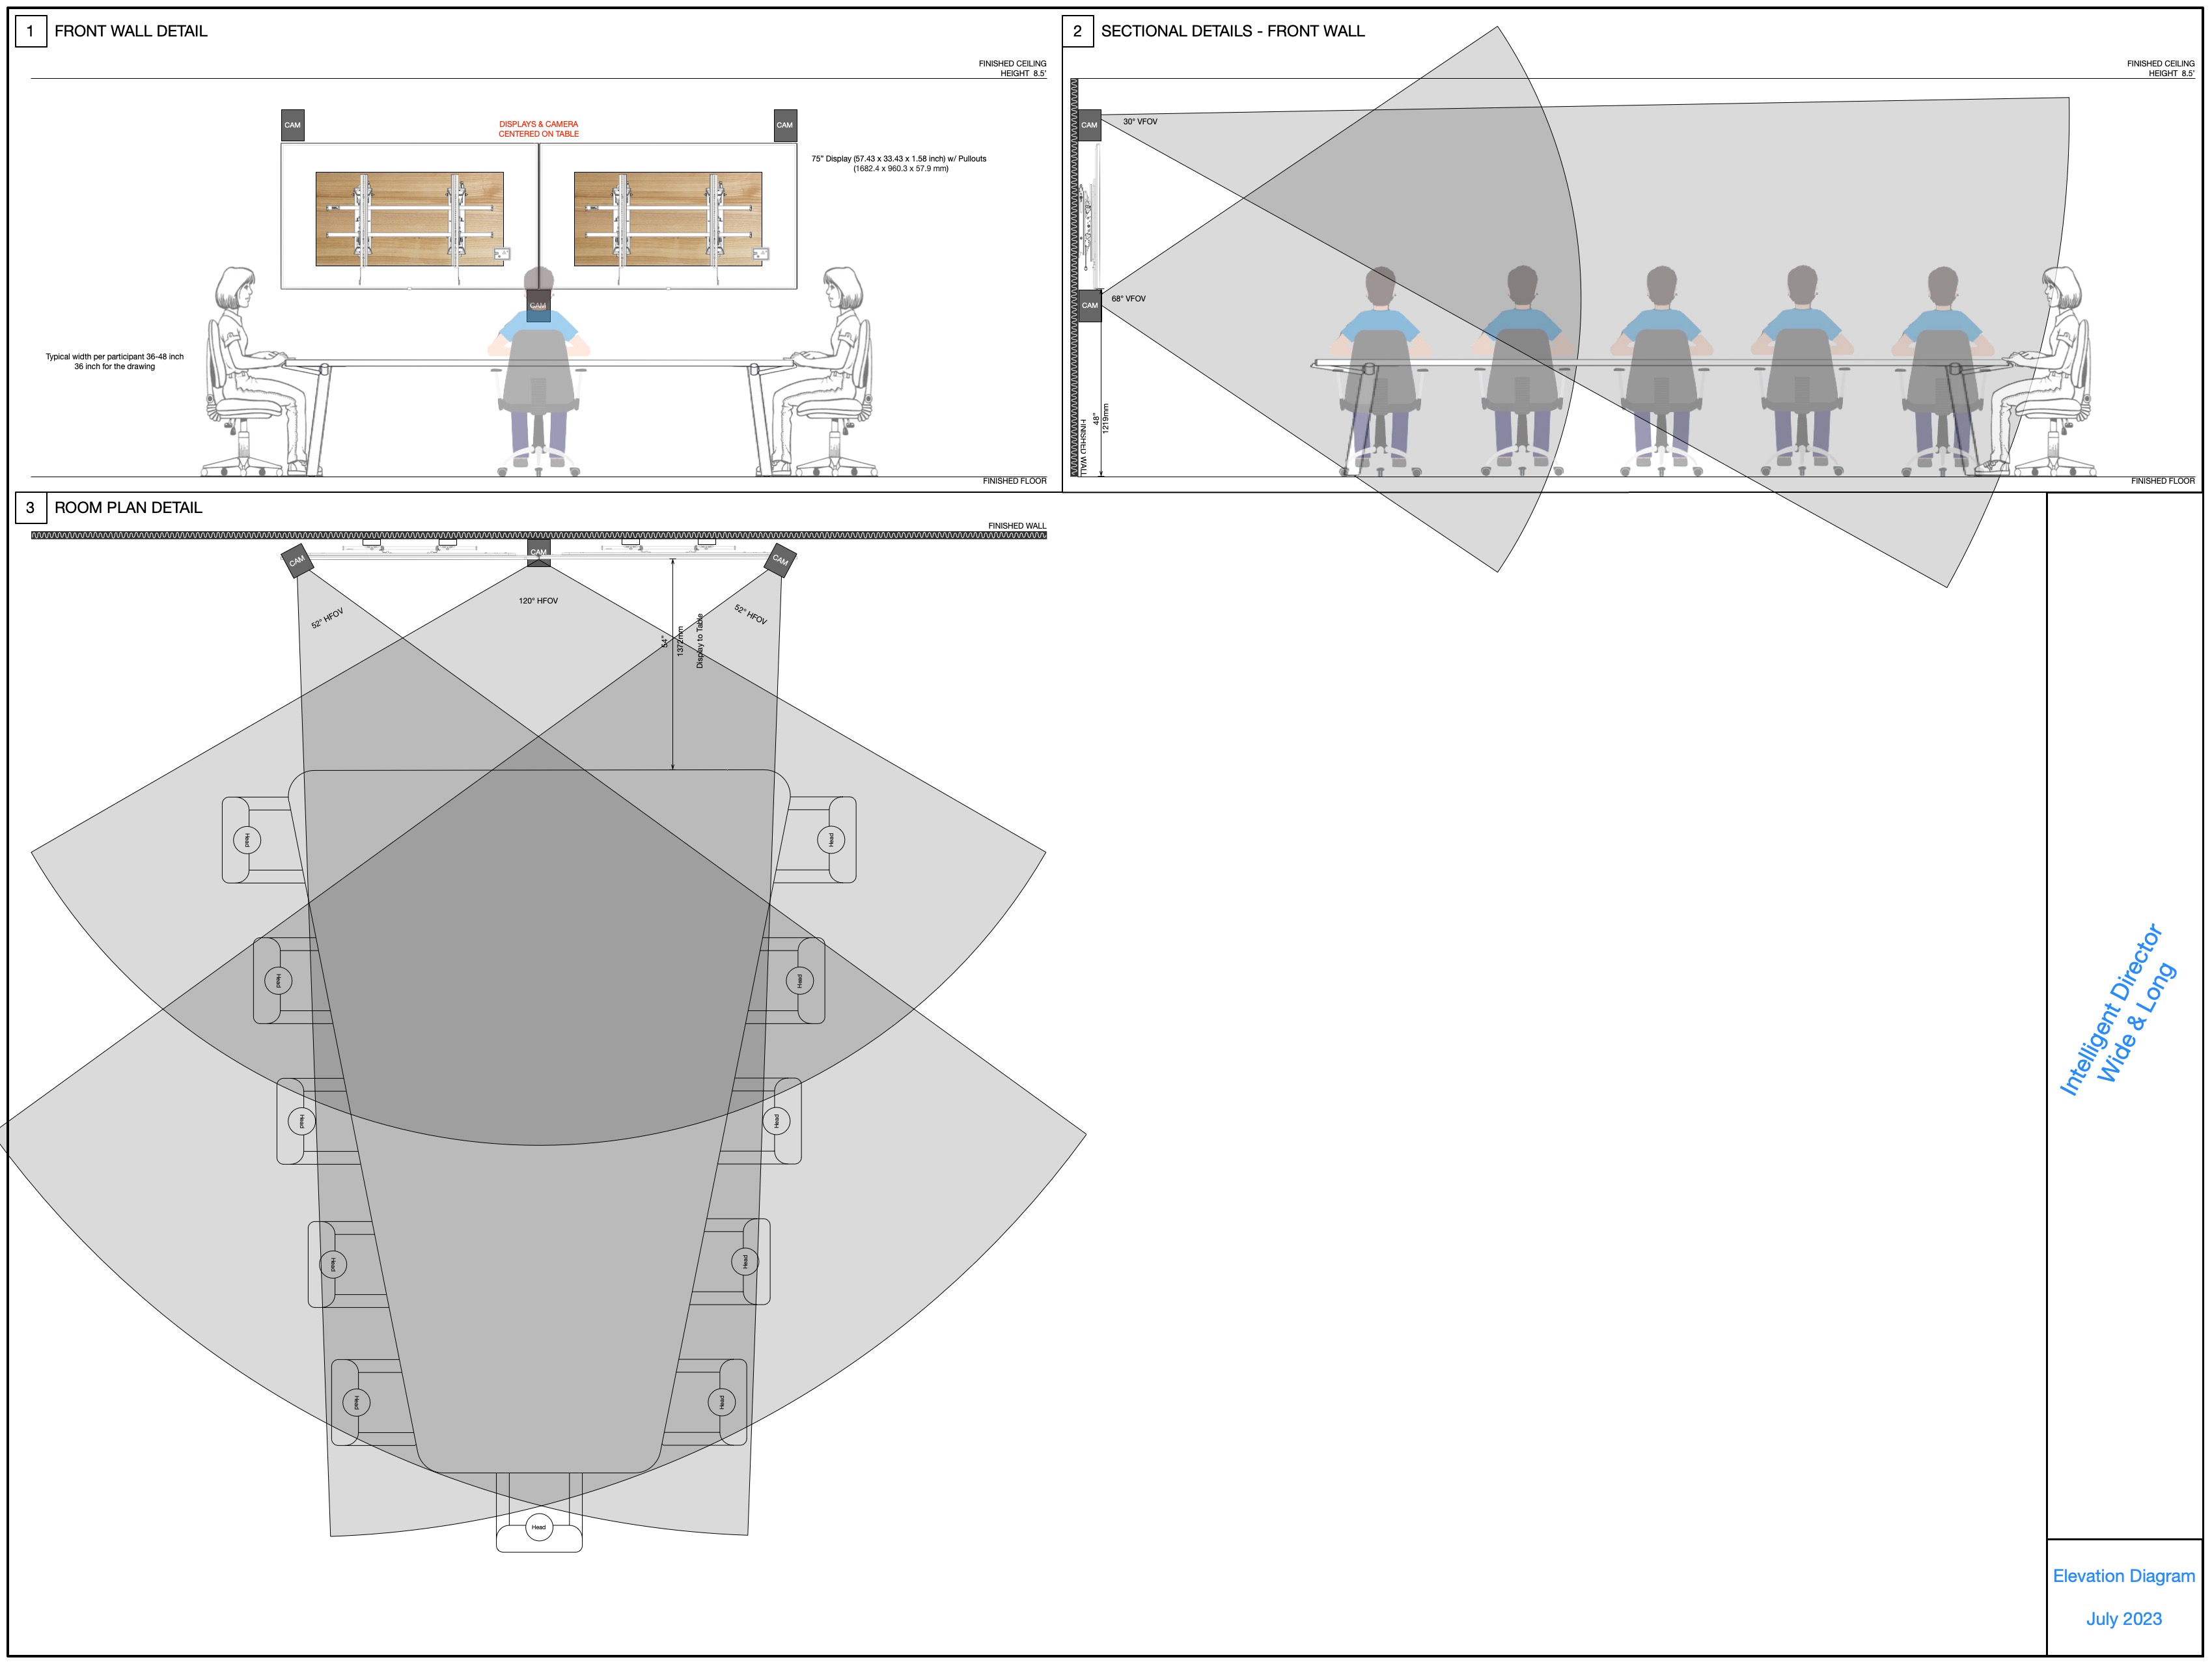
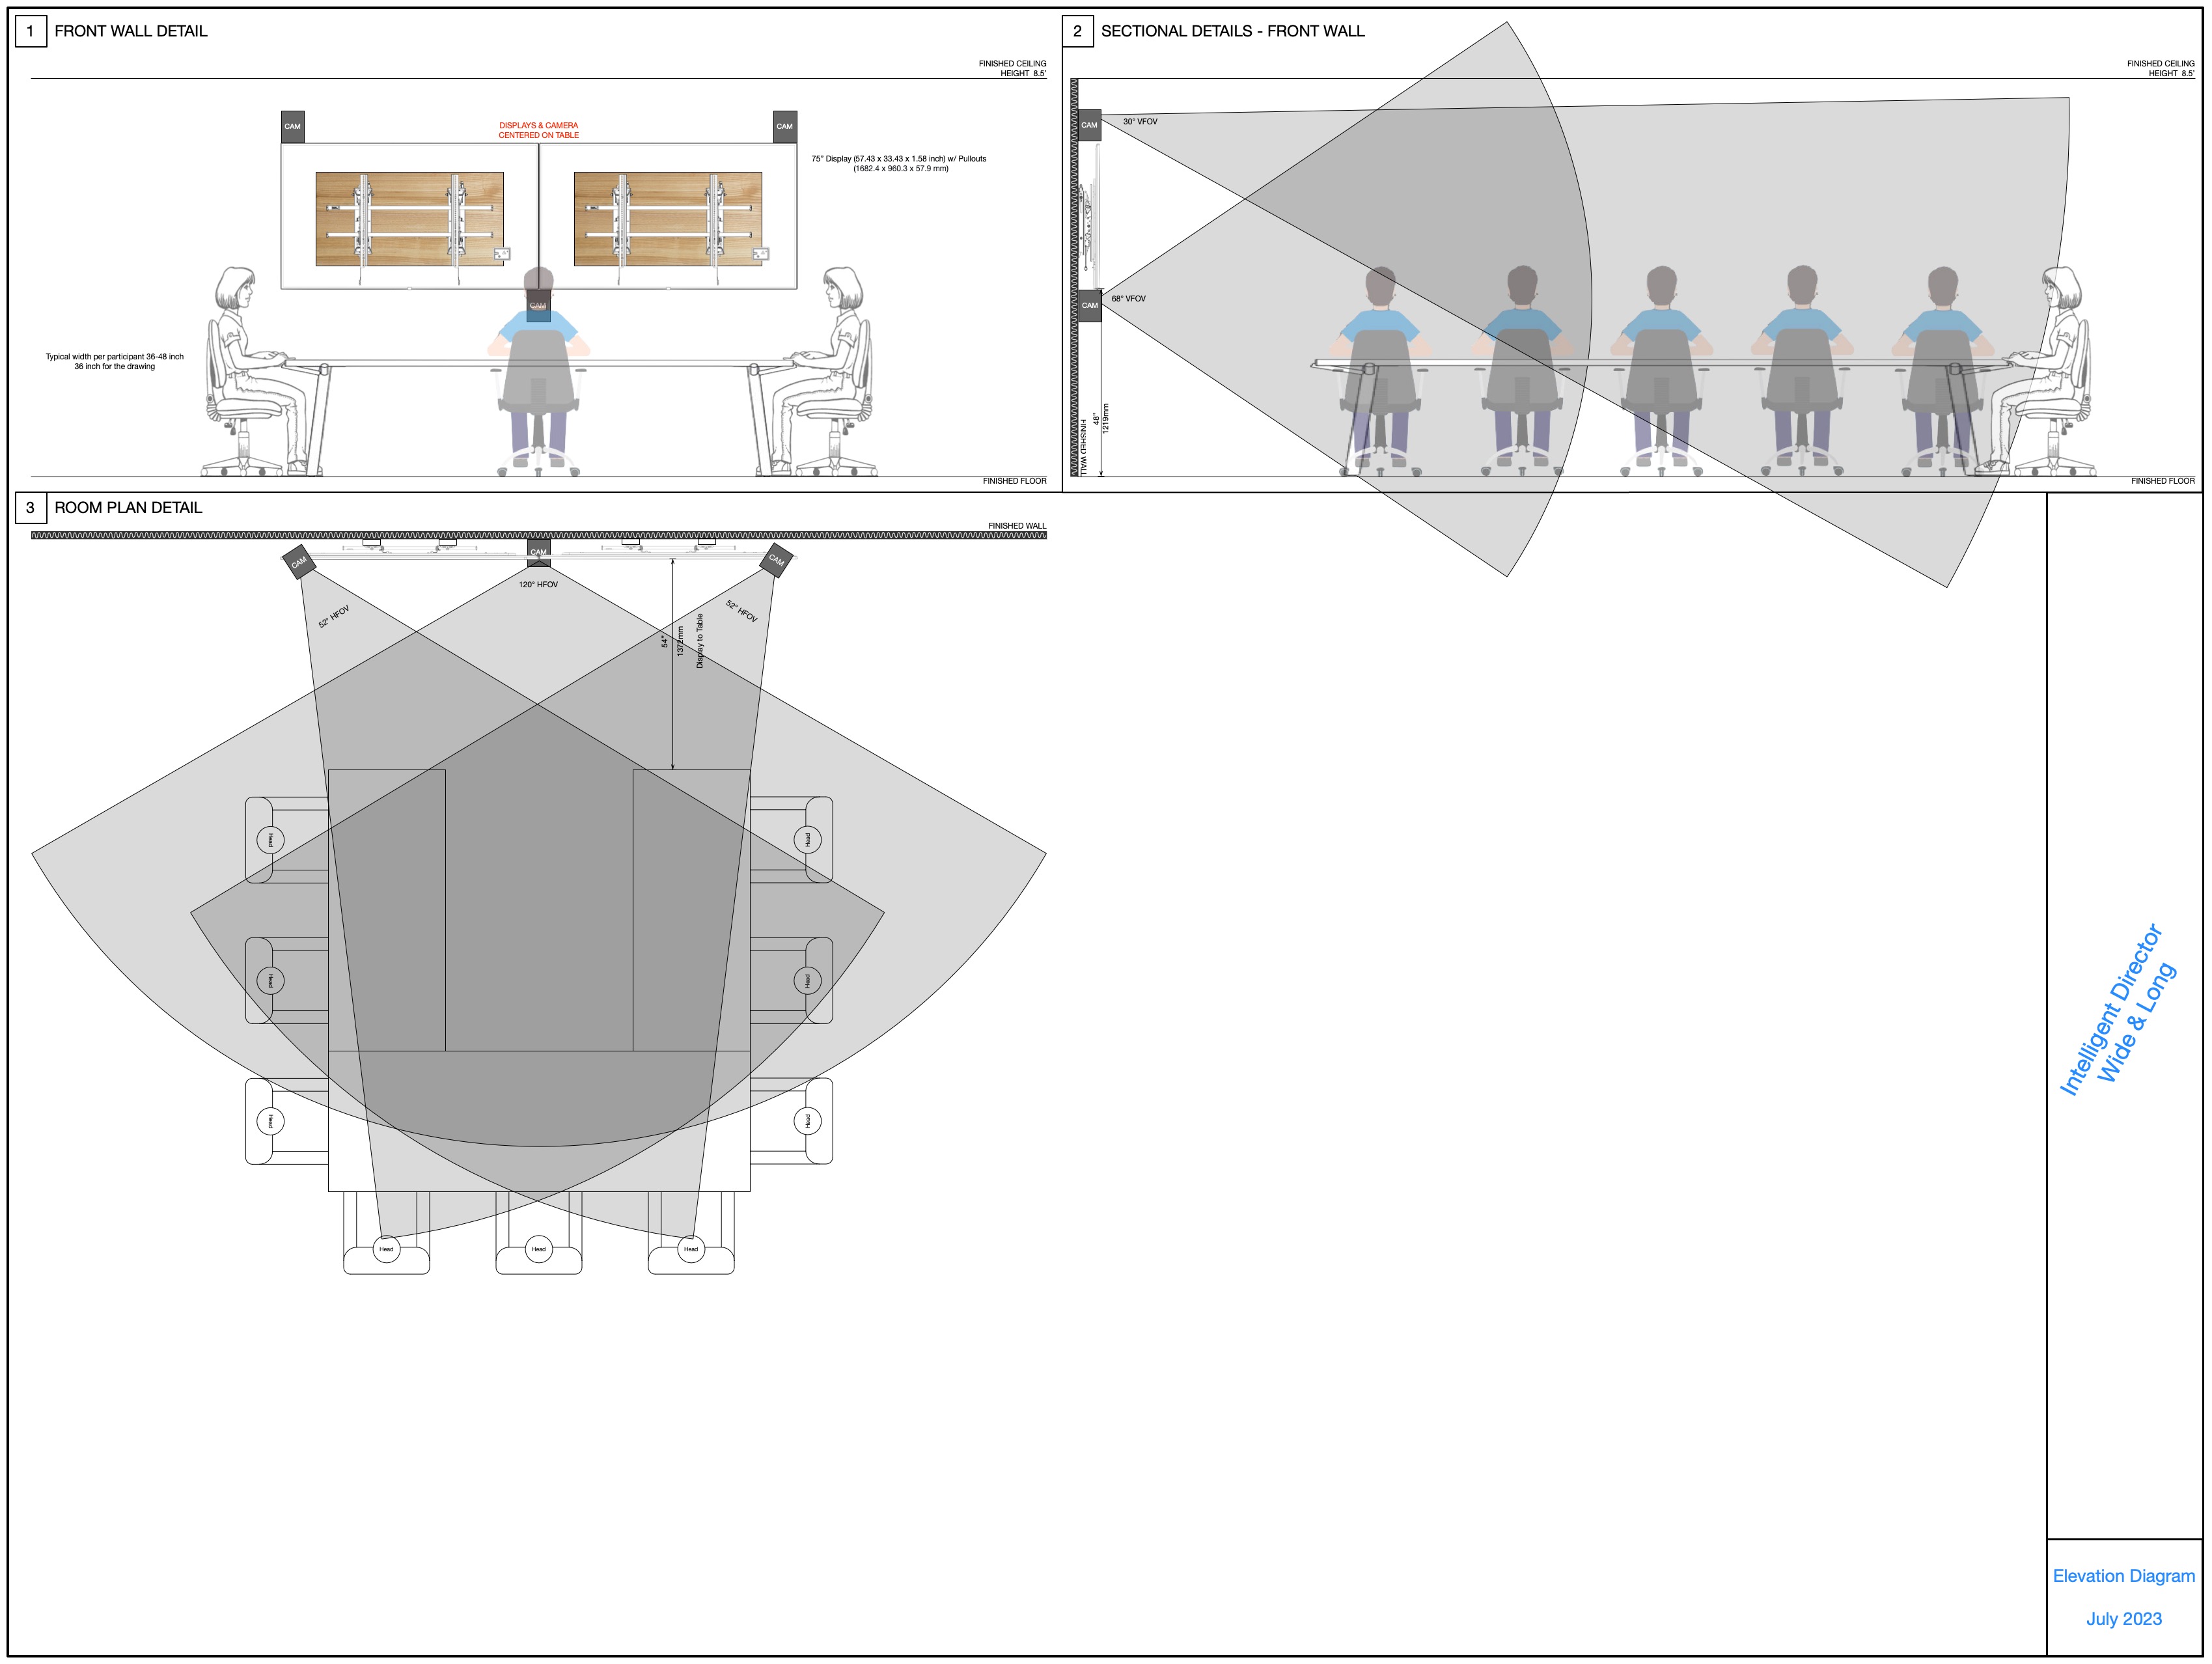
Furniture Layout D: Traditional Conference Room with V or U Shape Table (Wide and Long Table)
- This is a layout similar to conference spaces, however, the furniture in the room is too wide for the center camera to capture the entire width of the front row.
- For this case, the center camera will be placed above the display to capture the second half of the table.
- The side cameras will be placed below the displays aligned close to each front corners of the table. This way you can be sure that no one will impede the camera from shooting across the other side of the table. Cameras on each side will capture the front half of the table panned to capture the opposite side of the table as shown in the diagram below.
- Both cameras should be zoomed out to a point where any person standing around the table would be captured in the view of the camera.
V Shape Table
U Shape Table
Example Two Camera Room Layouts
Notes:
- These layout designs can be downloaded from the attachments section at the bottom of the page.
- The examples below are guidelines and don't need to be followed precisely for every setup. It may be necessary to configure the camera positions and angles to fit your specific needs.
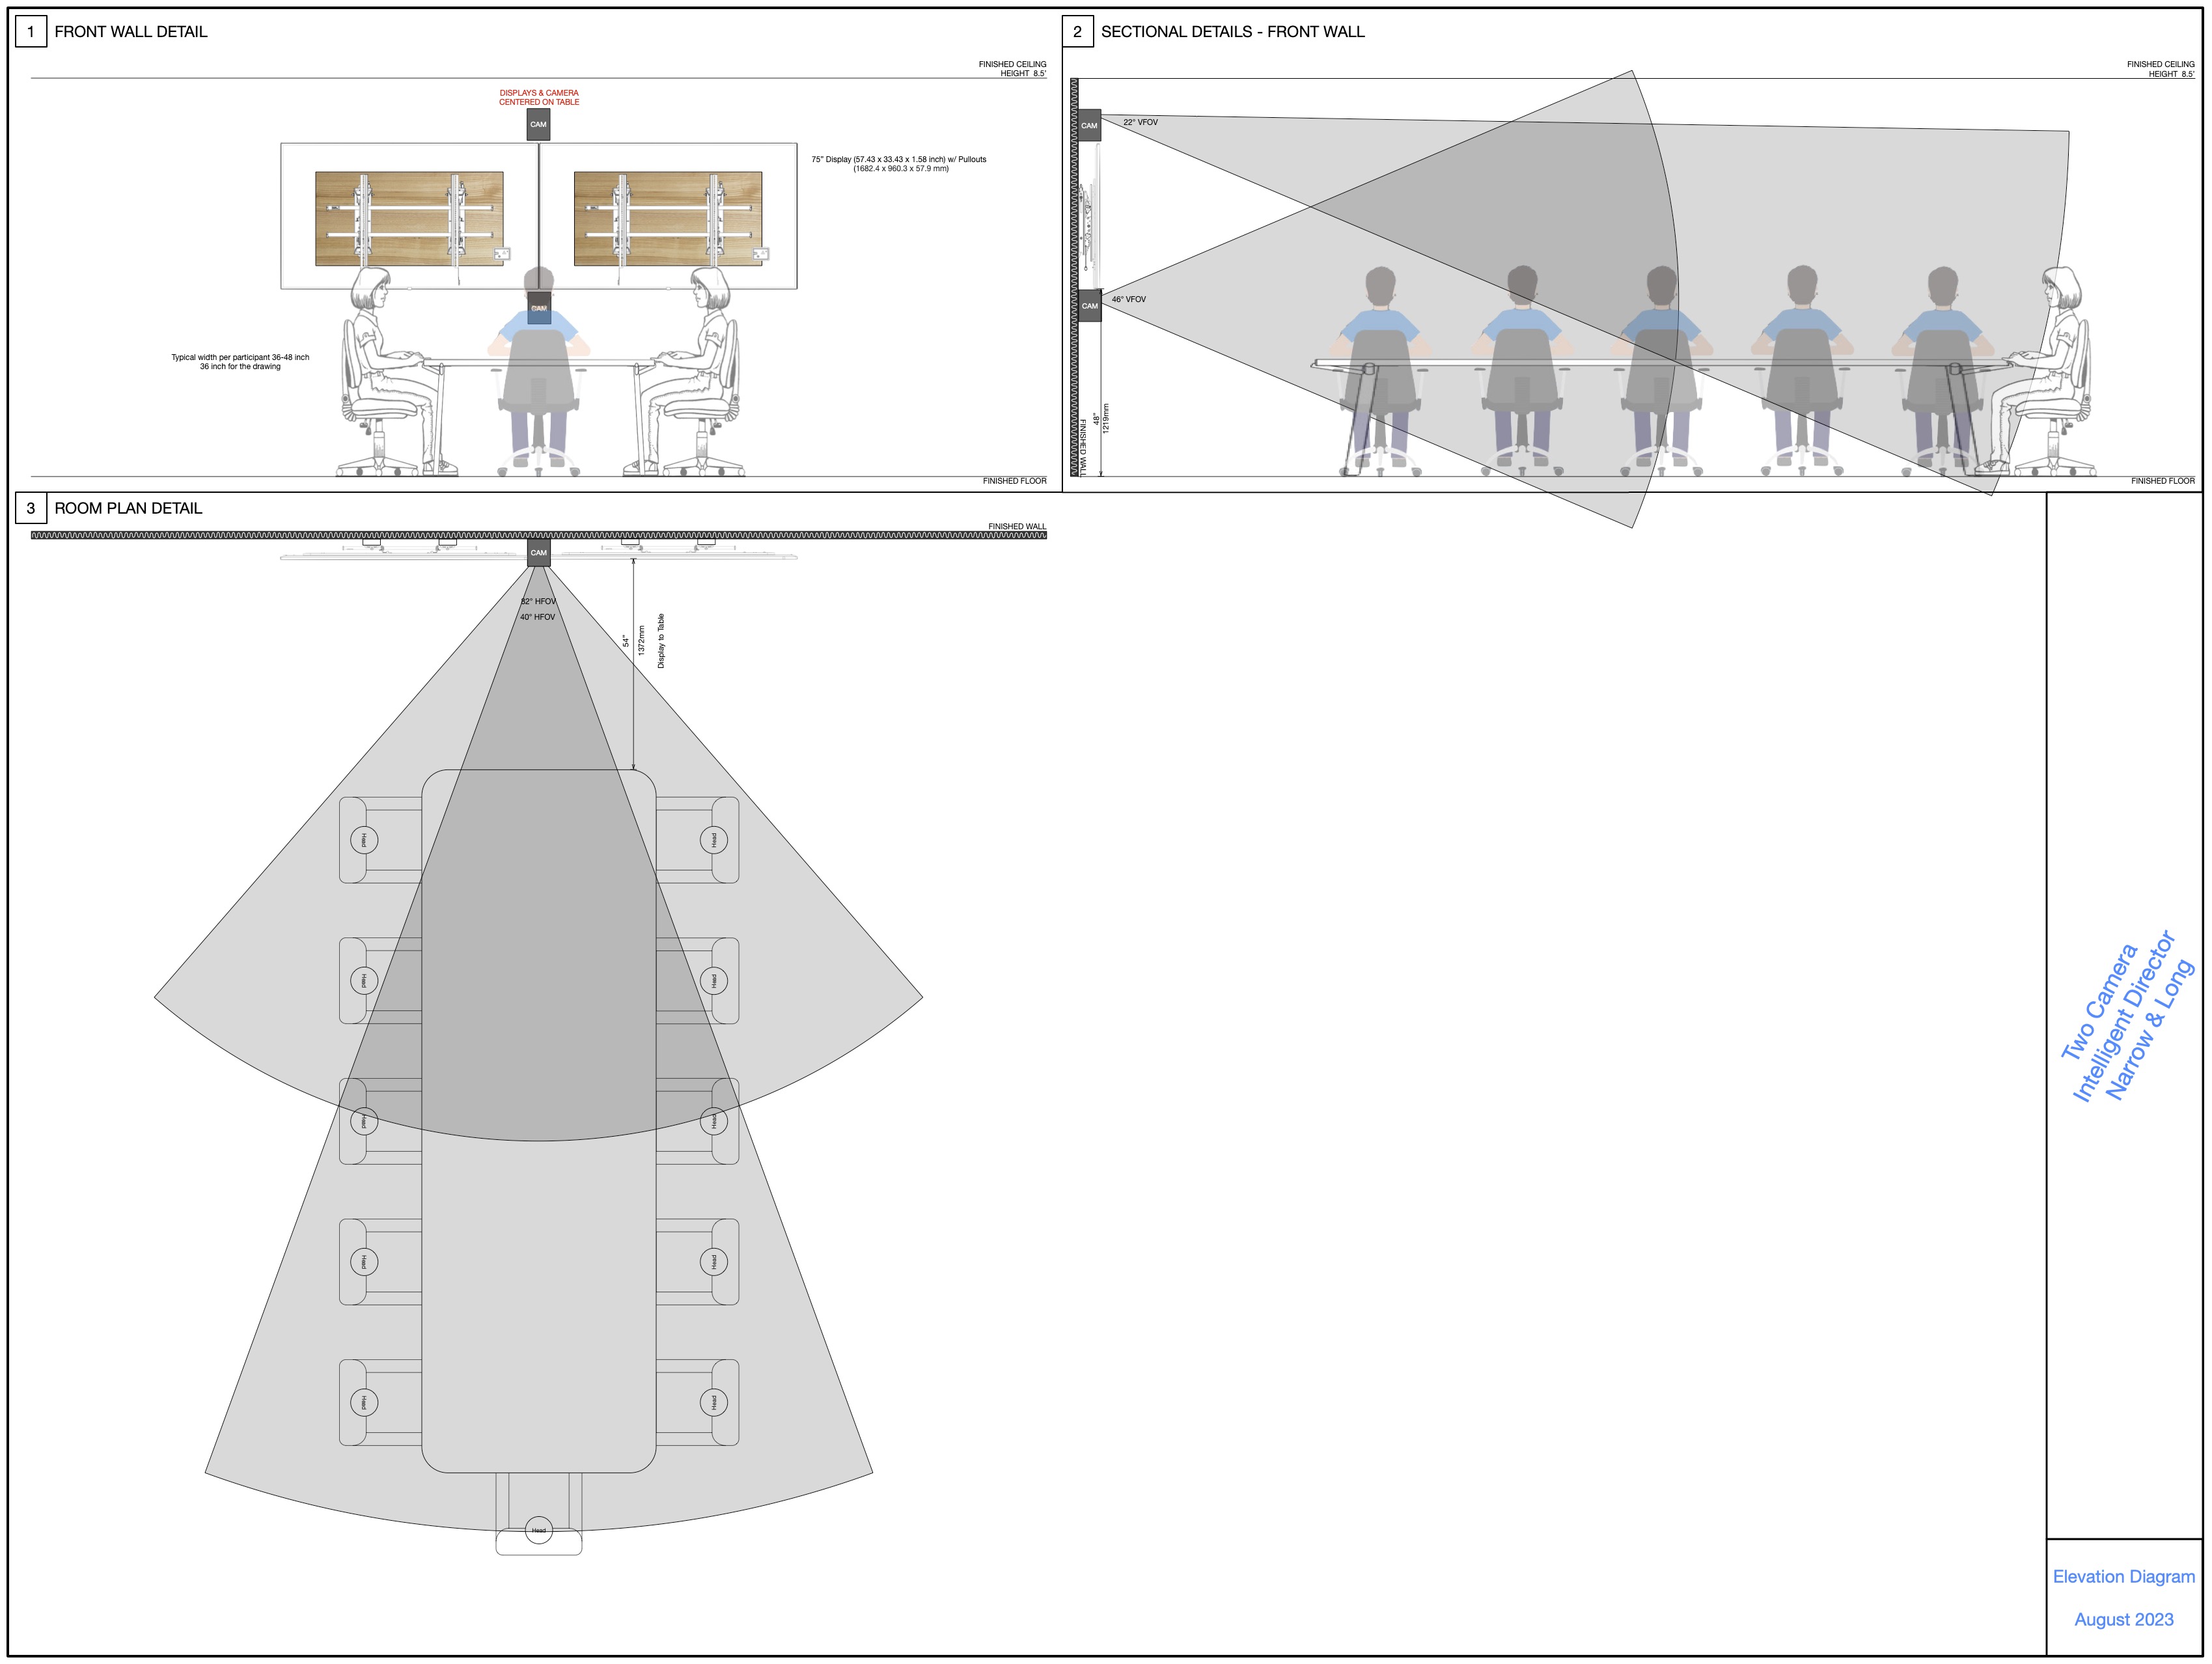
Furniture Layout E: Traditional Conference Spaces (Narrow and Long Table)
- This is a layout that is very common for many conference spaces.
- Both cameras should be zoomed out to a point where any person standing around the table would be captured in the view of the camera.
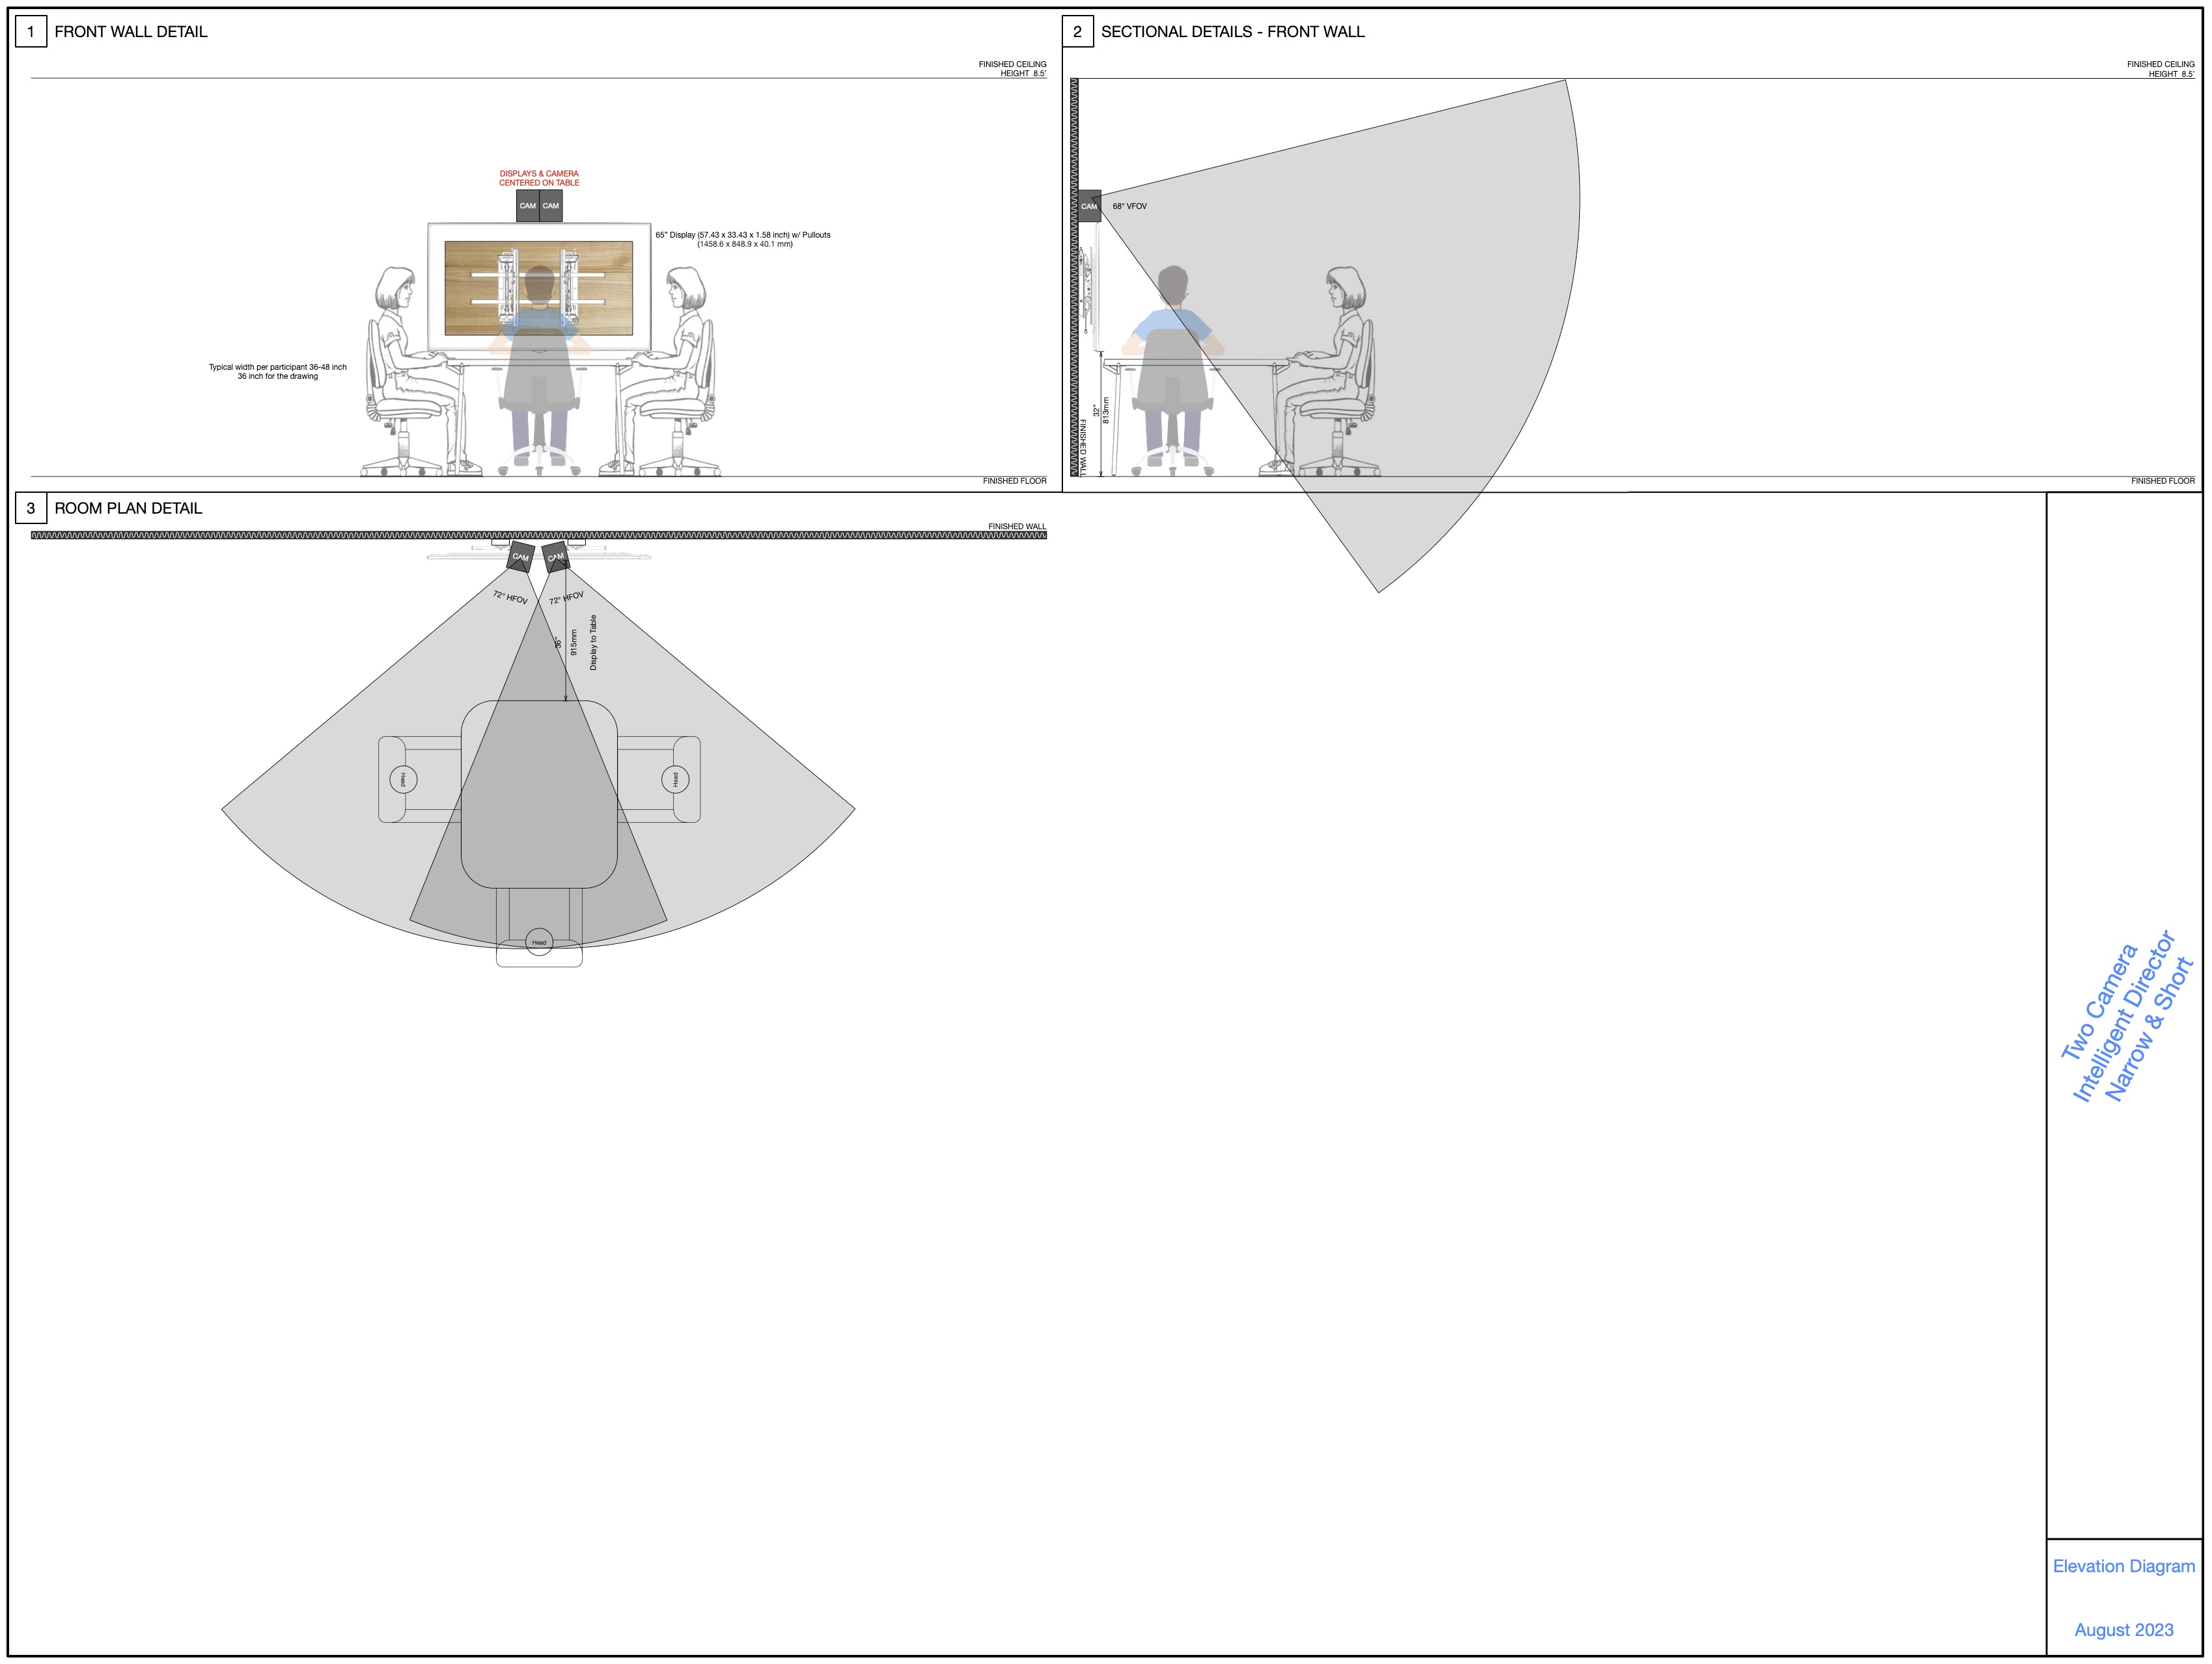
Furniture Layout F: Huddle Spaces (Narrow and Short Table)
- This is a layout that is common for a lot of Huddle Spaces. In rooms where table is butted against the wall, single camera may not have enough horizontal field of view (FOV) to cover the entire table
- All cameras are placed on top of the display to make sure we aren’t capturing too much of the table as well as the table not being in the way to be able to capture participants standing in the room.
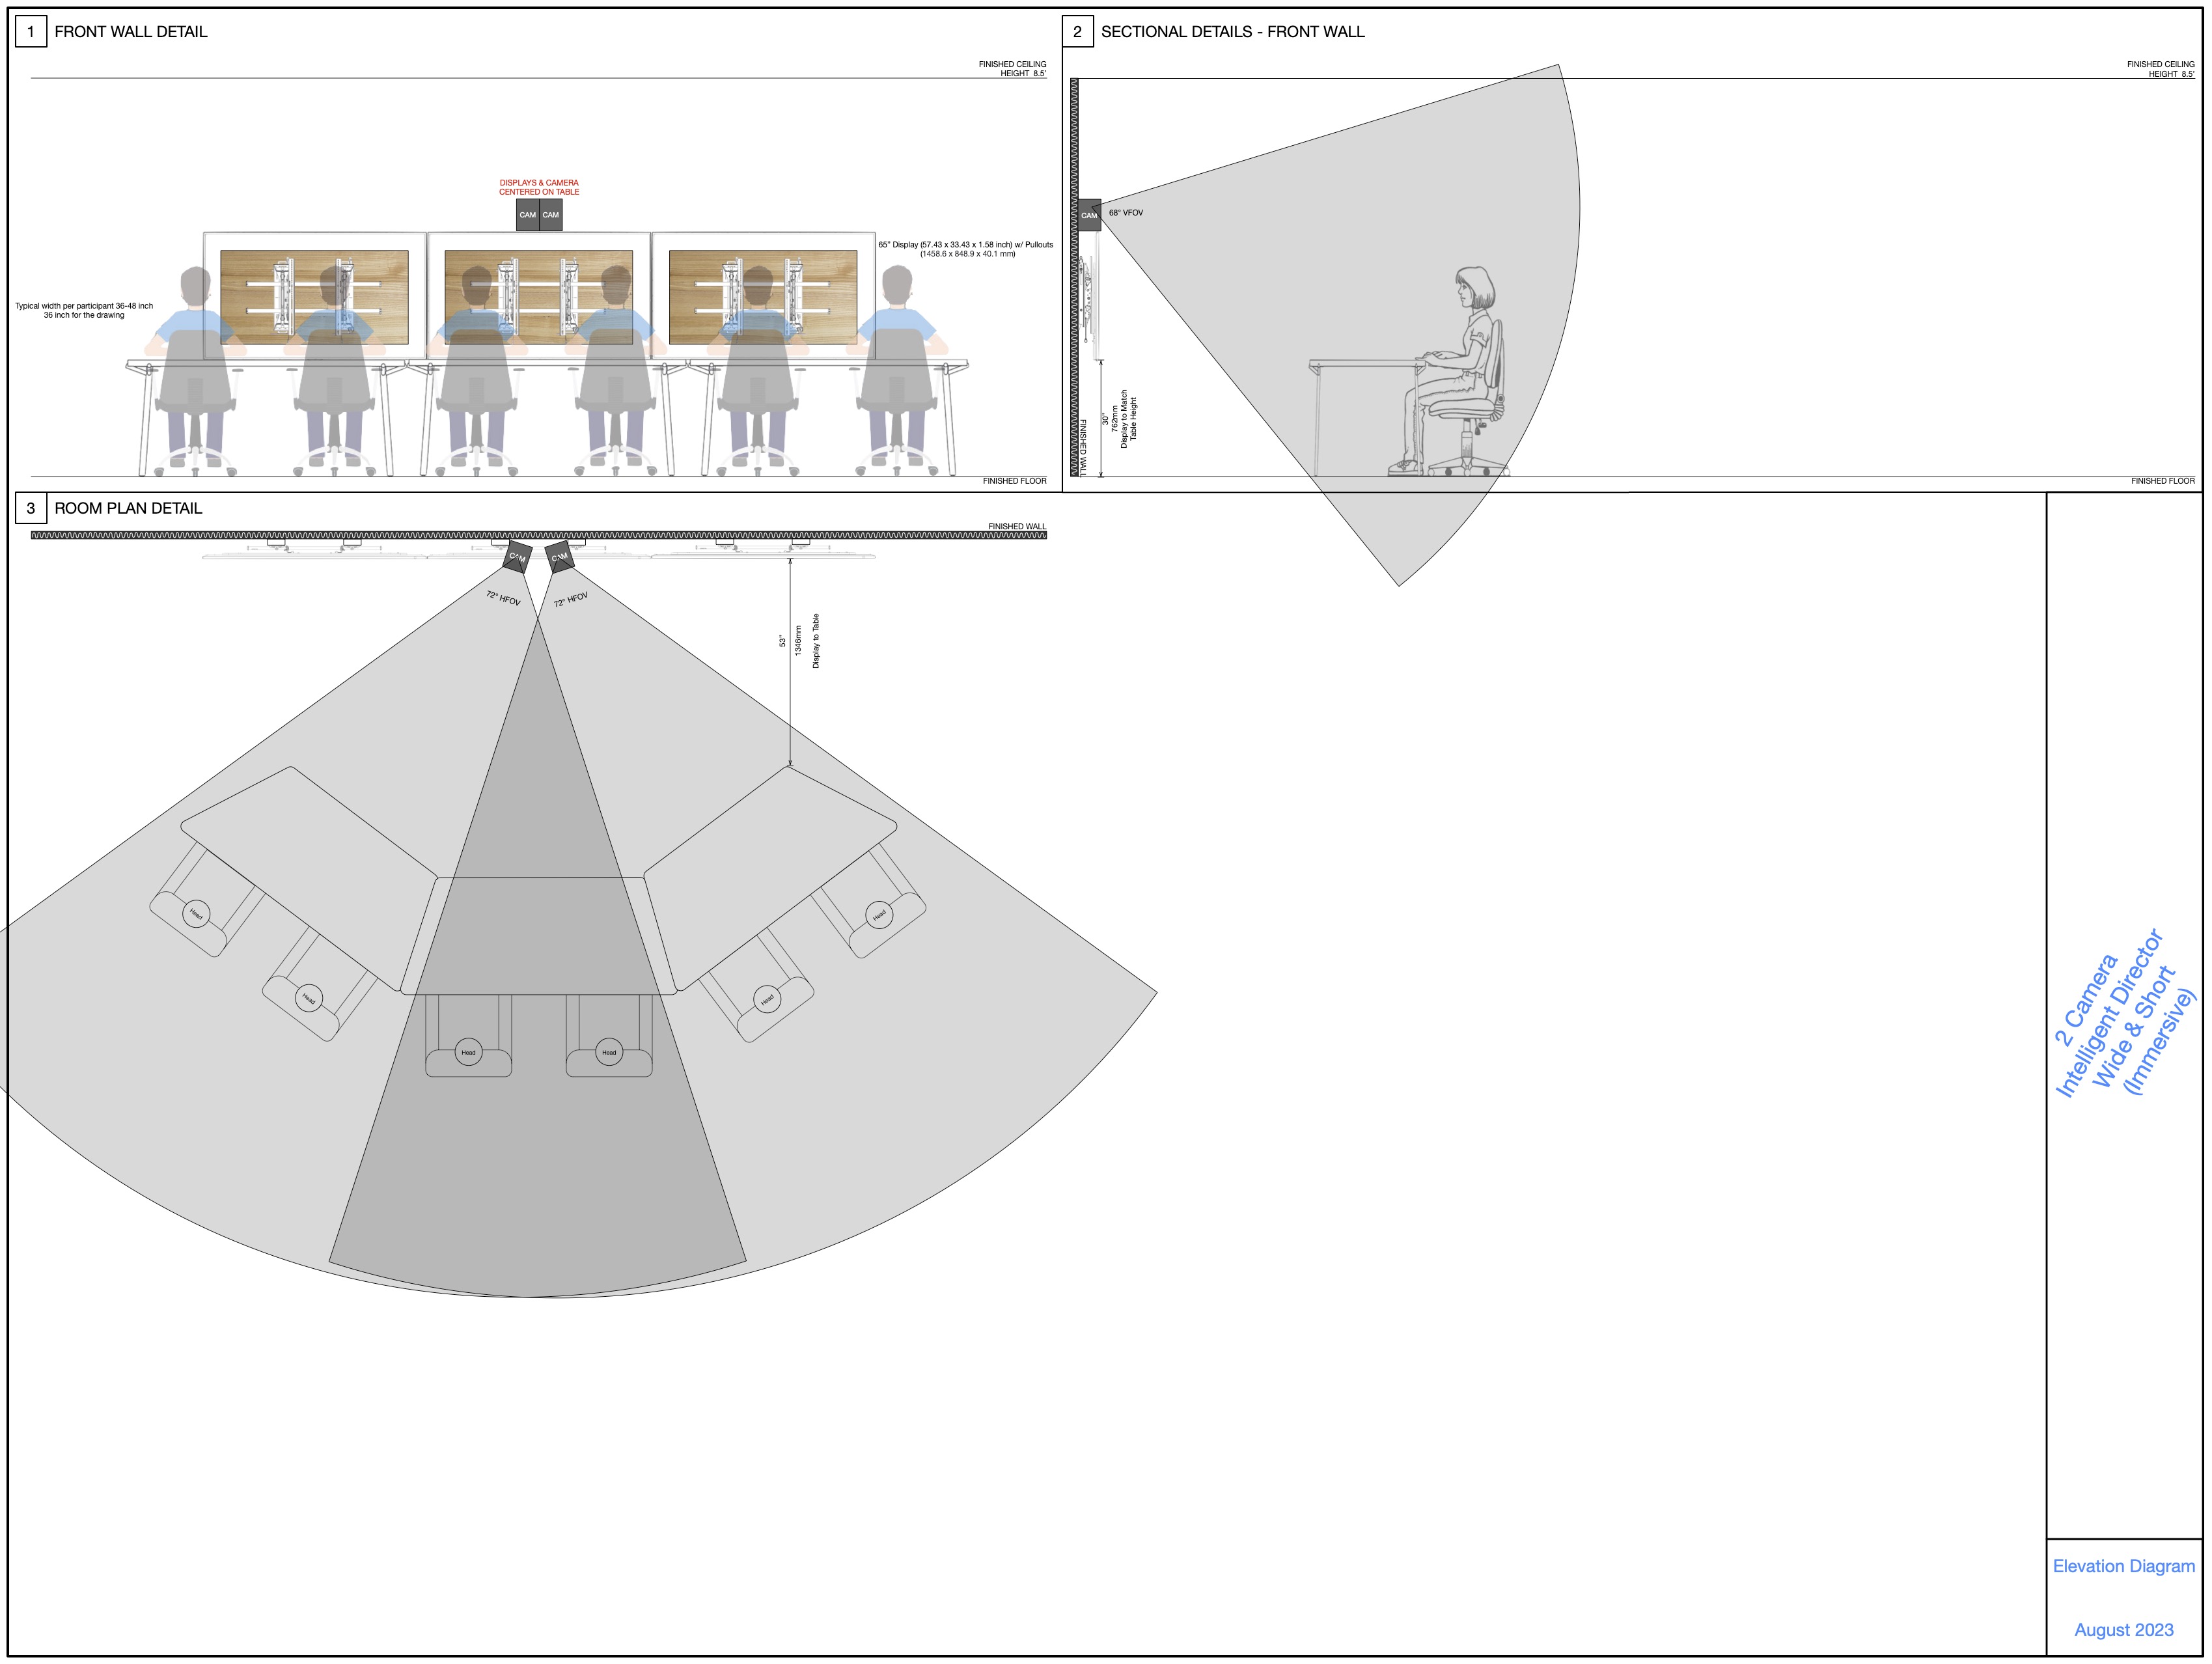
Furniture Layout G: Immersive Collaboration Spaces (Wide and Short Table)
- This is a layout that is common for Immersive Collaboration Spaces. In rooms where multiple displays are along the wide part of the room to create an immersive view, a single camera may not have enough horizontal field of view (FOV) to cover the entire table.
- All cameras are placed on top of the display to make sure we aren’t capturing too much of the table as well as the table not being in the way to be able to capture participants standing in the room.
Download PDF images of example layouts
- Three Camera Room Layouts
- Two Camera Room Layouts


