Using Zoom Huddles
Zoom Huddles are video-enabled virtual coworking spaces designed to foster inclusive discussions, bringing the fluid interactions of in-person work to distributed, hybrid teams throughout their work day. This article guides users through joining a huddle, how to interact with others in a huddle, and how to create a smaller Conversation within a huddle.
Requirements for using Zoom Huddles
- Zoom Huddles enabled
- Zoom desktop app
- Windows: 5.14.0* or higher
- macOS: 5.14.0* or higher
*Some additional features are supported with version 5.16.5, so updating to that version or later is recommended.
Zoom Huddles is a closed beta as of September 2025 and is no longer accepting new beta customers. Customers who currently have access to Zoom Huddles will continue to have access.
Limitations of Zoom Huddles
- Users can only be in one Huddle at a time, and cannot be in a Huddle and a Meeting simultaneously.
- A Zoom Huddle can only be active for a maximum of 30 consecutive hours, at which time it will automatically close for a brief moment before it can be rejoined.
How to create Zoom Huddles
If admins allow all users to create Huddles, users can create new Huddles through the Zoom desktop app. Huddles can be customized with unique names, descriptions, and images.
- Sign in to the Zoom desktop app.
- Click the Huddles
 tab.
tab. - In the top right corner, click New Huddle to create a new Huddle.
- Under Name, enter a name for this huddle. This will be seen by admins and end-users.
- (Optional) Under Description, enter a short description to inform others what this huddle is intended for, such as the huddle being for a specific team or purpose.
- (Optional) Click Add banner to upload a banner image.
Images must be JPG or 24-bit PNG, no larger than 1280 x 1280px, and cannot exceed 2 MB. This image is displayed as part of each Huddle listed in the Huddle tab of the Zoom app, and help provide some flair and customization when viewing available Huddles to join. - (Optional) Click Add wallpaper to upload a wallpaper image.
Images must be JPG or 24-bit PNG, no larger than 1280 x 1280px, and cannot exceed 2 MB. This image is displayed as part of each Huddle listed in the Huddle tab of the Zoom app, and help provide some flair and customization when viewing available Huddles to join. - Click Create to create this huddle.
How to use Zoom Huddles
View and join an available Huddle
Once Zoom Huddles have been created for the account, you can view and join Huddles on your account.
- Sign in to the Zoom desktop app.
- Click the Huddles tab.
The available Huddles will be listed below.
The Huddle’s name, image, and current members are listed for each Huddle. - (Optional) On the left side, filter your view of available Huddles with the available filter options:
- Public huddles: Filter to all available Huddles on your account.
 Recent: Filter by your recently joined Huddles.
 Starred: Filter by your starred Huddles.
 Active: Filter by only currently active Huddles.
 Recommended: Filter by Huddles recommended for you.
- (Optional) For each Huddle listed, click the star to star, or favorite, that Huddle, making it easier to rejoin later.
- Click the Huddle you wish to join.
You will join that Huddle, unless you have the Always show video preview dialog when joining a video meeting client setting enabled, in which case you will see your video preview before clicking Join to join the Huddle.
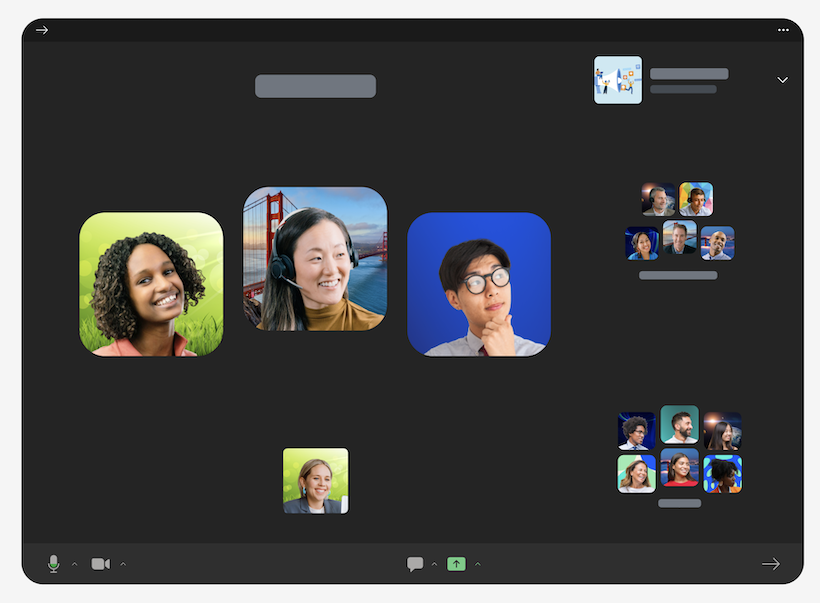
While in a Huddle, you will see video tiles for all other present Huddle participants. Each participant’s tile functions the same as when in a meeting, displaying their initials, profile picture, avatar, or virtual background, but slightly cropped to allow more participant tiles on screen. Conversations, separate smaller groups of participants, are listed to the right of the participants in the main Huddle area.
When someone joins the huddle, an audio notification will be played, letting you know that someone else has joined the Huddle. This audio notification will only sound once a minute, regardless of how many new participants join the Huddle in that minute.
Background music will also begin playing, which can be changed or stopped.
Available Huddle controls
After joining a Huddle, each participant will have the following controls along the bottom of the Huddle window:
- Join Audio
 or Unmute
  / Mute
  : This allows you to connect to the huddle's audio, then once connected, mute or unmute your microphone.
- Audio controls (click ^ next to Mute/Unmute): The audio controls allow you to change the microphone and speaker that Zoom is currently using on your computer, leave computer audio, and access the full audio options in the Zoom settings.
-
- Start Video
 / Stop Video
  : This allows you to start or stop your own video.
- Video controls (click ^ next to Start/Stop Video): If you have multiple cameras on your computer, you can select which Zoom is using, access the full video controls, and select a Virtual Background.
-
- Volume
 : Control if other participants’ audio is heard by you. This will disconnect you from computer audio and mutes your audio as well.
 - React
 : Allows you to use reactions, non-verbal feedback, or raise your hand.
 - Raise
 : Click to raise or lower your hand in the Huddle.
 - Share
 : Opens the standard sharing window, allowing you to choose which screen or open app to share with other participants in the current Huddle.
 - Whiteboards
 : Opens a window to select and share a Whiteboard in the current Huddle.
 - Captioning
 : If manual or automated captions are enabled on your account, click here to access the caption options.
 - Invite
 : Click to invite Zoom contacts or Zoom Rooms to the current Huddle.
Within the right side panel, the following options are available:
- New Conversation: Click to create a private conversation within the Huddle.
- Team Chat
 : Opens the dedicated Team Chat channel for this huddle. This allows participants to continue discussions outside of the Huddle, as well as review and reference these discussions later.
Notes:
- Each Huddle has a dedicated public chat channel created for it, and these channels can be joined manually and accessed through the Team Chat tab directly. Joining a Huddle will automatically add you to the associated Team Chat channel.
- Team Chat can be accessed while in the main Huddle area, but is not available when in a Conversation.
- Music
 : Click to adjust music settings.
To leave a Huddle or Conversation, click the close window button in the top-right (Windows and Linux) or top-left (macOS) corner of the screen, and then select Leave Huddles.
Set a wallpaper
If a wallpaper has been provided for a Huddle, any user can toggle this on or off while in a Huddle.
- While in a Huddle and in the top-right corner, click the ellipsis
 next to the name of the Huddle.
 - Click Show wallpaper / Hide wallpaper.
The wallpaper will be applied to the Huddle window, behind all video tiles and other visuals.
Create a new Conversation
While in a Huddle, you may want to split off from the main group and have a more private conversation or working session with others in that Huddle. Creating a Conversation allows you and others to remain in that overall Huddle, but have your audio and video isolated to just that Conversation. A Conversation will remain active as long as one participant remains, even if the original creator is gone. When the last participant leaves the Conversation or Huddle entirely, the Conversation and associated invite link will no longer be active.
- While in a Huddle, click New Conversation.
Your Conversation will be created and have the same controls as the main Huddle, except for Team Chat. - (Optional) Click the text above the video tiles area and enter a custom name for this Conversation.
This name is visible to everyone in this Conversation and overall Huddle. - (Optional) Click Copy Invite Link to share with others to join this Conversation directly.
Note: All participants for each Conversation are visible by others in the main Huddle area, as well as included in the preview and number of other participants in the overall Huddle when viewed from the Huddles tab.
Manage music in a Huddle
Music will automatically begin playing in a Huddle if you have the Automatically play music when I join the huddle app setting enabled. You can also enable an app setting that will fade the music volume up and down if someone starts speaking. Each participant’s music choice is independent of each other’s, so you can listen to one channel, while others have a different selection.
- When in a Huddle, click Music to see music settings.
The following options will appear:
- Music channels: The first section lists available music channels, each having a particular vibe and intensity, including Chill & Chat, Acoustic Sunrise, Brainstorm, High Energy, Zen Garden.
- Music off: Click to start or stop music in the Huddle. This can also be controlled by the play option
 next to this menu.
 - Settings
 : Access Huddle app settings.
Huddle settings
- Sign in to the Zoom desktop app.
- Click your profile picture, then click Settings.
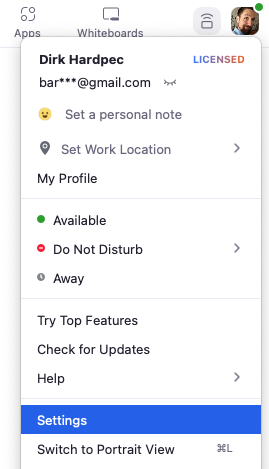
This will open the settings window. - Select the Huddles tab.
The following settings will be available:
- Notifications
- Show notifications for starred huddle is active: Enable to have the Zoom app notify you when a Huddle you have starred is active again.
- Show notifications for new huddle created: Enable to have notifications displayed when a new Huddle is created.
- Remind me to rejoin my last huddle when I am not in a meeting, phone call, or away after X minutes: Enable to have a reminder notification appear when you are not in a meeting, active call, or are idle for more than the minutes specified in the dropdown menu.
-
- In-huddle notifications
- Play join sound when someone joins the huddle. Max one notification every 1 minute: Enable to have an audio notification when someone joins the Huddle. If multiple users join, only one audio notification will play per minute.
-
- In-huddle music
- Automatically play music when I join the huddle: Enable to have music begin playing immediately upon joining a Huddle. Users can stop this music at any time within the Huddle.
- Fase music when someone is speaking: Enable to have the music fade out slightly when speech is detected, and fade back in when speech ceases.
-
- Visibility
- Do not update my status to indicate when I am in a huddle: Enable to not have any status update or other indication you are currently in a Huddle.