Setting up Zoom Contact Center chat bot integration
Contact center admins can integrate Zoom Contact Center with Google Dialogflow ES or Amazon Lex to enable consumers to interact with these chat bots.
Requirements for setting up chat bot integration
Note: For more information on setting up a Kore.ai, ServiceNow, Google Dialogflow ES, or Amazon Lex chat bot, visit the following support sites. Zoom doesn’t provide support for Dialogflow ES or Amazon Lex configurations.
How to set up a chat bot integration
Kore.ai
Learn how to set up the Kore.ai Virtual Assistant connector app.
ServiceNow
- Sign in to the ServiceNow admin portal.
- In the navigator, search for oauth.
- Under System OAuth, click Application Registry.
- Click New.
- Click Create an OAuth API endpoint for external clients.
Note: The default values for most of the fields should be acceptable. Other fields will be filled after the client is created. - Enter the following:
- Click Submit.
- Sign in to the Zoom web portal as an admin with the privilege to edit integration settings.
- In the navigation menu, click Contact Center Management then Integrations.
- Click the Integration Bots tab.
- Click Add Integration Bot, then specify these settings:
- Name: Enter an internal display name to help identify the chat bot.
- Integration Source: Select ServiceNow.
- Instance URL: Enter the instance subdomain.
- Client ID: Client ID automatically generated by ServiceNow OAuth server.
- Client Secret: Client secret for the OAuth applications. Leave it empty for auto-generation.
- Click Test Connection to make sure the connection is authenticated.
- Click Save.
Google Dialogflow ES
- Sign in to the Google Dialogflow console.
- Sign in to the Zoom web portal as an admin with the privilege to edit integration settings.
- In the navigation menu, click Contact Center Management then Integrations.
- Click the Integration Bots tab.
- Click Add Integration Bot, then specify these settings:
- Name: Enter an internal display name to help identify the chat bot.
- Integration Source: Select Google.
- Authentication: Obtain the authentication information from Google Cloud > APIs & Services Credentials > Credentials.
Example:
{
"type": "service_account",
"project_id": "victor-bot-ej9b",
"private_key_id": "*****",
"private_key": "-----BEGIN PRIVATE KEY-----\n*******\n-----END PRIVATE KEY-----\n",
"client_email": "victor@victor-bot-ej9b.iam.gserviceaccount.com",
"client_id": "100891150127753595672",
"auth_uri": "https://accounts.google.com/o/oauth2/auth",
"token_uri": "https://oauth2.googleapis.com/token",
"auth_provider_x509_cert_url": "https://www.googleapis.com/oauth2/v1/certs",
"client_x509_cert_url": "https://www.googleapis.com/robot/v1/metadata/x509/victor%40victor-bot-ej9b.iam.gserviceaccount.com"
}
- Link to Bot Settings: Enter an external link URL to link to. This will insert a shortcut link from the Zoom web portal to the third-party bot settings.
- Click Test Connection to make sure the connection is authenticated.
- Click Save.
Amazon Lex
- Sign in to the Zoom web portal as an admin with the privilege to edit integration settings.
- In the navigation menu, click Contact Center Management then Integrations.
- Click the Integration Bots tab.
- Click Add Integration Bot, then specify these settings:
- Click Test Connection to make sure the connection is authenticated.
- Click Save.
Obtain Amazon Lex authentication information
Note: If you encounter issues, refer to the Amazon AWS support site.
| Field | How to obtain the fieldin AWS |
| botId |
- Sign in to the AWS account.
- In the left-side navigation menu, click Amazon Lex then select a bot.
- In the Bot details section, find the ID field.
|
| botAliasId |
- Sign in to the AWS account.
- In the left-side navigation menu, click Amazon Lex then select a bot.
- In the left-side navigation menu, click Deployment then Aliases.
- In the Details section, find the ID field.
|
| localeId |
- Sign in to the AWS account.
- In the left-side navigation menu, click Amazon Lex then select a bot.
- In the left-side navigation menu, click All languages.
- Take note of the language, then find the relevant language code.
|
| region |
- Sign in to the AWS account.
- In the top-right corner, select a region.
- Take note of the region code next to the region name. Example region code: us-west-2.
|
|
access_key
secret_key
|
- Sign in to the AWS account as a root user.
- Select your account.
- In the top-right corner, click the account name then click Security credentials.
- The Access keys (access key ID and secret access key) section, click Create New Access Key.
If you have IAM access and want to generate security credential for a user:
- Sign in to the AWS account.
- In the left-side navigation menu, click Access management then Users.
- Select a user.
- Click the Security credentials tab.
- Click Create access key.
|
How to add a chat bot integration to a Zoom Contact Center flow
- Sign in to the Zoom web portal as an admin with the privilege to edit flow settings.
- In the navigation menu, click Contact Center Management then Flows.
- Click a flow's display name to edit it.
- In the left-side widgets panel, click and drag Bot onto the preferred location in the flow.
- Select the Bot widget.
- (Optional) Click Rename to change the display name of the widget.
- In the Settings tab, customize these options:
- Bot: Select the bot you want to add to the flow.
- Max Wait Time: Enable the toggle to apply a max wait time to every message sent by the bot to a consumer. Specify the max wait time in seconds. Once this is exceeded after the bot sends a message to a consumer, the flow will route to the widget specified in the exit setting. If an exit is not specified, the engagement will end.
- Click the Exits tab to customize these options:
- Transfer to Staff Service: Specify the route if the consumer requests to be transferred to a live agent. You can route to any widget in the flow. For example, you can route to a chat queue.
- End: Select the widget for when the chat engagement ends.
Example
Note: This section shows an example configuration and is not meant to be a complete configuration guide.
This example shows a simple chat bot flow. If the consumer requests to be transferred to a live agent, the flow routes to a chat queue. If the chat engagement ends, a message is displayed to the consumer.
Flow layout
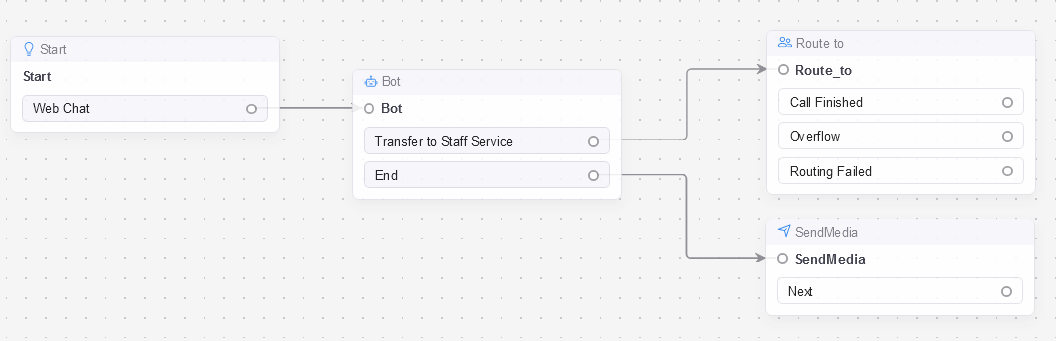
Bot widget
Settings
- Bot: Select the chat bot integration.
Exits
- Transfer to Staff Service: Select the Route to widget.
- End: Select Send Media widget.
Route to widget
- Route to: Select Queue.
- Queue: Select the chat queue with agents to route to.
Send Media widget
- Media Type: Select Text.
- Text 1: Enter Thanks for contacting us.
How to configure Amazon Lex to route a consumer back to the Zoom Contact Center flow
Important: If you encounter issues, refer to the Amazon Lex support site for help. Zoom doesn’t provide support for Amazon Lex configurations.
Once the Zoom Contact Center flow sends a consumer to the Amazon Lex third party bot, the consumer will remain inside Lex until Lex signals back to the Zoom Contact Center that the consumer should be returned to the Zoom Contact Center flow.
Routing from Amazon Lex to the Zoom Contact Center Transfer to Staff Service exit:
- Sign in to the Amazon Lex Portal.
- Configure an intent; for example, TransferToAgent.
- Configure some Sample utterances such as connect to an agent.
- Configure the intent to go to the Closing response step. In the Closing Response step, configure the custom payload {"liveAgentHandoff":true}.
Routing from Amazon Lex to the Zoom Contact Center End exit:
- Sign in to the Amazon Lex Portal.
- Configure an intent, for example EndChat.
- Configure some Sample utterances such as goodbye.
- Configure the intent to go to the Closing response step. In the Closing Response step, configure the custom payload {"sessionEnd":true}.
How to configure Google Dialogflow to route a consumer back to the Zoom Contact Center flow
Important: If you encounter issues, refer to the Google Dialogflow ES site for help. Zoom doesn’t provide support for Google Dialogflow configurations.
Once the Zoom Contact Center flow sends a consumer to the Dialogflow third party bot, the consumer will remain inside Dialogflow until Dialogflow signals back to the Zoom Contact Center that the consumer should be returned to the Zoom Contact Center flow.
Routing from Google Dialogflow to the Zoom Contact Center Transfer to Staff Service exit:
- Sign in to the Dialogflow Portal.
- Configure an intent, for example TransferToAgent.
- Configure some Training Phrases such as connect to an agent.
- Save the intent and download the intent as a .JSON file.
- Edit the JSON file locally and set liveAgentHandoff to true.
- Delete the intent from the Dialogflow website and then recreate the intent by uploading the modified .json file. This will create the intent with the liveAgentHandoff set to true.
Routing from Google Dialogflow to the Zoom Contact Center End exit:
- Sign in to the Dialogflow Portal.
- Configure an intent, for example TransferToEnd.
- Configure some Training Phrases such as goodbye.
- In the Responses section, enable the Set this intent as end of conversation. Do not configure any text response or custom payload on this intent.