Configuring LTI Pro 1.3 app for Schoology
With the LTI Pro 1.3 app, organizations can integrate their Schoology instance with Zoom, allowing instructors to create, launch, and manage Zoom Meetings utilized for their virtual or hybrid classes from within the Schoology LMS.
Requirements for configuring the LTI Pro 1.3 app for Schoology
- Education, Business, or Enterprise Plan
- Zoom Account user with Admin role permissions
- Admin access in Schoology
- LTI Pro app added in the Zoom Marketplace
How to create and install the LTI Pro 1.3 app for Schoology
Create new credentials for the LTI Pro app
- Create a new LTI credential.
- (Optional) Update a credential from LTI 1.1. to LTI 1.3. in the configuration page by choosing LTI 1.3 under Select which LTI version to use.
- Click Save.

You will see an LTI Pro configuration page after clicking Save.
Configure the Approved domains
- In the Zoom Marketplace as an admin.
- Click Manage, then click Apps on Account.
- Find the LTI Pro App.
- Under the Action column, click the
 More icon, then click Configure.
 - Find your LTI credentials and click Edit.
- Under the LTI Credentials tab, navigate to Approved Domains.
- Enter the domains that will be utilized to access the LMS.
Create the LTI 1.3 app in Schoology
- As an admin, log into the Schoology apps page.
- Click Add App.
- Fill in the App Name, Description, Category, and Available for fields.
- For Type of App, select LTI 1.3 App.
- For Can be installed for, select where users will be able to access the app (e.g. Users, Courses, Groups).
- Click the checkbox for LTI Advantage Extensions your App will use.
- Copy and paste the following values from the LTI 1.3 app in the Zoom Marketplace:
- For the JWKS URL in the Schoology configuration page, copy and paste the Publick JWK URL from the LTI Pro app.
- For the Domain/URL in the Schoology configuration page, copy and paste the Target Link URL from the LTI Pro app.
- For the OIDC Login Init URL in the Schoology configuration page, copy and paste the Login Initiation URL from the LTI Pro app.
- For the Redirect URLs in the Schoology configuration page, copy and paste the Tool Redirect URL from the LTI Pro app.
- Click the checkbox for This application meets the Schoology Terms of Use.
- Click Submit.
Configure the Client ID
- Navigate to the Schoology Apps page and log in.
- Next to the newly created Zoom LTI app, click Options.
- In the Zoom Marketplace, navigate the Configuration page for the LTI Pro credentials.
- Click the 3rd Party Credentials tab.
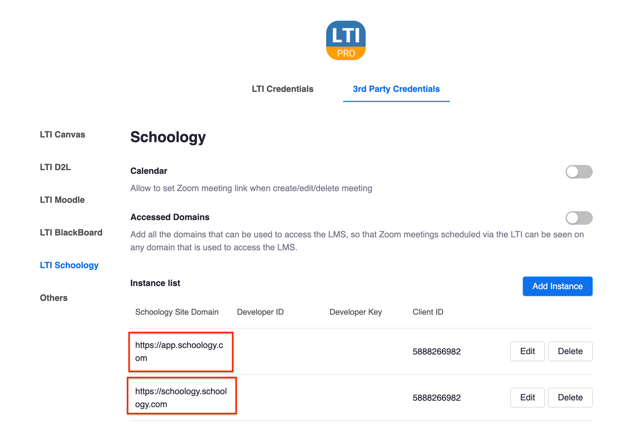
- In the left navigation, click LTI Schoology.
- Click Add Instance.
- In the LTI Schoology Site Domain field, enter the domains used for your Schoology instance.
- Copy the Client ID from your Schoology instance, and paste it into the Client ID field of the LTI Credentials.
- Click Save.
- Repeat steps 6-9 for each domain utilized by your Schoology instance, including the domains https://app.schoology.com and https://schoology.schoology.com.
Add the LTI Pro App to a Schoology Course/Group
- In your Schoology instance, navigate to the App Center and locate the LTI Pro app added in the previous steps.
- Click Install LTI 1.3 app.
- Click I Agree, to authorize access to Schoology by the LTI Pro app.
- Click Continue.
- Click Add to Organization.
- Click the checkboxes next to the Users, Courses, or Groups you want to install the LTI Pro app for.
- Click Submit.
How to launch the LTI Pro App in Schoology
- In Schoology, navigate to the desired course or group.
- Click the LTI Pro app added.
The LTI Pro app will launch within the course or group.