Using webinar session branding
Hosts can use webinar session branding to have more control over their session’s appearance, such as how the panelists are displayed to attendees. Hosts can customize what attendees see by uploading a wallpaper behind the video tiles, setting the virtual background for all panelists, and providing digital name tags for panelists. Hosts can also save the customization as part of a webinar template.
Webinar Session Branding includes the following customizations:
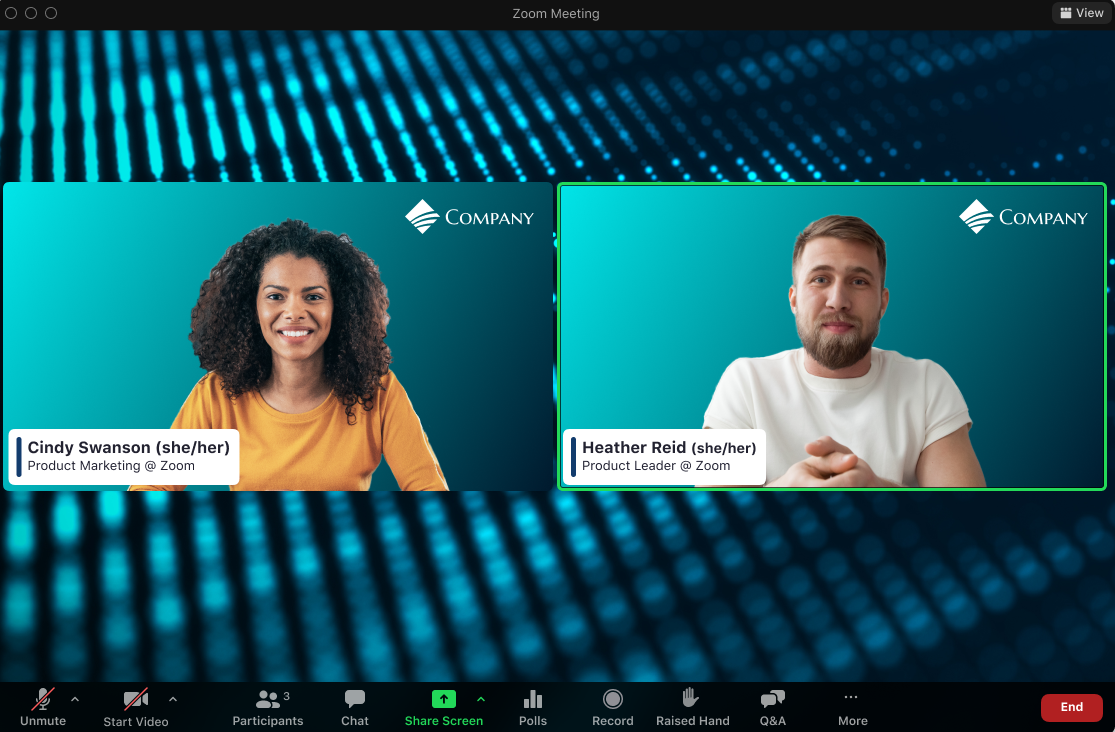
- Wallpaper image: Hosts can make a session unique by uploading a branded wallpaper that is displayed in all views behind the video tiles and shared content.
- Shared Virtual Backgrounds: Hosts can set virtual backgrounds for each panelist, automatically applied when they join the session.
- Name Tags: Hosts can add name tags that are customizable to meet your brand colors. Name tags are automatically applied when panelists join and are displayed while their video is on.
Be sure to consider the following using these customizations:
- How the virtual backgrounds and name tags coordinate with the wallpaper behind them all.
- Text placement on the Wallpaper and how many concurrent video tiles will be shown, thus obscuring more of the wallpaper.
- Color coordination for name tags with your organization’s colors or presentation theme.
- Using a custom gallery view order to arrange video tiles.
- Creating additional name tag templates and uploading extra virtual backgrounds, in case you promote an attendee and want to adjust their branding during the session. You may want these promoted guests to have an appearance that is distinct from your own.
Requirements for using Webinar Session Branding
Notes:
- Panelists who join from a version older than the minimum client version will not receive the assigned virtual background or name tag, and will not be able to see the wallpaper behind their video tiles.
- Attendees who join from a version older than the minimum client version will not be able to see the wallpaper or name tags. They however will see any virtual backgrounds set by panelists.
How to upload a wallpaper
The webinar wallpaper is a wide-screen image that is anchored at the top left of the screen. The wallpaper scales to smaller screen resolutions but does not stretch to fill all remaining black areas when the window is in different aspect ratios.
- After you have scheduled a webinar with Webinar Session Branding, click the Branding tab.
- In the Webinar Wallpaper section, click the Upload button.
- Find and select your image from your device and click Open.
Your uploaded image will be displayed. - (Optional) Click Change to upload and replace the image.
- (Optional) Click Delete to delete your uploaded image.
If a verification dialog appears, click Delete to confirm. - (Optional) In the top right corner of the Webinar Wallpaper section, click Preview Wallpaper to preview how your uploaded image will be displayed in 2 layouts.
- At the bottom of the preview box, preview the following views:
- Click Speaker to preview your uploaded image in Speaker view.
- Click Gallery to preview your uploaded image in Gallery view.
Notes:
- Wallpapers can be JPEG/JPG or 24-bit PNG, with a maximum size of 15 MB.
- Zoom recommends an image in 1920x1080 resolution, but images must be in 16:9 ratio.
- Using a wallpaper and screen sharing during the webinar can increase the size of cloud recordings. This is due to the wallpaper being scaled larger than the shared content, so that the wallpaper is still visible around the shared content in the cloud recording.
How to upload a virtual background
With Webinar Session Branding, you can assign a virtual background to each panelist. These can be coordinated to all be the same, or each panelist can have a separate and unique background.
- After you have scheduled a webinar with Webinar Session Branding, click the Branding tab.
- In the Virtual Background section, click Upload.
- Find and select your image from your device and click Open.
Your uploaded image will be displayed. - (Optional) Hover your mouse over a virtual background tile and click the
 button to delete it. If a verification dialog appears, click Delete to confirm.
 - (Optional) Hover your mouse over a virtual background tile and click Make Default. If a verification dialog box appears, click Save.
- (Optional) Click Preview Virtual Background to preview how your virtual background will be displayed.
- At the bottom of the preview box, click the arrows or numbers to browse your virtual backgrounds.
Notes:
- Virtual backgrounds can be JPEG/JPG or 24-bit PNG, with a maximum size of 15 MB.
- Zoom recommends an image in 1920x1080 resolution.
- You can upload up to 20 images.
Managing virtual backgrounds
- Upload a virtual background.
- Click Manage Virtual Backgrounds.
A Virtual Backgrounds pop-up window will appear. - In the top right corner of the pop-up window, click the
 button to switch between the list and thumbnail views:
- In the tile view, do the following actions:
- Click the Choose Files button to upload additional virtual backgrounds.
- Hover your mouse over a virtual background and click the button to delete it. If a verification dialog displays, click Delete to confirm.
- In the list view, do the following actions:
- Click the Choose Files button to upload more virtual backgrounds.
- Select the check boxes left to the virtual backgrounds to select one or more backgrounds, or click the ellipses
 option to the right of each background. The following options will appear:
- Download: Download the selected virtual background(s).
- Delete Delete the selected virtual background(s)..
If a verification dialog appears, click Delete to confirm.
- Click Done.
How to create a name tag
You can choose to use the provided name tag style, or customize and create your own styles. When creating a new style, you can control the color or the background of the tag as well as the color of the text and the graphical line element.
Notes:
- A default name tag style is provided out of the box for setup, but cannot be edited or deleted.
- In the left preview panel, switch the preview between a desktop or mobile layout by clicking the swap-view icon
 .
.
- After you have scheduled a webinar with Webinar Session Branding, click the Branding tab.
- In the Name Tag Design section, click + Create New.
The Add Name Tag Template window will appear. - In the pop-up window, you can customize your name tag template. Changes are previewed live in the left preview panel:
- Enter the Template name in the text box.
- Select the Text Color.
- Select the Background Color.
- Select the Accent Color.
Note: Select the rainbow option to enter a specific custom color.
- Click Save.
- (Optional) Hover your mouse over a name tag tile and click the button to delete it. If a verification dialog appears, click Delete to confirm.
- (Optional) Hover your mouse over a name tag tile and click Make Default. If a verification dialog box appears, click Save.
Note: You can select the Set this new default for all, including those not currently assigned the default check box to change the default name tag and replace it for all panelists, including those who are not assigned the current default name tag.
Managing name tags
- Create a name tag.
- Click Manage name tag.
A Name tags pop-up window will appear. - In the top right corner of the pop-up window, click the button to switch between the list and thumbnail views:
- In the tile view, do the following actions:
- Click the + Add button to create more name tags.
- Hover your mouse over a name tag and click the button to delete it. If a verification dialog appears, click Delete to confirm.
- In the list view, do the following actions:
- Click the + Add button to create more name tags.
- To the right of a name tag, click the ellipses .
- Click Edit to edit the name tag.
- Click Delete to delete the tag.
If a verification dialog appears, click Delete to confirm.
- Click Done.
How to manage branding appearance before the session
- After you have scheduled a webinar with Webinar Session Branding, click the Branding tab.
- At the top right corner of the Branding tab, click Manage Appearance.
A Panelists pop-up window will appear. - (Optional) Click the Invite tab to invite additional webinar panelists.
The host's, any alternative hosts’, and any invited panelists’ custom brandings are previewed and are ready for customization. The name tag and background will be set automatically when you join, so you can focus on other preparation tasks on the day of the event.
In the top right corner of the Preview tab, click the button to switch between the list and panelists preview views:
Editing branding in the panelist preview view
- In the preview image view, click the pencil icon
 on a preview image to edit the panelist preview.
 - (Optional) In the Panelist Preview window, switch the preview between a desktop or mobile layout by clicking the swap-view icon .
- (Optional) If you have multiple preview images, at the bottom of the preview, click the numbers or arrows to scroll through each panelist’s preview.
- Under Branding, edit your name tag and virtual background:
- Under Name Tag, enter the panelist’s information into the Name, Description, and Pronouns fields.
The entered information will appear in the name tag preview.
- Choose a name tag design that you created to display in the panelist preview.
- Under Virtual Background, select an uploaded virtual background to display in the panelist preview.
- Click Save.
Editing branding in the list view
In the list view, you can edit and enter information under different columns for each panelist.
- Under Host and Panelist, click the host or panelist’s name to edit.
An editable text box will appear. - Under Description, click the text box and enter a descriptive label. Press Enter to save the label.
- Under Virtual Backgrounds, click the drop-down menu to display and choose from your uploaded virtual backgrounds.
- Under Name Tag, click the drop-down menu to display and choose from your created name tags.
- Under View, click Preview.
You will be directed to the Panelist Preview window. - Click Done.
Adding more branding
You will always have the option to add more branding to your webinar in the Preview tab.
- At the bottom of the Preview tab window, click + Add more branding.
- Select if you want to Add new name tag template or Add new virtual background.
How to manage branding appearance during the session
While Zoom certainly recommends configuring branding before the webinar, flexibility and adaptability are important for live webinars, thus the host can also adjust branding appearances for each panelists and any attendees promoted to panelist during the webinar.
- Hover your cursor over the video tile you want to adjust and click the ellipses button.
- Click Change Panelist Appearance.
A window similar to the Panelist Preview window in the web portal will open. - Choose a name tag template, add their name and other details, and select a virtual background.
- Click Apply.