Windows | macOS
Sharing your desktop, screen, or content
- In the meeting or webinar controls toolbar, click Share
 .
.
The screen share modal will open. - At the top of the screen share modal, click Screens, Documents, or Advanced.
Note: Some options may not be available if they are disabled by admin in account settings.
- Screens tab
- Share your entire screen or specific application windows. Hold the Shift key (macOS) or the Ctrl key (Windows) to select more than one application.
- Documents tab
- Whiteboard: Share a Zoom Whiteboard.
- Docs: Share a Zoom doc to collaborate together during a meeting.
- Document repositories: Share a file from a third-party sharing service like Google Drive or Dropbox. Follow the on-screen prompts to sign in to the third-party service and grant Zoom access. Alternatively, you can open the file in a web browser then share the browser window. For example, to share a Google Doc, open the Doc in Chrome, then share the Chrome window.
- Advanced tab
- Video file: Share locally stored video content through Zoom's native video player.
- Clips: Select a Zoom Clip to play in the meeting or webinar. Once you start sharing a clip, it will play for everyone. You can pause or resume the clip as needed.
- Second camera: Share a secondary camera connected to your computer; for example, a document camera or the integrated camera on your laptop.
- Computer audio: Only share your computer's audio (your selected speaker in your audio settings). Select the down arrow icon
 to the right of Computer Audio option to view audio options and switch between Mono and Stereo (high fidelity) audio options.
 - iPhone/iPad via AirPlay: Share your iOS screen through AirPlay.
- iPhone/iPad via cable: Share your iOS screen through a wired connection.
- Portion of screen: Share a portion of your screen represented by a green border. You can adjust the border as needed during the share by clicking and dragging any side or corner.
- (Optional) In the Presenter layout panel on the right, choose from presenter layout options.
Note: These options are not available to all screen share content types. - (Optional) Below Share options, enable the following features as needed:
- Share sound: If you select this option, any sound played by your computer will be shared in the meeting. Click the down arrow icon to switch between Mono and Stereo (high fidelity) audio options.
- Optimize for video sharing: Select this if you will be sharing a video clip in full-screen mode. Do not check this otherwise, as it may cause the shared screen to be blurry.
Note: When Optimize for video sharing is enabled, the receiving device will see a green border around the shared content; the green border can't be disabled. - Share to breakout rooms: Allows the host or co-host to share their screen from the main session directly into all open breakout rooms.
- (Optional) Select Show Zoom windows if you want to the Zoom app during screen share, which can be useful if a participant is helping you use Zoom.
- Click Share.
When the sharing process is started and 80% of devices acknowledge receiving the shared screen, you will see a notification banner stating Participants can now see your shared screen, or whatever you have chosen to share. - (Optional) On the meeting controls menu, hover over You are screen sharing, then click the drop-down arrow
 , to view the screen shared with your participants. To stop viewing the screen shared, click the up arrow
  .
.
Notes:
- Zoom will automatically switch to full screen to optimize the shared screen view. To exit full screen, click Exit Full Screen in the top-right corner or press the Esc key.
- To disable automatic full screen when viewing a shared screen, adjust the Window size when screen sharing behavior in your desktop app settings.
- If you selected Second camera, click Switch Camera in the top-left corner to switch the shared camera.
- The preview of your shared screen is available when doing a simultaneous screen share, and sharing a video.
- Advanced screen sharing settings, controlling who and how many can share, as well as who can interrupt someone else's share, are also available for the host.
Controls when screen sharing
When you start sharing your screen, the meeting controls will move into a floating toolbar that you can move around your screen.
Note: Some of the options detailed below may not be visible due to account admin restrictions or the feature is only visible to the meeting host or co-host.
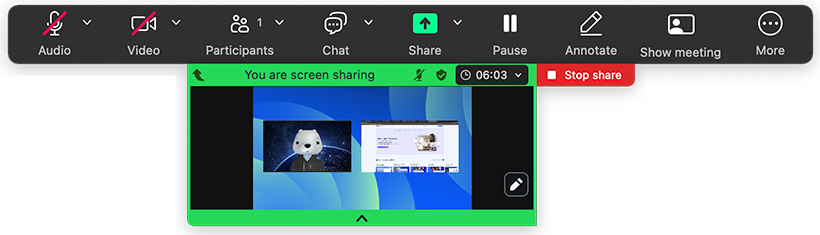
- Stop share: Stop sharing your screen.
- Audio: Mute or unmute your microphone.
- Video: Start or stop your in-meeting video.
- Participants: View or manage the participants (if you're the host).
- Click the down arrow to access Invite, where you can invite others to join the meeting.
- Chat: Open the chat window.
- Share
- Pause / Resume: Pause or resume screen sharing.
- Layout: Manage the presenter layout.
- Annotate: Display annotation tools for drawing or adding text on the screen share.
- Show / Hide meeting: Show or hide the participants and screen share content from your personal view.
- More: Hover over More for additional options.
- Record: Start a computer or cloud recording.
- Transcript: If you have enabled closed captioning and live transcription for your account, click here to access those options.
- Breakout rooms: Start breakout rooms.
- Polls/quizzes: Create, edit, and launch your polls or quizzes.
- Start focus mode
- Enable / Disable annotation for others: Allow or prevent the participants from annotating on your shared screen.
- Show / Hide names of annotators: Show or hide the participants' name when they are annotating on a screen share. If set to show, the participant's name will briefly display beside their annotation.
- Hide floating meeting controls
- Share computer sounds
- Optimize for video sharing
Note: Do not enable this setting if you are not sharing a full screen video clip, as it will blur your screen share. This should be enabled/disabled before and after the video you wish to play.
Show Zoom windows during screen share
By default, the Zoom window is not shared while sharing your screen. Showing the Zoom window during screen share can be useful if a participant is helping you use Zoom.
To show Zoom windows during screen share:
- Sign in to the Zoom web portal.
- In the navigation menu, click Settings.
- In the In Meeting (Basic) section, make sure Show Zoom windows during screen share is enabled. This setting will allow the setting to appear in the desktop app.
- Sign out of the Zoom desktop app and sign back in. Alternatively, you can exit the app and re-open it.
- Click your profile picture, then click Settings.
- Click the Share screen tab.
- Under When I share, click the Show my Zoom Workplace Application and meeting windows toggle to enable it.
Use dual monitors
If you are using a dual-monitor setup, you can turn on the dual windows feature to see the screen sharing on one monitor and participants on the second.
Note: On macOS 10.15 Catalina, you need to allow Zoom access to screen recording to share your screen. You can do this in your System Preferences. Select the Security & Privacy option, click the Privacy tab, scroll down to Screen Recording, and finally check the option for zoom.us.
Linux
Share your desktop, screen or content
To share your screen or content:
- In the meeting controls toolbar, click Share .
- Select one of these screen share options:
- Basic: Share your entire desktop, specific application window, or whiteboard.
- Advanced
- Portion of Screen: Share a portion of your screen represented by a green border. The border can be adjusted as needed during the share by clicking and dragging any side or corner.

- Music or Computer Sound Only: Only share your computer's audio (your selected speaker in your audio settings). Select the down arrow ˅ just to the right of Music or Computer Audio option to view audio options and switch between Mono and Stereo (high fidelity) audio options.

- (Optional) Enable these features, located in the bottom-left corner of the share window:
- Share Computer Sound: If you check this option, any sound played by your computer will be shared in the meeting. Select the down arrow just to the right of the Share Computer Sound option to switch between Mono and Stereo (high fidelity) audio options.
- Optimize Screen Sharing for Video Clip: Check this if you will be sharing a video clip in full screen mode. Do not check this otherwise, as it may cause the shared screen to be blurry.
Note: When Optimize for video sharing is enabled, the receiving device will see a green border around the shared content; the green border can't be disabled. - Share to breakout rooms: Allows the host or co-host to share their screen from the main session directly into all open breakout rooms.
- Click Share.
When the sharing process is started, you will see a notification banner stating Participants can now see your shared screen, or whatever you have chosen to share. - (Optional) On the meeting controls menu, hover over You are screen sharing, then click the drop-down arrow , to view the screen shared with your participants. To stop viewing the screen shared, click the up arrow .
Notes:
- Zoom will automatically switch to full screen to optimize the shared screen view. To exit full-screen, click Exit Full Screen in the top-right corner or press the Esc key.
- To disable automatic full screen when viewing a shared screen, adjust the Window size when screen sharing behavior in your desktop app settings.
- If you selected Content from 2nd Camera, click Switch Camera in the top-left corner to switch the shared camera.
- Advanced screen sharing settings, controlling who and how many can share, as well as who can interrupt someone else's share, are also available for the host.
Controls when screen sharing
When you start sharing your screen, the meeting controls will move into a menu that you can drag around your screen.
Note: Some of the options detailed below may not be visible due to account admin restrictions or the feature is only visible to the meeting host or co-host.

- Mute/Unmute: Mute or unmute your microphone.
- Start/Stop Video: Start or stop your in-meeting video.
- Security: Access in-meeting security options.
- Participants: View or manage the participants (if the host).
- Click the down arrow to access Invite, where you can invite others to join the meeting.
- New Share: Start a new screen share. You will be prompted to select which screen you want to share again.
- Pause Share: Pause your current shared screen.
- Annotate: Display annotation tools for drawing, adding text, etc.
- Polling: Allows you to create, edit, and launch your polls. The options to create or launch polls will open up the Zoom web portal in your default browser. When the poll closes, you can view the results and can download the full poll report. If a poll has already been created, both host and co-host can launch the poll, but only the host can edit or add polls to the meeting.
- More: Hover over more for additional options.
- Chat: Open the chat window.
- Record on this Computer: Start a local recording.
- Record to the Cloud: Start a cloud recording.
- Meeting Info: Shows the current meeting's ID, host, passcode, invite link, your participant ID, and encryption status.
- Allow/Disable participants annotation: Allow or prevent the participants from annotating on your shared screen.
- Show/Hide Names of Annotators: Show or hide the participants' name when they are annotating on a screen share. If set to show, the participant's name will briefly display beside their annotation.

- Hide / Show video panel
- Audio Settings: Open the audio settings in the client.
- Video Settings: Open the video options in the client.
- Share Computer Sound
- Optimize Share for Full-screen Video Clip
Note: Do not enable this setting if you are not sharing a video clip, as it will blur your screen share. This should be enabled/disabled before and after the video you wish to play. - End Meeting: Leave the meeting or end the meeting for all participants.
When using dual monitors
If you are using a dual-monitor setup, you can turn on the dual monitors feature to see the screen sharing on one monitor and participants on the second.