Creating an interactive voice response system
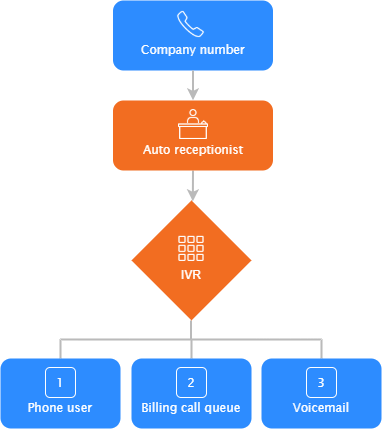
Account owners, admins, and auto receptionist operators can route an auto receptionist to an interactive voice response (IVR) system. An IVR system allows callers to select routing options using the dial pad. For example, after a caller is connected to the auto receptionist, the IVR system can present these choices:
- Dial 1 to connect to a phone user
- Dial 2 to connect to billing (call queue)
- Dial 3 to leave a voicemail
The following diagram illustrates this setup:
You can also add a dial-by-name directory as part of the IVR system and enable speech recognition for navigating IVR menus.
Requirements for creating an interactive voice response system
- Either a Zoom Workplace license with Phone included, or a standalone Zoom Phone calling plan
- Account owner, admin, or auto receptionist operator privileges
IVR routing options
When creating or editing an IVR system, you can set or customize these routing options:
- Leave Voicemail to: Route the caller to the voicemail belonging to one of these extensions.
- Voicemail Greeting: Select a greeting from the drop-down menu or click Audio Library to select, record, or upload custom audio.
Note:
- If routing to another extension's voicemail, the voicemail greeting you set will override the greeting set for that extension.
- If you're routing to a phone user's voicemail, select Follow User Voicemail Greeting in the drop-down menu to use the phone user's greeting instead of selecting a replacement.
- Forward to: Route the caller to one of these extensions.
- User
- Zoom Room
- Common Area
- Cisco/Polycom Room
- Agents

- Auto Receptionist
- Call Queue
- Shared Line Group
- Zoom Contact Center
- Partner Contact Center: Account owners and admins can integrate Zoom Contact Center (ZCC) with Zoom Phone (ZP) natively through the admin web portal. They can route calls to ZCC voice flows and numbers from auto receptionists, call queues, shared line groups, and other routing options. Admins can view and select published ZCC voice flows with assigned phone numbers. They can also set ZCC numbers as outbound caller IDs for users, rooms, and common areas.
Note: Contact Center has been renamed to Partner Contact Center. This option is used to route calls from Zoom Phone third-party contact centers. - External Contacts: If the account has a directory of external users, you can route calls to an external contact.
Note: You must select this checkbox: I acknowledge that calls forwarded to the PSTN will be billed based on usage. Calls can only be forwarded to the PSTN from a user, call queue, or auto-receptionist that has a direct phone number assigned. - Phone Number (external phone number): To enable this option, you must have a direct number assigned to the associated auto receptionist.
Notes:
- You must select this checkbox: I acknowledge that calls forwarded to the PSTN will be billed based on usage, per the terms of my calling plan. Calls routed to an external phone number will be billed at the plan rate.
- Make sure to select the correct country/region in the drop-down menu so you can add the external phone number. Some countries share the same country code, but appear to have separate entries in the drop-down menu.
- Dial by name: Route to the dial-by-name directory.
How to create a single-level IVR menu
Follow these steps to create a simple IVR menu that contains one level. In other words, it doesn't route to secondary IVR menus to present more routing options to callers.
- Sign in to the Zoom web portal as an admin with the privilege to edit account settings.
- In the side menu, click Product configuration, then click Phone system, followed by Auto Receptionists.
- Click an existing auto receptionist or create a new one.
- Change the auto receptionist settings as needed.
- To the right of Route to, click Edit.
A pop-up window will appear. - In the window, click the dropdown menu and select Interactive Voice Response (IVR), then click OK.
- In the IVR Menu section, click Edit and customize these settings:
- IVR Greeting Audio Prompt: Use the following actions:
- Click Default
 to use and listen to the default IVR greeting audio prompt.
 - Click Edit
 to customize the IVR greeting audio prompt and choose from the following options:
- Timeout Options: Set the timeout option for the IVR system.
- When Allow callers to navigate IVR by voice is enabled:
- Caller Takes No Action or Says Nothing After: Click the dropdown menu and set the number of seconds until the IVR system times out when the caller takes no action.
- Play audio prompt: Set the number of times (1 to 5) the IVR prompt plays for callers who don’t press an IVR menu option or press an invalid option. After the set number of prompts, the caller is routed based on the routing setting.
- And then: Select the routing setting. You can choose how you want to disconnect the call and how you want to forward the call.
- When Allow callers to navigate IVR by voice is disabled:
- Caller Takes No Action or Says Nothing After: Set the number of times (1 to 3) the IVR prompt plays for callers that don’t press an IVR menu option or press an invalid option. After the set number of prompts, the caller is routed based on the routing setting.
- Then: Select the routing setting. You can choose how you want to disconnect the call and how you want to forward the call.
- Allow callers to navigate IVR by voice: Click the toggle to enable or disable it, then click Confirm.
When enabled, speech recognition can be used for navigating IVR menus. This feature allows callers to navigate IVR menus using voice commands instead of pressing keys on their phone. The speech recognition capability understands English language commands. - Allow dial by extension: Click the toggle to enable or disable it, then click Confirm.
When enabled, callers are allowed to dial an extension to reach users, common areas, call queues, auto receptionists, and shared line groups on this account. - Voice Input Confidence Score: Set the confidence levels (Low, Medium, or High) that are used to proceed to the next step.
Note: You can only set the confidence levels when Allow callers to navigate IVR by voice is enabled. - IVR menu: To the right of a key, click Edit to customize routing options for the selected key.
- Click Save.
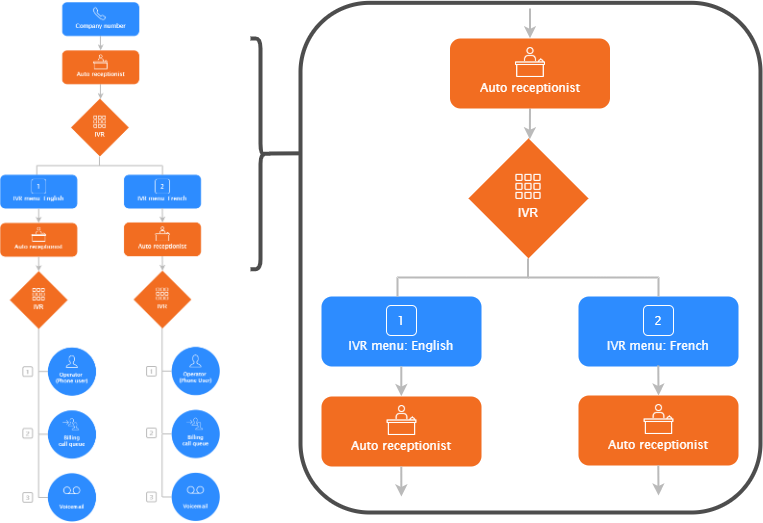
How to create a multi-level interactive voice response (IVR) system
If you require a hierarchical IVR system that allows callers to select routing options, you can create a multi-level IVR.
For example, if your organization provides services in English and French, your first-level IVR menu can prompt callers to select a language. The second-level menus can prompt callers to dial a phone user, route to a call queue, or leave a voicemail. The following diagram illustrates this setup that contains three IVR menus:

When creating a multi-level IVR, focus on a single branch and start at the lowest levels that don't lead to another auto receptionist, then work your way up to the first menu that will be assigned to your main company or site number.
If you're creating a complex IVR system with many menus, consider a diagram like the one above to visualize everything you need to create.
Create routing options
Start at the bottom of your IVR system's hierarchy and create the routing options for the low-level auto receptionists. Repeat this for each branch of your IVR system.
Create an IVR menu with your routing options
After creating your routing options, follow the steps to create an IVR menu and add the routing options you created. Repeat these steps to create additional routing options and IVR menus for each branch of your IVR system.
Create an IVR menu that routes to an auto receptionist
After creating the low-level auto receptionists, you need to create a separate IVR menu to route to the auto receptionist you previously created:
- Create an auto receptionist.
- To the right of Route to, click Edit.
A pop-up window will appear. - In the window, click the dropdown menu and select Interactive Voice Response (IVR), then click OK.
- In the IVR Menu section, click Edit.
- To the right of a key, click Edit.
A pop-up window will appear. - In the window, under Action, click the dropdown menu and select Forward to Auto Receptionist.
- Under Target, search for or enter the name of an auto receptionist you previously created, then select it.
- (Optional) Under Voice Input (Optional), enter the voice input.
- (Optional) Under Voice Input Synonyms (Optional), enter the synonyms for the voice input.
- Repeat these steps for all low-level auto receptionists you created.