Customizing webinar branding settings
You can customize your webinar registration page with a color scheme, title, banner, logo, and speaker information, including descriptions and profile pictures for up to three speakers. The speaker information is also included in the webinar invitation email and webinar attendee confirmation email.
You can also designate a post attendee URL that users will be redirected to from the Zoom launcher page and customize the social media description that will be included when your registration link is shared on Facebook or LinkedIn.
Users can customize these settings when they schedule a webinar that requires registration. Admins can customize account-level webinar branding settings. Admins can also customize webinar email settings.
Requirements for customizing webinar branding settings
How to access and manage webinar branding settings
Account
To manage webinar branding settings for all users in the account:
- Sign in to the Zoom web portal as an admin with the privilege to edit account settings.
- In the navigation menu, click Account Management then Account Settings.
- Click the Webinar tab.
- Under Branding, customize webinar branding settings for your account. Customizing these settings will apply them as defaults for all users in the account. Hosts will be able to change these settings for their webinars.
- Branding: Click Upload to add an image as the banner at the top of the webinar invitation page.
- Logo: Click Upload to add a logo that will display on the right side of the webinar topic on the webinar invitation page, registration page, and in the email invitation.
- Theme: Click Change Theme to customize the theme colors for the webinar registration page.
- Registration and Email Branding: Click the toggle on to allow hosts to upload a banner and logo to be used on their webinar's registration page and emails. To prevent all users in the group from changing the setting, click the lock icon
 , and then click Lock to confirm the setting.
 - Session Branding: Click the toggle on to allow hosts to have full control over their webinar's appearance to attendees. Learn more about session branding. To prevent all users in the group from changing a setting, click the lock icon , and then click Lock to confirm the setting.
- URL for expired Webinar: Enter a valid URL that people will be redirected to if they access the webinar link after it's over.
- Post Attendee URL: Enter a valid URL that attendees will be redirected to if they access the join link and do not close the launcher window. Learn more about customizing the post-attendee URL.
Group
To manage webinar branding settings for a group of users:
- Sign in to the Zoom web portal as an admin with the privilege to edit groups.
- In the navigation menu, click User Management then Groups.
- Click the applicable group name from the list.
- Click the Webinar tab.
- Under Branding, click the following toggles to enable or disable the settings:
- Registration and Email Branding: Allows hosts to upload a banner and logo to be used on their webinar's registration page and emails.
- Session Branding: Allows hosts to have full control over their webinar's appearance to attendees. Learn more about session branding.
- If a verification dialog appears, click Enable or Disable to verify the change.
Note: If the option is grayed out, it has been locked at the account level and needs to be changed at that level. - (Optional) To prevent all users in the group from changing a setting, click the lock icon , and then click Lock to confirm the setting.
How to customize the branding of a scheduled webinar
You can customize webinar branding for a webinar you have scheduled.
- Sign in to the Zoom web portal.
- In the navigation menu, click Webinars.
- Click on the title of the scheduled webinar.
- Click the Branding tab.
- Customize the settings in the following sections as needed.
Note: Some of these options may not be available if they were disabled and locked at the account or group level.
Webinar Session Branding
Webinar Session Branding allows you to customize your session's appearance with how panelists are displayed, the webinar wallpaper, shared virtual backgrounds for all panelists, and name tag design. Learn more about using webinar session branding.
Note: Account owners and admins can enable or disable session branding at the account or group level. If you do not see the Webinar Session Branding section for your individual webinar, it may be disabled at the account or group level.
Title
By default, the title for your webinar registration is Webinar Registration. Click Edit to change the webinar title, then click Save.
Banner
You can add a banner which will be displayed at the top of your invitation page.
- In the Banner section, click Upload.
Note: If an admin has already uploaded a banner at the account level, you have the option to click Change or Delete to modify the image or remove the banner image completely. - Locate and select a banner image on your computer.
The image will automatically upload and appear on the registration page. If it does not, please ensure that it meets the following requirements:
- Format: GIF, JPG/JPEG, or 24-bit PNG (alpha/transparency allowed)
- Dimensions: 640px by 200px (suggested), 1280px by 1280px (maximum)
- Maximum file size: 1024KB
- (Optional) Click Add Description to add a text description of the banner, then click Add. This description will make it easier for people with visual impairments to access and understand the images uploaded to the registration page.
Logo
You can add a logo which will be displayed on the right side of your invitation page, registration page, and webinar email invitation.
- In the Logo section, click Upload.
Note: If an admin has already uploaded a logo at the account level, you have the option to click Change or Delete to modify the image or remove the banner image completely. - Locate and select the logo on your computer.
The image will automatically upload and appear on the registration page. If it does not, please ensure that it meets the following requirements:
- Format: GIF, JPG/JPEG, or 24-bit PNG (alpha/transparency allowed)
- Dimensions: 200px by 200px (suggested), 600px by 600px (maximum)
- Maximum file size: 300KB
- (Optional) Click Add Description to add a text description of the logo, then click Add. This description will make it easier for people with visual impairments to access and understand the images uploaded to the registration page.
Speakers
You can add information for up to 20 speakers. The webinar invitation email and webinar attendee confirmation email also include information about the speakers, such as their name, picture, biography, and links.
Note: If Session Branding is enabled, speaker information can be edited from the Resources tab.
To add a new speaker:
- In the Speakers section, click Add a new speaker.
The Add a Speaker window will open. - Edit the following details for the speaker:
- (Optional) Profile Picture: Click Upload to add a portrait of the speaker.
- Name: Enter the speaker's full name.
- (Optional) Title: Enter the speaker's title or occupation.
- (Optional) Company Logo: Click Upload to add the logo of the speaker's company.
- (Optional) Company Name: Enter the speaker's company name.
- (Optional) Company Website: Enter the speaker's company website.
- (Optional) Speaker's Biography: Enter a biography for the speaker, up to 2000 characters.
- (Optional) Social Presence: Add the URLs to the speaker's X profile, YouTube channel or video, and LinkedIn profile.
- Click Save.
To modify an existing speaker:
- In the Speakers section, locate the name of the speaker you want to edit.
- Do any of the following:
- Click Edit/Preview to edit or preview the speaker's details.
- Click the trash icon
 to delete the speaker's information.
 - Click the toggle to enable or disable the speaker's information from showing on this webinar.
Notes:
- If your account administrator has edited the Invite Attendee Email template or the Registrants Confirmation Email template on the Webinar Settings page, the speaker information is not included in these emails. To show the speaker information in these emails, the administrator must edit these email templates and use the Restore button.
- Speaker information is not visible when viewing the registration page on a mobile browser, only when viewing on a desktop browser.
Theme
- In the Theme section, click Change Theme.
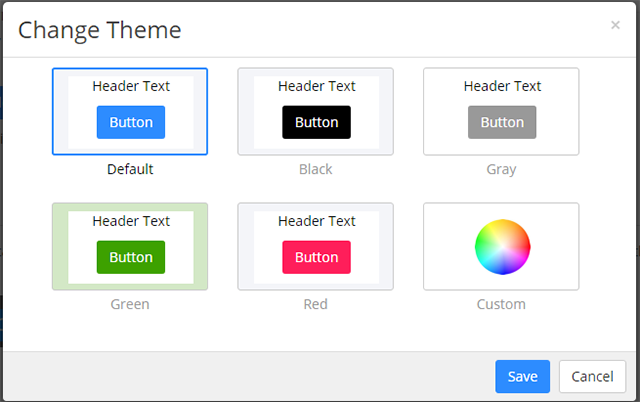
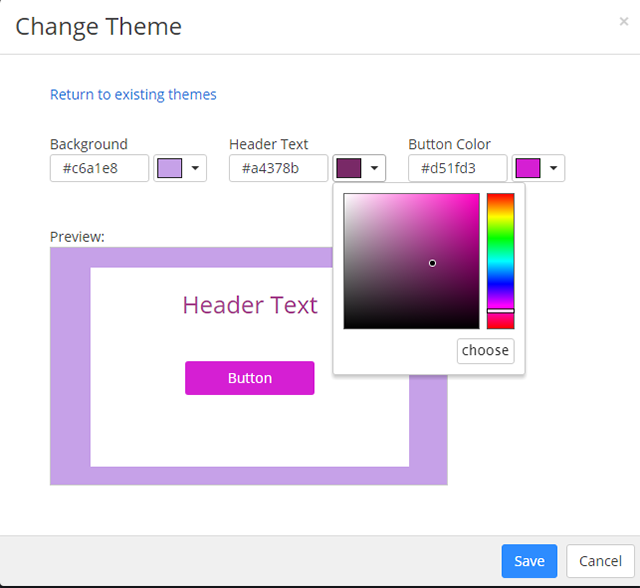
- Choose one of the predefined themes or click Custom to create a theme with your own colors.
If you click Custom, the Change Theme dialog opens, where you can use the color controller to choose your own colors for the Background, Header Text, and Button Color.
- Click Save.
Post Attendee URL
Attendees who access the webinar from the join link and do not close the launcher window will be redirected to the post attendee URL after 5 minutes. These instructions explain how to set the post attendee URL for an individual webinar. Admins can also designate a post attendee URL for all webinars or all meetings on the account. Learn more about post attendee URLs.
- In the Post Attendee URL section, click Edit.
- Enter the URL that you want to redirect attendees to.
- Click Save.
Social Media Share Description
If the webinar has registration enabled, you can customize the short description that will appear on the registration post to social media.
- In the Social Media Share Description section, click Edit.
- Customize your social media share description:
- Enter the description that you would like to be included when the webinar is shared on Facebook or LinkedIn.
- Check if you would like the banner and logo to be included.
- Click Save.
How to change the language of the registration page
The webinar registration page will be shown in the language of the registrant's Zoom profile, if available. Otherwise, the page will be shown in the language of the user's browser/operating system. Learn how to change your language on the Zoom website.