Managing Zoom Phone call queues
Call queues allow account owners and admins to route incoming calls to a group of users. For example, you can route calls to your office's billing, sales, or customer service departments. Each call queue has a maximum of 50 members. You can also change call queue settings and monitor call queue calls.
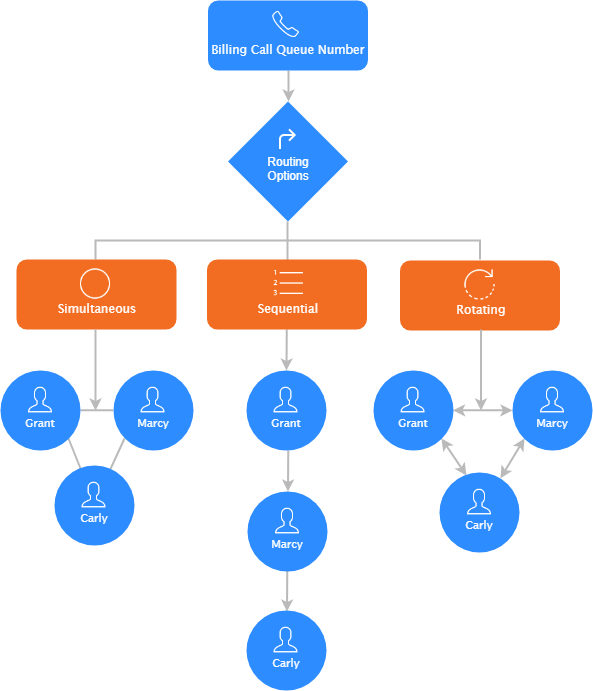
There are five call distribution options for call queues:
- Simultaneous: Rings all available members at the same time.
- Sequential: Rings available members one at a time.
- Rotating: Rings available members in a regularly changing order so that calls are distributed evenly.
- Group rotating (custom groups): Rings a configurable subset of queue members simultaneously (the subset is defined by the group size), before moving on to ringing the next subset of queue members with the next call or after a configurable ringing-time interval.
- Longest idle: Routes calls to the member who has been idle for the longest time (they have not answered a queue call). If the member that has been idle the longest does not answer, the system will rotate to the next member that has been idle for the longest time.
Requirements for managing Zoom Phone call queues
- Pro, Business, or Education account
- Account owner or admin privileges
- Zoom Phone license
- Initial Zoom Phone setup to create and manage call queues
How to create a call queue
- Sign in to the Zoom web portal as an admin with the privilege to edit account settings.
- In the top-right corner, click your profile picture or initials, then click Admin Center.
- In the side menu, click Product configuration, then click Phone system, followed by Call Queues.
- Click Add.
- Enter the following information:
- Site (only visible if you have multiple sites): Select a site for the new call queue.
- Name: Enter a display name.
- Description (Optional): Enter a description to help identify the call queue.
- Extension Number: Enter an extension for callers to reach the call queue. You can assign direct phone numbers to the call queue after creating it.
- Member(s): Click Add. Select the phone users you want to be included in the call queue, then click OK. You can add phone users or common area phones to call queues.
- Specify a template to be assigned to Call Queues: Apply a template.
- Click Save.
The web portal will redirect you to the call queue's settings.
After creating a new call queue, only account owners and admins can view or change the settings. In the Admin setting, click Set to open role management and assign call queue admins.
How to manage multiple call queues at once
You can add or update several call queues to your account simultaneously. In doing so, you can allocate or update extension numbers, phone numbers, cost centers, members, or others to these call queues.
Add multiple call queues at once into your account
- Sign in to the Zoom web portal as an admin with the privilege to edit account settings.
- In the top-right corner, click your profile picture or initials, then click Admin Center.
- In the side menu, click Product configuration, then click Phone system, followed by Call Queues.
- Click Import.
- In the Import dialog window, do the following:
- Click the Add Call Queues tab.
- Click Upload CSV to upload your list of shared line groups.
- (Optional) Click CSV Sample to download a sample of the CSV file to guide you on the data to enter.
- Click Close to exit the dialog box.
Update multiple call queues at once in your account
- Sign in to the Zoom web portal.
- In the top-right corner, click your profile picture or initials, then click Admin Center.
- In the side menu, click Product configuration, then click Phone system, followed by Call Queues.
- Click Import.
- In the Import dialog window, do the following:
- Click the Update Call Queues tab.
- Click Upload CSV to upload your list of shared line groups.
- (Optional) Click CSV Sample to download a sample of the CSV file to guide you on the data to enter.
- Click Close to exit the dialog box.
How to delete or duplicate a call queue
- Sign in to the Zoom web portal as an admin with the privilege to edit account settings.
- In the top-right corner, click your profile picture or initials, then click Admin Center.
- In the side menu, click Product configuration, then click Phone system, followed by Call Queues.
- Click the call queue name.
- In the right column, click the ellipsis icon
 , then click one of these options:
- Duplicate: Set up a new call queue by duplicating an existing one. All settings will be copied from the original except for the extension number, phone numbers, and display name.
- Delete: Delete the call queue. Any phone numbers assigned to the call queue will become unassigned. If you want to keep the call queue but deactivate it, use the Active Status setting.