Using Exchange 2010 with Zoom Rooms
When a calendar resource is integrated with a Zoom Room, the room’s TV display, controller, and Scheduling Display show the meetings scheduled for the room. Members of your organization can schedule a meeting in a Zoom Room by inviting the room to the meeting. Conference rooms are assigned as a calendar resource through a calendar service. Authorizing Zoom to have access to calendar resources enables users to start and join meetings in the room using one touch.
Before you can add a calendar service for Zoom Rooms, an Exchange administrator must do the following:
- Create a dedicated user in Exchange who can manage calendars
- Create or locate a calendar resource to be used for each Zoom Room
- Enable the dedicated user to have full delegate access to each calendar resource
- Enable the dedicated user to edit each calendar resource
After the Exchange administrator completes these steps, you use the credentials of the dedicated user to provide authorization for the Zoom Rooms in your account to use the calendar service and all of its calendar resources.
Requirements for using Exchange 2010 with Zoom Rooms
- An admin account on Exchange
- The ability to create and manage calendars for rooms
- The ability to create a new Exchange user
How to create a service account and room email
Creating a Zoom Rooms service account
- Launch EMC (Exchange Management Console).
- Select “Mailbox” under “Microsoft Exchange” > “Microsoft Exchange On-Premises "(your_server's_domain)” > “Recipients Configuration”
- Right-click the “Mailbox” and then click “New Mailbox…”
- Select “User Mailbox” then click “Next” in the “New Mailbox” dialog
- Click add “New User” > “Next”
- Create new user email, for example, room@company.com
- This same user email will be used by all of your Zoom Rooms
- Make a note of the “User logon name (User Principal Name)” and “Password”
- Complete the remaining steps
Creating or obtaining the room and room email
- Launch EMC (Exchange Management Console)
- Select “Mailbox” under “Microsoft Exchange” > “Microsoft Exchange On-Premises "(your_server's_domain)” > “Recipients Configuration”
- Make a note of the "Room Name" and the “Primary SMTP Address” next to it
How to link the service account with room resources
Delegating access to the service account
- Launch EMC (Exchange Management Console)
- Select “Mailbox” under “Microsoft Exchange” > “Microsoft Exchange On-Premises "(your_server's_domain)” > “Recipients Configuration”
- Right-click the first room and select “Properties”
- Switch to the “Resource Policy” tab. Click “Add...” under “Specify delegates of this mailbox”.
- In the “Select Recipient” dialog, select the dedicated email and then click “OK”.
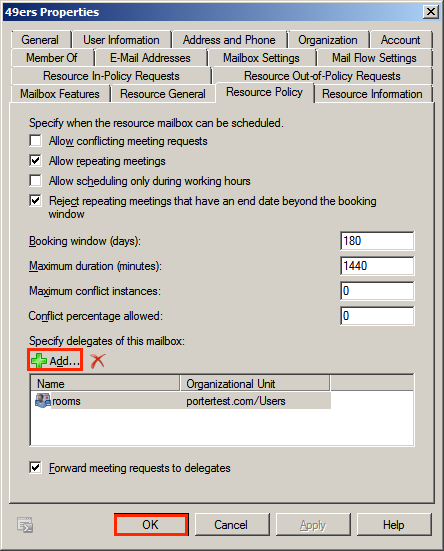
- Switch to the “Resource General” tab.
- Check "Enable the Resource Booking Attendant".
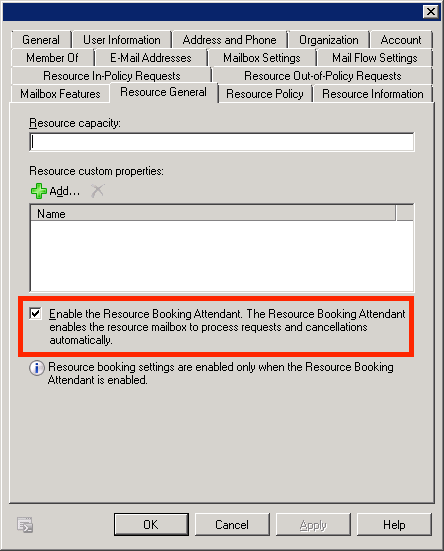
- Click “OK” to save the change.
How to enable Basic Authentication or NTLM Authentication
Zoom Rooms supports Basic and NTLM forms of authentication for on-premise solutions such as Exchange server. Please use one of the following to enable either of which applies to your account.
Basic Authentication
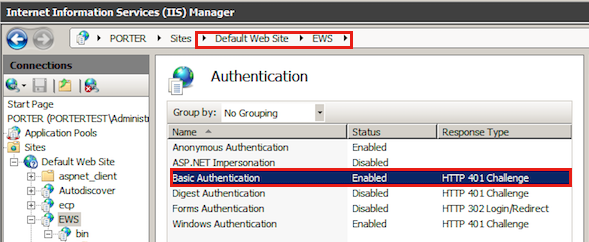
- Launch “Server Manager” on Windows Server.
- Go to “Internet Information Services (IIS) Manager” under “Roles”
- Select “Web Server (IIS)” > “EWS” under “Sites”
- Select “Default Web Site” > then double click “Authentication” under “IIS”
- In the “Features View” Right click the “Basic Authentication” and click “Enable”
Enabling NTLM Authentication
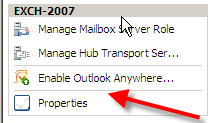
- Open the Exchange Management Console and navigate to Server Configuration/Client Access.
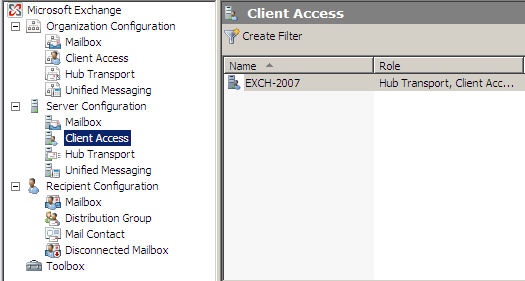
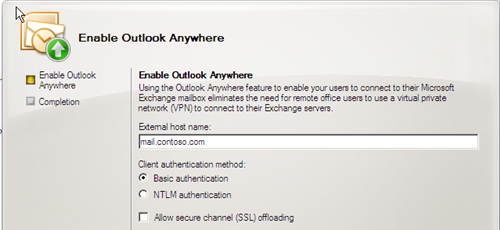
- In the Actions pane to the right of the Exchange Management Console click on Enable Outlook Anywhere.
- Enter the external host name in the field shown here.
How to configure resource attributes
Retrieving EWS URL
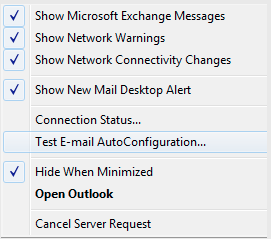
- CTRL+Right click the Outlook icon in the notification area in the lower right-hand area of the screen
- Select "Test E-mail Auto configuration"
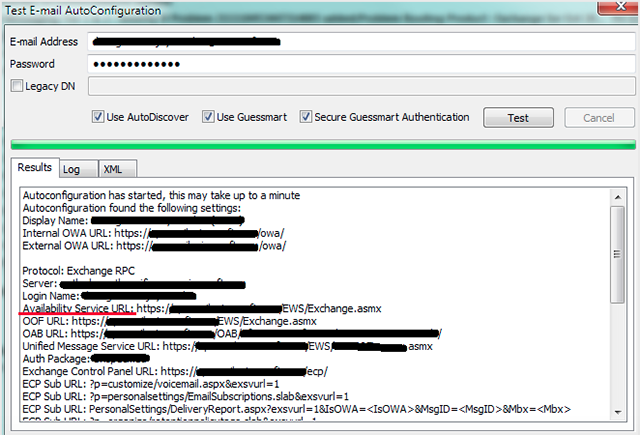
- Enter your email address and password.
- Select the Use AutoDiscover box (you can uncheck the other boxes).
- Select the Test button.
- Make a note of the "Availability Service URL" (EWS URL)
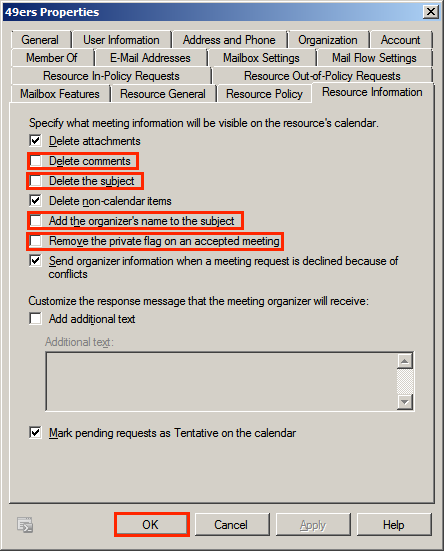
Disable Removal of Subject from Room Events
- Launch EMC (Exchange Management Console)
- Select “Mailbox” under “Microsoft Exchange” > “Microsoft Exchange On-Premises "(your_server's_domain)” > “Recipients Configuration”
- Right-click the first room and then click “Properties”
- Switch to “Resource Information” and uncheck the following options:
- Delete comments
- Delete the subject
- Add the organizer's name to the subject
- Remove the private flag on an accepted meeting
- Click “OK” to save the change.
How to add the calendar service to Zoom
To add the Exchange calendar service to your Zoom account:
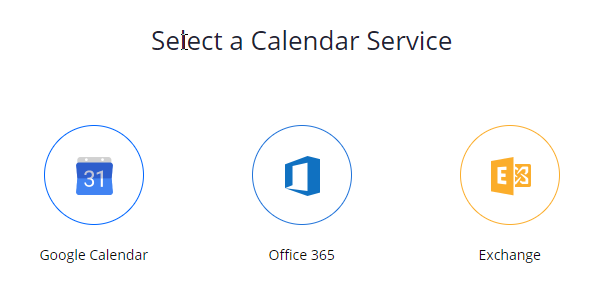
- Sign into the Zoom web portal as a Zoom Rooms administrator.
- Choose Calendar Integration, and then click Add Calendar Service.
The Add a Calendar Service dialog displays. - Click Exchange.
- Enter the Exchange details:
- Exchange login username or UPN: Enter your exchange credentials as user logon domain\user logon name, as set in Active Directory. For exchange, if your email address is johnsmith@mycompany.com, you can enter it as mycompany\johnsmith.
- Exchange login password: Enter your Exchange password.
- Exchange Version: Select your Exchange version from the dropdown.
- EWS URL: Enter the URL for the EWS Server. Be sure to include the entire URL, including the https:// portion.
- Account Permission Type: Choose Full Access Delegate if you've followed the configuration above.
- Click Authorize.
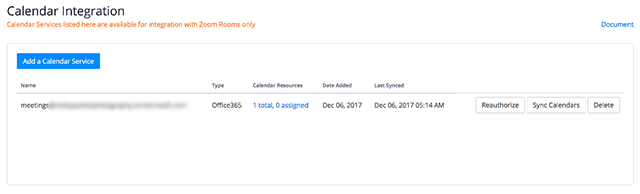
The Calendar Integration page shows the calendar service that you added.
-
See Add a Zoom Room for information on configuring a calendar resource with a Zoom Room.