Wired HDMI Screen Sharing with a capture device
Wired HDMI screen sharing is a one-plug method to share content from a laptop or mobile device to a Zoom Room. This method captures HDMI output from another device, such as a laptop, connected to either the built-in HDMI input of a Zoom Room (e.g. a Zoom Rooms Appliance) or an HDMI-USB capture card peripheral connected to the Zoom Room (e.g. a macOS- or Windows-based Zoom Room). In the case of a capture card for a macOS- or Windows-based Zoom Room, the capture card's HDMI input is connected to the laptop, and the device outputs to the Zoom Room using USB. The laptop OS can use "mirror" or "extend" display mode to output to the Zoom Room. The Zoom Room can also accept audio over the HDMI input, if supported, which requires the laptop OS to be configured to output audio via its HDMI output. Alternatively, you can also use wireless direct sharing, share.zoom.us, or Apple screen mirroring (AirPlay) to share content from your laptop or mobile device to a Zoom Room.
Requirements for wired HDMI screen sharing with a capture device
- Zoom Rooms:
- Windows: Global minimum version or higher
- For most Windows-based Zoom Rooms, an HDMI-USB converter from the list of supported HDMI-USB capture devices.
Note: Other HDMI-USB converter peripherals are not recognized as capture devices for HDMI wired screen sharing - they are treated as USB camera sources only.
- macOS: Global minimum version or higher
- An HDMI-USB converter from the list supported HDMI-USB capture devices.
Note: Other HDMI-USB converter peripherals are not recognized as capture devices for HDMI wired screen sharing - they are treated as USB camera sources only.
- Appliances: Global minimum version or higher
- A Zoom Rooms Appliance with an HDMI input. Consult your device vendor's system specifications to confirm an HDMI input is available. Some devices require an additional accessory.
- The following Zoom Rooms Appliances support screen sharing up to 60fps:
- (Optional) Kramer TP-580T and TP-580R for HDMI extension over Category 5E cabling.
- Always consult your device vendor's documentation to confirm supported HDMI extenders.
Notes:
- Annotation is available on systems running an Intel 8th-generation processor or higher. If your system does not meet the requirement, please consider using direct sharing when annotation is needed.
- Learn more about supported Zoom Rooms appliances.
Supported Zoom Rooms appliances
| Manufacturer | Model |
|---|
| Poly | X32 |
| Poly | X52 |
| Poly | X72 |
| Poly | G62 |
| Neat | Bar (Gen 2) |
| Neat | Bar Pro |
| Neat | Board 50 |
| Neat | Board Pro |
| Jabra | PanaCast 50 VBS |
How many HDMI-USB capture devices are supported for wired HDMI content sharing simultaneously
Windows and macOS-based Zoom Rooms only support the connection, presence, and use of one HDMI-USB capture device from the supported list of devices at a time. Do not connect more than one device from the supported list simultaneously, as this will cause unpredictable results. If you wish to have the ability to connect multiple different devices with HDMI output to a Zoom Room for wired HDMI content sharing purposes, use an HDMI switch between those devices and the one HDMI-USB capture device connected to the Zoom Room.
How to extend HDMI-USB capture capability to a conference room table
In a typical conference room setup, the Zoom Room computer is located either by the displays, or in a dedicated equipment rack. This presents a challenge, as end users that may wish to use wired HDMI content sharing may be sitting at a conference table a significant distance away.
Due to USB cable length limitations, and to avoid latency, Zoom recommends extending HDMI to the end users (e.g. the conference table), not USB. For distances greater than maximum HDMI passive cable lengths (30ft, 10m), Zoom recommends using active cables or HDMI extenders, e.g. the Kramer TP-580T and TP-580R for HDMI extension over Category 5E cabling.
In instances where active hardware extenders are used for this signaling, please note that many of these devices do not signal connection status of the far end video signal and will accordingly be seen as 'always on' sources which may require additional settings by an admin to enable manual sharing initiation.
How to use automatically-initiated HDMI content sharing
By default, wired HDMI sharing is automatically initiated upon plugging in your laptop HDMI output to the HDMI-USB capture device connected to the Zoom Room.
- Choose one of the following options:
- Connect the USB output of the HDMI-USB capture device into the Zoom Room computer. This connection may be made permanently.
- Connect the HDMI cable to the HDMI-USB capture device HDMI input. This connection may be made permanently.
- Connect the HDMI cable to the sharing device's HDMI output. The active video signal will automatically initiate content sharing of your laptop’s output to the Zoom Room.
- Unplug the HDMI cable to stop content sharing.
How to enable manually-initiated wired HDMI content sharing
You can disable automatic detection for HDMI sharing by selecting the manual HDMI sharing option for Zoom Rooms. This may be useful when a device is always connected, such as a dedicated/fixed content computer.
- Sign in to the Zoom web portal as a role with access to Zoom Rooms.
- Click Room Management then Zoom Rooms.
- Find the Zoom Room you want to change and click Edit.
- Click the Meeting tab.
- Click the Start HDMI content share manually on controller toggle
 to enable the setting.
How to use manually-initiated wired HDMI content sharing
- Start a Zoom Room meeting or tap Share Content on your Zoom Room controller.
- Plug the capture device into your Zoom Room and the HDMI cable into the HDMI port of the device you are sharing from. This will start the screen share from your desktop to the Zoom TV display
- Unplug the HDMI cable to stop HDMI screen sharing.
How to share HDMI content locally before sharing with all participants
Enabling local content sharing
- Sign in to the Zoom web portal as a role with access to Zoom Rooms.
- Click Room Management then Zoom Rooms.
- Click Account Settings to enable this setting for all rooms. You can also use the location hierarchy to enable the feature for specific rooms or groups of rooms.
- Click the Meeting tab, then click the toggle next to Allow HDMI content share locally before and during the meetings.
Using local content sharing in a Zoom Rooms meeting
- Start a Zoom Room meeting.
- Plug in your devices for manual or automatic HDMI sharing.
The shared content will appear on your Zoom Rooms display, but will not be shown to participants. - (Optional) To share your content with the other meeting participants, tap Share Content, then tap Share to Meeting.
Note: You can also plug in your devices and begin content sharing before a meeting, then follow this step after starting a meeting to share the content with participants.
How to control audio sharing with HDMI content
Users can configure whether content share audio from wired HDMI sources plays back for all meeting attendees, including those in the room, or only remote participants. This setting can be toggled during meetings through the Zoom Rooms controller or touch interface.
Note: This feature requires Zoom Rooms version 6.4.0 or higher.
Control audio sharing from the web portal
- Sign in to the Zoom web portal as a role with access to Zoom Rooms.
- Click Room Management then Zoom Rooms.
- Click Account Settings to enable this setting for all rooms. You can also use the location hierarchy to enable the feature for specific rooms or groups of rooms.
- Click the Meeting tab, then click the toggle next to Include playback of local HDMI share audio to only share the audio with remote participants by default.
Control audio sharing in a meeting
- Start a Zoom Room meeting.
- Plug in your devices for manual or automatic HDMI sharing.
- In the Share Content window, tap the settings
 icon on your Zoom Room controller.
 - Tap the toggle
 next to Include local HDMI share audio playback to only share the audio with remote participants.
How to use HDMI sharing with 60fps (frames per second)
Enabling HDMI sharing with 60fps
- Sign in to the Zoom web portal as a role with access to Zoom Rooms.
- Click Room Management then Zoom Rooms.
- Click Account Settings to enable this setting for all rooms. You can also use the location hierarchy to enable the feature for specific rooms or groups of rooms.
- Click the Meeting tab, then click the toggle next to Allow users to enable 60fps HDMI sharing.
- (Optional) Click the checkbox
 next to Enable 60fps HDMI sharing by default if you want this feature to be automatically activated for every meeting in the Zoom Room.
Using HDMI sharing with 60fps in a Zoom Rooms meeting
- Start a Zoom Room meeting or tap Share Content on your Zoom Room controller.
- Plug in your devices for manual or automatic HDMI sharing.
- In the Share Content window, tap the settings icon on your Zoom Room controller.
- Tap the toggle for Optimize Full-screen Video Sharing, then tap the toggle for 60fps HDMI Sharing.
Note: The maximum resolution available for this feature is 720p.
How to change the HDMI sharing label
In some instances, it may be best to change the label the Zoom Room uses to refer to the input from the capture device. Follow these steps if you want to change the default HDMI label for wired HDMI sharing:
- Sign in to the Zoom web portal as a role with access to Zoom Rooms.
- Click Room Management then Zoom Rooms.
- You can use location hierarchy to change this setting for a specific room or location. Click Account Settings to change it for the entire account.
- Find the Customize HDMI sharing label section and click the pencil
 icon.
icon. - Enter a replacement label and click Save.
How to setup the Magewell USB Capture HDMI Gen2
Hardware List:
Notes:
Diagram:
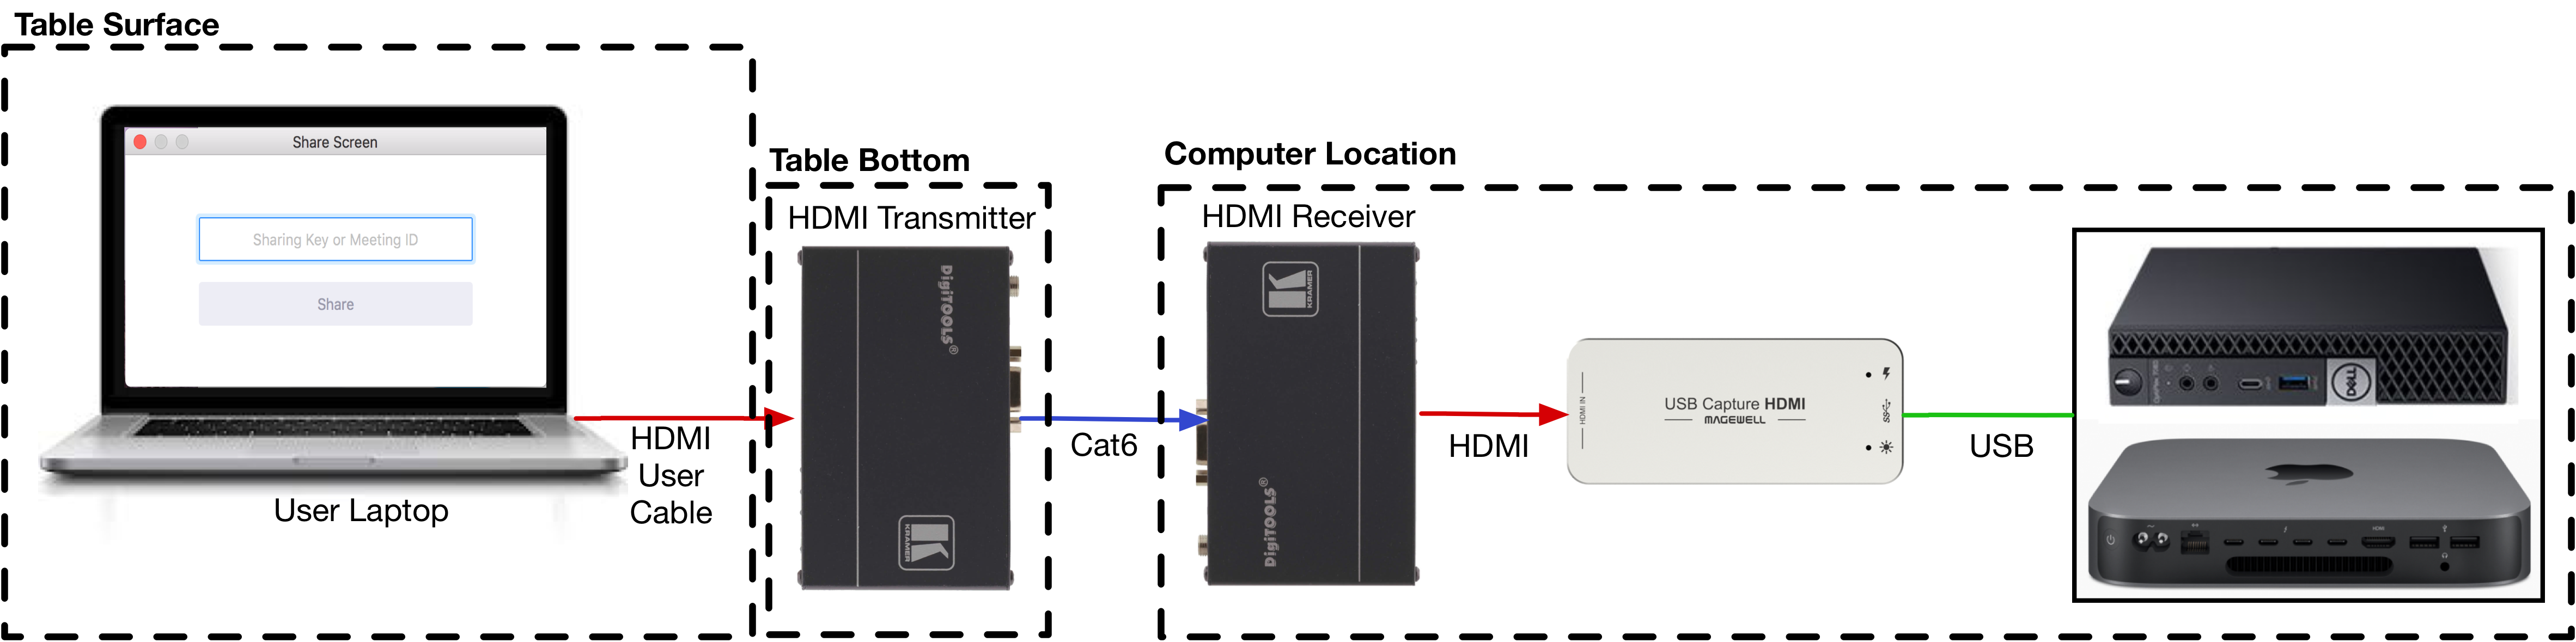
How to use HDMI-USB capture devices as cameras in a Zoom Room
If you wish to use HDMI output devices such as cameras as cameras (not content sharing) in Zoom Rooms, use an HDMI-USB peripheral other than those on the supported USB-HDMI capture devices list.