Managing multiple sites
Sites allow you to organize the phone users in your organization. For example, you could create multiple sites based on office location. Here are some benefits of having multiple sites:
- Each site has its own main auto receptionist so you can route calls differently for each site.
- Each site also has its own caller ID name, phone numbers, call queues, and desk phones so you can better manage your extensions.
- You can assign a site code to each site, allowing users to easily identify and dial phone extensions that belong to the same site.
- You can customize some settings, like business hours, at the site level instead of applying them to the whole organization.
Note: After enabling multiple sites, Zoom will automatically create a main site and move everything to this site (indicated by Main Site in the Multiple Sites tab). Your organization still has one main company number, which will be applied to the the main auto receptionist of the main site.
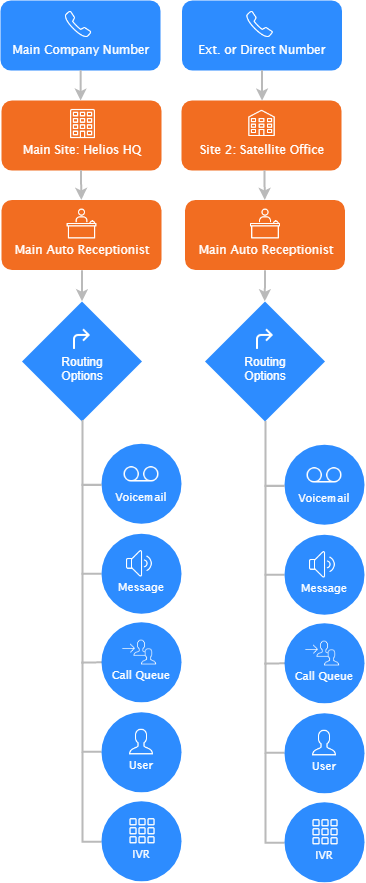
The following diagram illustrates a two-site setup with a main site (headquarters) and a secondary site (satellite office):
Requirements for managing multiple sites
- Either a Zoom Workplace license (with Phone included), or a standalone Zoom Phone calling plan
- Account owner or admin privileges
How to enable multiple sites
Note: After enabling multiple sites, Zoom will automatically create a main site and move everything to this site (indicated by Main Site in the Multiple Sites page). Your organization still has one main company number, which will be applied to the the main auto receptionist of the main site.
- Sign in to the Zoom web portal as an admin with the privilege to edit site settings.
- In the top-right corner, click your profile picture or initials, then click Admin Center.
- In the side menu, click Product configuration, then click Phone system, followed by Company Info.
- Click Account Settings.
- In the Multiple Sites section, click the Enable Multiple Sites toggle.
- (Optional) Enable and assign site codes.
How to add a site
After enabling multiple sites, you can add sites to organize phone users in your organization.
- Sign in to the Zoom web portal as an admin with the privilege to edit site settings.
- In the top-right corner, click your profile picture or initials, then click Admin Center.
- In the side menu, click Product configuration, then click Phone system, followed by Company Info.
- Click Add Site and enter the required information:
- Display Name: Enter a name to identify the site.
- Site Code (only visible if you enabled site codes): Enter a site code.
- Short Extension (only visible if you have site codes): Specify the length of short extension numbers for the site. If existing extensions in the site are too long or short to meet this requirement, you will be prompted to fix the conflicts.
- Range (Optional): Specify a number range for the short extensions.
- Auto Receptionist: Click Add and create a new main auto receptionist for the site, or copy an existing auto receptionist. Inbound calls to the site will be routed to the main auto receptionist.
- Country: Displays the country of the site's default emergency address. The country determines the reserved extension numbers that you can't use.
- Default Emergency Address: Click Add and select an existing emergency address you previously added or enter a new address.
Note: By default, this emergency address will be applied to all phone users and numbers you add to the site. - (Optional) Force Off-Net: Click the toggle to enable this feature to force calls out to your PSTN network. By enabling Force Off-Net, calls from users or extensions between sites will be routed through the PSTN network. Users within this site will only be allowed to be part of advanced functionality (e.g., auto receptionists, call queues) that is configured within this site. Users will require a paid Zoom license to call between sites.
Notes:
- The Force Off-Net setting will only appear only after entering the Default Emergency Address.
- Force Off-Net sites must be configured during site creation and cannot be enabled later.
- Click Save.
- Repeat the steps above to add more sites.
How to create multiple sites in bulk
After enabling multiple sites, you can create multiple sites in bulk to help you organize phone users in your organization.
Note: When completing your CSV file, make sure to follow the provided format and avoid including any unnecessary information that could cause errors during the uploading process.
- Sign in to the Zoom web portal as an admin with the privilege to edit site settings.
- In the top-right corner, click your profile picture or initials, then click Admin Center.
- In the side menu, click Product configuration, then click Phone system, followed by Company Info.
- On the top right, click Import.
- In the dialog box, click the Add Sites tab.
- Click CSV Sample, to download a sample of the CSV file containing required information you'll need to provide when creating your sites.
- Fill out your CSV file by providing the following required information:
- Site Name: Specify a name for each site.
- Main Auto Receptionist Name: Specify the main auto-receptionist name for each site.
- New or Copy from a Site Auto Receptionist?: Set this to Yes for a new site auto-receptionist, or No for copying from an existing site auto-receptionist.
- Default Emergency Address: Specify the default emergency address for each site.
- Click Upload CSV, to upload your file.
- Click Close.
How to update multiple sites in bulk
If you have multiple sites to update within your organization, you can efficiently manage them by utilizing a CSV file.
Note: When completing your CSV file, make sure to follow the provided format and avoid including any unnecessary information that could cause errors during the uploading process.
- Sign in to the Zoom web portal as an admin with the privilege to edit site settings.
- In the top-right corner, click your profile picture or initials, then click Admin Center.
- In the side menu, click Product configuration, then click Phone system, followed by Company Info.
- On the top right, click Import.
- In the dialog box, click the Update Sites tab.
- Click CSV Sample, to download a sample of the CSV file containing the required information you'll need to provide when updating your sites.
- Fill out your CSV file by providing any information that needs to be updated and the following required information:
- Site Name: Specify the name for each site you want to update.
- Click Upload CSV, to upload your file.
- Click Close.
How to move users, common area phones, auto receptionists, and call queues to another site
After creating phone users, common area phones, auto receptionists, or call queues, you can move them to another site in your account.
- Sign in to the Zoom web portal as an admin with the privilege to edit site settings.
- In the top-right corner, click your profile picture or initials, then click Admin Center.
- In the side menu, click Product configuration, then click Phone system and navigate to one of these pages:
- Click the checkbox to select what you want to move, then click Move Site at the top of the table.
- Select the target site and click Confirm.
How to disable multiple sites
If you don't want to use multiple sites, you need to move your users, numbers, and phones to the main site before you turn off multiple sites.
Delete sites and move assets to the main site
- Sign in to the Zoom web portal as an admin with the privilege to edit site settings.
- In the top-right corner, click your profile picture or initials, then click Admin Center.
- In the side menu, click Product configuration, then click Phone system, followed by Company Info.
- Click on a site name that does not have Main Site after its name.
- Click Delete Site.
- In the drop-down menu, select the name of your main site to move all users, numbers, and phones.
- Check the box to acknowledge that company locations of the site to be deleted will be deleted.
- (Optional) Click Export Locations to download a CSV file of the site's company locations.
- Click Confirm.
- (Optional) Repeat these steps for each site that is not the main site.
Disable multiple sites
After deleting all sites except for the main site, you can turn off multiple sites.
- Sign in to the Zoom web portal as an admin with the privilege to edit site settings.
- In the top-right corner, click your profile picture or initials, then click Admin Center.
- In the side menu, click Product configuration, then click Phone system, followed by Company Info.
- Click Account Settings.
- In the Multiple Sites section, click the Multiple Sites toggle.
- Click Disable to confirm.