Using Zoom Events Image Generation
Zoom Events Image Generation leverages AI technology, which may include third-party models, to help you use AI to create unique images to use in your event. When enabled, hosts can use Zoom AI to create images to use in their event.
Learn more about enabling Zoom Events Image Generation, creating a Zoom Event, and how Zoom AI features handle your data.
For language availability, review the supported languages for Zoom AI features.
Requirements for using Zoom Events Image Generation
Note: Zoom AI may not be available for select verticals and select regional customers.
How to use Zoom Events Image Generation
Use AI to create high-quality, unique images to use in your event.
Event creation sections where Image Generation is available
Generate an image for the main event image. Generated images that are inserted into the event are added to the Zoom Events content library automatically. You can use the Image Generation feature for the following sections in the event creation setup:
Use Zoom Events Image Generation in the event creation setup
Note: The recommended image dimensions are 1920x1080 pixels. Use JPG, JPEG, and PNG files only with a maximum image size of 15MB.
- Create an event or access the event creation setup.
- Access the sections in the event creation setup where the Image Generation feature is available.
- Find the image that you want to change, then hover your mouse over the image and click the pencil icon
 to upload an image.
The content library uploader window will appear. - In the window, click Create image with AI
 .
.
An Event Image Generation window will open to generate images. - In the window, view and click the Suggestions to provide a draft of what you want your email images to look like, or enter a command in the prompt box.
This gives additional context for Zoom AI to mimic in its generated reply.
Note: After you enter a command in the prompt box, you will see 3 alternative prompt suggestions under Suggestions. - Under Ratio, select from the following options to set the aspect ratio:
- Under Style, select from the following options:
- Expressive: Images will be more creative.
- Realistic: Images will be more realistic and natural.
- Click Generate image.
The loading screen will appear, and an image will generate typically within 15-20 seconds. The generated image will appear as a preview. - If you want to use the image, click Apply image.
The generated image will be added into that place in the event.
Note: All applied images will automatically be added to the content library in the hub and be accessible to others in the hub.
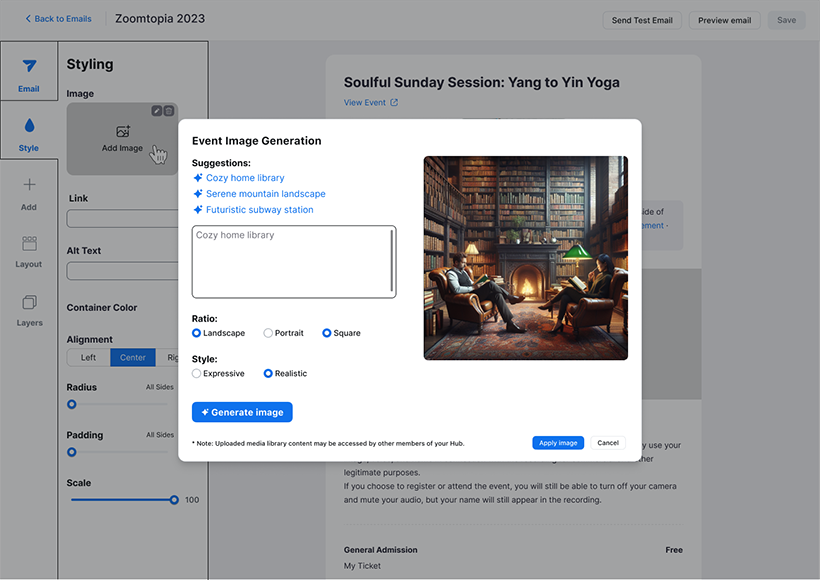
Use Zoom Events Image Generation in Email Builder
- Access Email Builder in the event creation setup.
- In the left navigation menu, click the Add tab
 .
. - Under Generic, click and drag the Image element into the email body.
- Click the Image element in the email body.
On the left side of the screen, the Styling tab will be selected and its panel will appear. - Under Styling, click Add Image.
The content library uploader window will appear. - At the bottom of the window, click Create image with AI .
An Event Image Generation window will open to generate images. - In the window, view and click the Suggestions to provide a draft of what you want your email images to look like, or enter a command in the prompt box.
This gives additional context for Zoom AI to mimic in its generated reply.
Note: After you enter a command in the prompt box, you will see 3 alternative prompt suggestions under Suggestions. - Under Ratio, select from the following options to set the aspect ratio:
- Under Style, select from the following options:
- Expressive: Images will be more creative.
- Realistic: Images will be more realistic and natural.
- Click Generate image.
The loading screen will appear, and an image will generate typically within 15-20 seconds. The generated image will appear as a preview. - If you want to use the image, click Apply image.
The generated image will be added to the image component in the email.
Note: All applied images will automatically be added to the content library in the hub and be accessible to others in the hub.