Configuring and using Saved Replies for email engagements
Saved Replies for email allows agents to quickly access and use pre-saved replies to respond efficiently to customer emails. This feature includes options for rich text customization, file uploads, and dynamic fields for personalization. It empowers agents to provide consistent, high-quality responses and meet customer needs more effectively by using pre-set replies and customizing their messages directly within Zoom Contact Center.
Note: Saved Replies can also be used for messaging engagements, allowing agents to facilitate communication across multiple channels such as chat, SMS, and social media.
Requirements for Saved Replies for email engagements
- Account owner or admin privilege; or relevant role/privilege for creating saved replies
Note: Agents can’t create replies, only use pre-configured replies. - Zoom desktop app for Windows or macOS: Global minimum version or higher
- Zoom Contact Center license
- One or more email queues created by an admin
How to create an agent asset with Saved Replies (admins)
- Sign in to the Zoom web portal.
- In the navigation menu, click Contact Center Management then Asset Library.
- Click the Agents Assets tab.
- Click Add Asset.
- Enter the following information:
- Name: Enter an internal display name for the asset.
- Description (Optional): Enter an internal description for the asset.
- Asset Type: Select Saved Reply (Email).
- Category (Optional): Select a category to organize the reply. Agents can see categories in the Zoom desktop app. Click Edit Category to manage or create categories.
- Shortcut (Optional): Specify the shortcut key that agents can type after / to insert the Saved Reply. For example, if the shortcut is refund, agents can type /refund to insert the Saved Reply.
- Asset Language: Select the language of the reply, so that this reply is pre-filtered for the agent when the consumer language variable is set to this language. If this language is not supported, the default language will be used. After saving the reply, you can add additional replies for each language. Each asset can only have one reply for each language. For example, if the language variable is French, the replies are pre-filter to show French replies, but the agent can change the language filter and select any saved reply.
- Subject: Enter a subject line for the Saved Reply.
- Reply: Enter your message in the message box.
- (Optional) At the top of the message box, use the formatting and layout options for your email message.
- (Optional) At the bottom, use the icons to upload files, insert emojis, or upload images.
- (Optional) Click the drop-down menu at the top right of the message box to include dynamic fields such as Display Name, First Name, Last Name, Unsubscribe Link and global system variables.
Note: The email saved replies cannot exceed 25MB.
- Click Save.
Import replies by uploading a CSV file
- While creating an agent asset with Saved Replies, select the Type as Upload Text.
- Click the Upload button.
- Click Download CSV Sample to download a sample CSV file and view the fields.
- Fill out the CSV sample using spreadsheet software like Microsoft Excel.
- Click Choose File and select your completed CSV file to start the bulk import process.
Note: If there's an error in one or more fields, the process will not complete. You will an error message explaining why the import failed. - Click Close if the batch process is successful.
How to assign Saved Replies to email queues (admins)
By default, all saved replies are automatically enabled for all email queues
Admins can follow these steps to limit one or more saved replies for specific email queues
- Sign in to the Zoom web portal.
- In the navigation menu, click Contact Center Management then Queues.
- Select an email queue.
- In the Inbound Settings section, click Edit next to Saved Replies.
Note: Click Reset to Default to change this setting to All replies. Any new saved replies will automatically be available for the queue as well, to avoid manual updates to all queue every time a new saved reply is added. - Assign or remove agent assets:
- To assign agent assets, select the agent asset, then click Save.
- Under Selected, remove agent assets from the queue as needed.
- Click Save.
How to use Saved Replies (agents)
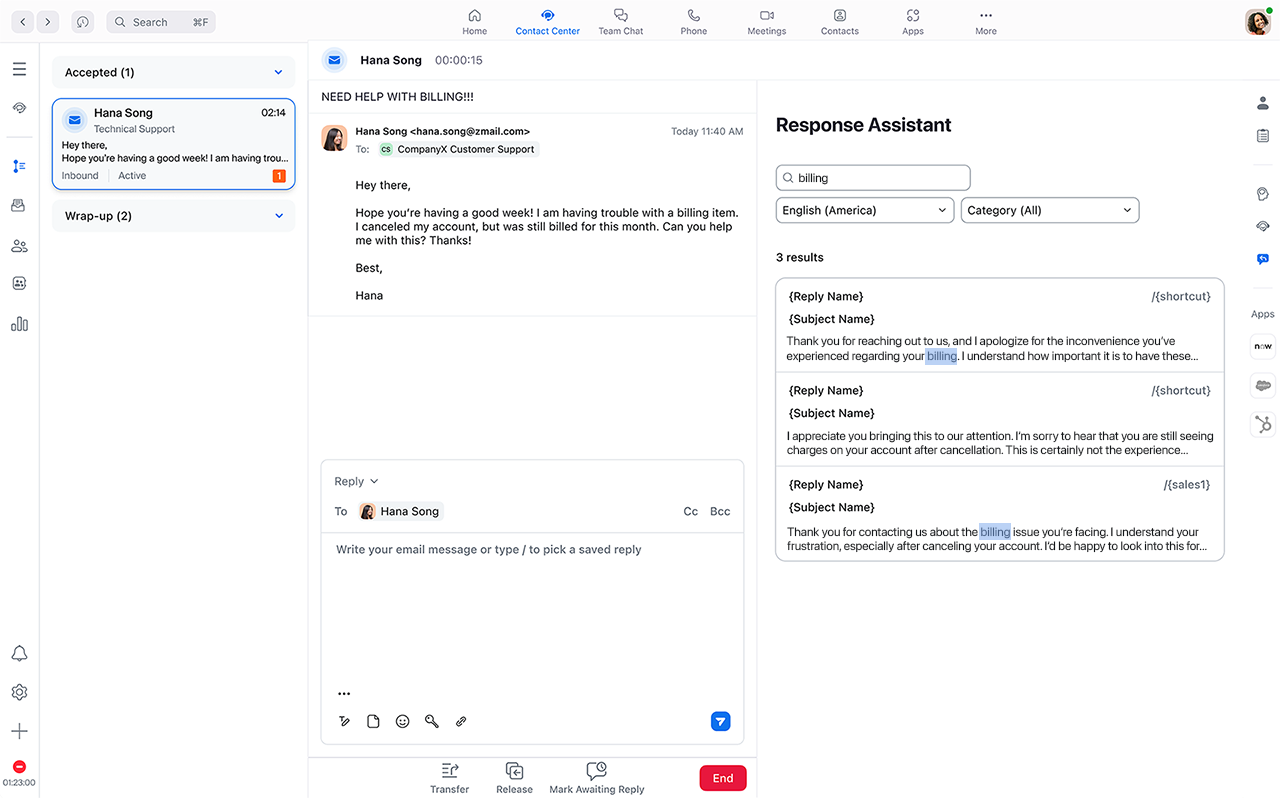
Agents can add saved replies to email engagements by accessing the Response Assistant menu on the right-side panel.
- Sign in to the Zoom desktop app.
- While in an email engagement, click the Response Assistant icon in the right-side panel.
Response Assistant will display all available saved replies for the assigned email queue. - Use the search box and filters to search for a reply, or filter replies by category or language.
- Hover over a reply, then click the insert icon
 to insert the reply. Alternatively, you can type shortcut in the top-left of the reply to quickly insert the reply.
Note: Agents can add multiple replies to an email, or add a reply to an existing email with manually-entered text. - Click the Send button
 .
.