Introducing the new Zoom Contact Center agent experience preview
The upgraded Zoom Contact Center agent interface puts the information agents need most front and center, delivers AI-powered recommendations more intuitively, and reduces the clicks needed to deliver great customer service. As contact centers evolve with more channels, more data, and more AI capabilities, the new agent experience was redesigned with three core principles in mind:
- Surface critical information immediately: Agents shouldn’t have to hunt for caller context or engagement history.
- Integrate AI recommendations seamlessly: AI Expert Assist suggestions, like relevant knowledge base articles or best next steps, appear where agents are already looking.
- Reduce cognitive load: Fewer panels when it's not needed and clicks allow agents to focus on delivering great service.
This article explains the changes, what they mean for agents, and how organizations can prepare for the transition.
Requirements for the new agent experience
- Existing customers: Can request the new agent experience from Zoom Support. Once enabled, the new interface won’t activate automatically. Instead, admins can control which agents access it. Only agents added to this list will be able to use the new experience.
- New customers (customers that enabled ZCC for the first time after Feb 6 2026): The new agent experience will be enabled by default.
How to navigate the upgraded agent experience
Middle panel updates
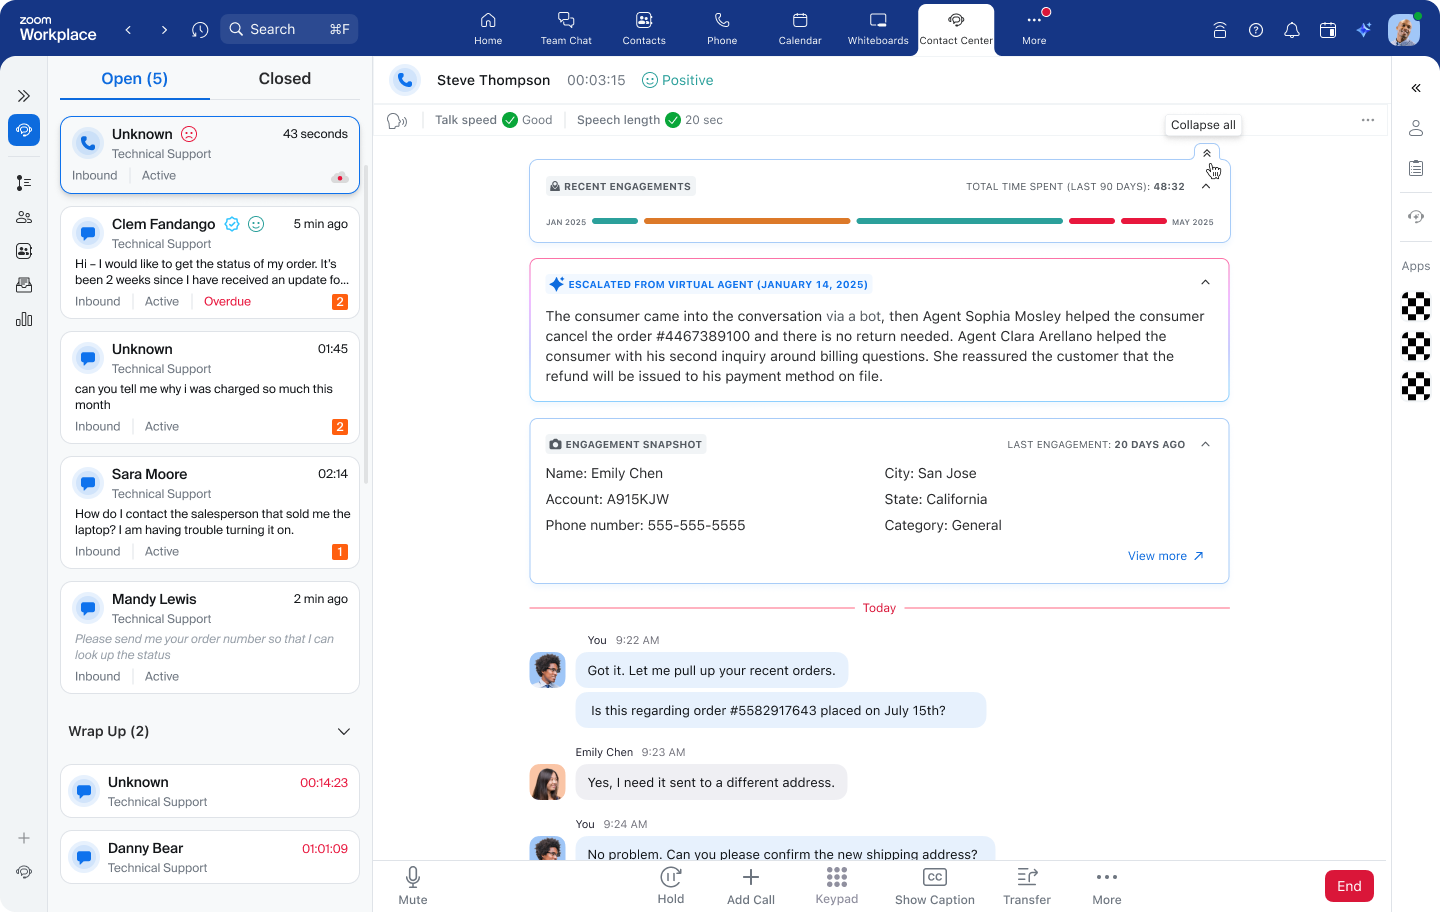
The most visible change is the middle panel during voice engagements. Previously dominated by the keypad (useful for IVR navigation but not needed constantly), the new design replaces the default dial pad with three dynamic information cards that expand automatically when a call is accepted:
- Recent engagements card: This card displays the caller’s most recent interactions within the last 90 days at a glance, including engagement summaries and consumer sentiment indicators (green, yellow, or red). Clicking an engagement opens an AI-generated summary, and agents can toggle to a threaded transcript view to see the full conversation details.
- Customer profile card: This card shows key caller variables such as account numbers, status indicators, and any custom fields configured by the organization. This keeps the most relevant customer context visible in the agent’s primary workspace, rather than hidden in a cluttered sidebar.
- Handover summary card: When an engagement is handed over from a virtual agent or transferred from another agent, this card automatically appears, presenting an AI-generated summary of the prior conversation to help agents quickly understand the context before continuing the interaction.
The dial pad remains accessible at the bottom of the screen for outbound calls or IVR navigation but no longer occupies the middle panel’s primary space.
Consumer History enhancements
- Review full conversation summaries and redacted transcripts.
- Toggle between snapshot and threaded views.
This is especially valuable for complex customer relationships, providing a complete picture of past interactions.
AI Expert Assist in the middle panel
Previously, AI suggestions required navigation to the right panel. The new interface introduces an AI sparkle indicator in the middle panel when recommendations are available:
- Agents click once to see the suggestion inline, without losing sight of customer context.
- The full AI Expert Assist panel on the right side remains available for asking questions or reviewing all suggestions.
This streamlines the workflow: customer asks a question → AI finds the answer → agent sees it immediately.
Left panel refinements
The left panel interface has been updated, particularly the My Engagements panel toggle in the left navigation. With the updated interface, the visual hierarchy becomes more clearly separated from other navigation options. Additionally, when an agent starts their day, the My engagements panel stays collapsed when they only have one engagement and opens automatically as more arrive.
How to configure the new agent experience
Enable the new agent interface for specific users
- Sign in to the Zoom web portal.
- In the navigation menu, click Contact Center Management then Preferences.
- In the Account tab, click the General Settings section.
- Click the New agent UI roll out control toggle.
- Use the search bar or click Add user to find specific users by their name or email address.
- Once located, check the box next to the names of the individuals you wish to transition to the new experience.
Configure the customer profile card
The variables that appear in the
Customer Profile card are configured at the queue level. Administrators can select up to 10
variables, including system
consumer variables,
custom variables, or
address book custom fields, and arrange them in the order that makes sense for workflows. This queue-level configuration means it is important to standardize which
variables matter most for engagements routed to each
queue. The customer's name, account number, and status might be universal, while queue-specific
variables, such as order numbers for a support
queue or membership tier for a loyalty queue, can be tailored appropriately.
- Sign in to the Zoom web portal.
- In the navigation menu, click Contact Center Management then Queues.
- Select a voice queue.
- Click the Policy tab.
- Under Custom profile widget, select up to 10 variables.
- (Optional) Drag variables to reorder.
Enable the AI expert assist middle panel toggle
To enable AI Expert Assist suggestions in the middle panel, follow the steps below:
- Sign in to the Zoom web portal.
- In the navigation menu, click Contact Center Management then Queues.
- Select a voice queue.
- Click the Policy tab.
- In the AI Expert Assist section, enable the Show AI Expert Assist suggestions toggle.
Note: When this toggle is disabled, agents can still access all AI suggestions through the right panel. The middle panel integration serves as an additional, more convenient access point.
Set the default right panel
Administrators can set the default right panel view when agents accept an engagement:
- Sign in to the Zoom web portal.
- In the navigation menu, click Contact Center Management then Queues.
- Select a voice queue.
- Click the Policy tab.
- In the Client experience section, select the default panel state (Open or Closed).
- Click Edit to select a default right panel.
Enable the consumer history
- Sign in to the Zoom web portal.
- In the navigation menu, click Contact Center Management then Preferences.
- In the Account tab, click the General Settings section.
- Under Consumer History, enable the Allow history of consumers to be viewed by Contact Center users toggle.
- Click Save.